Introduction
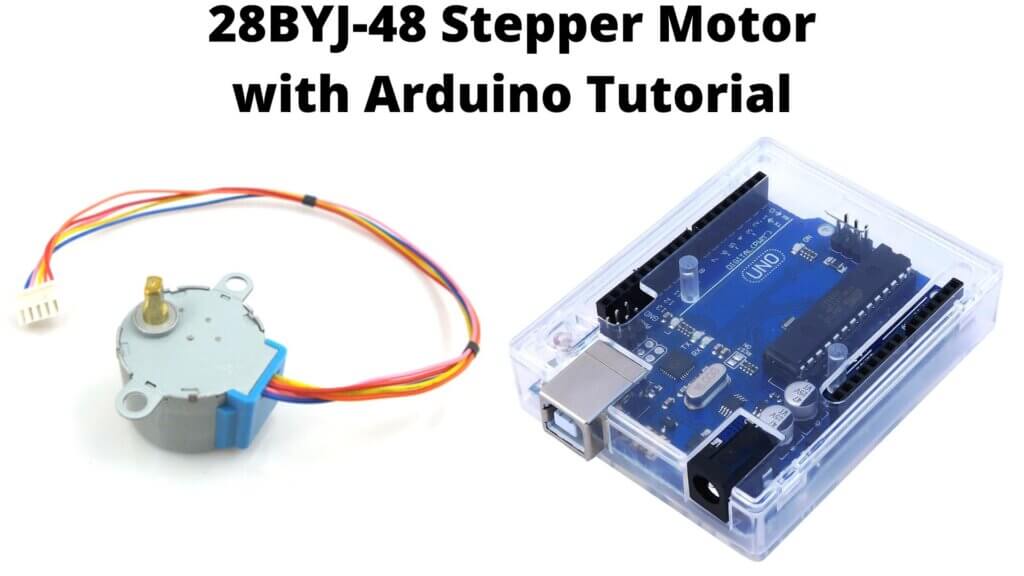
In this tutorial, we will be using a 28BYJ-48 stepper motor with an Arduino Uno and ULN2003 driver. A stepper motor is a Brushless DC electric motor that converts electrical pulses into discrete mechanical movements. The 28BYJ-48 stepper motor is a 4-phase, 8-wire motor. The ULN2003 driver board has seven Darlington arrays that can sink up to 500mA from a 50V supply. This means it can drive up to 35V and up to 7 stepper motors at once.
What is a Stepper Motor?
A stepper motor is an electromechanical device that converts electrical pulses into discrete mechanical movements. The shaft or axle of a stepper motor rotates in discrete steps, as opposed to continuously, which makes it ideal for applications requiring quick positioning or precise movements. Stepper motors are used in a variety of applications, including 3D printers, CNC machines, and scanners. They are also often used in robotics and automotive applications.
What is 28BYJ-48 Stepper Motor?
The is a five-phase, unipolar stepper motor with a built-in driver. It is one of the most popular stepper motors used in small projects, due to its low cost and ease of use. This stepper motor is often used in combination with a ULN2003A driver board.
The 28BYJ-48 stepper motor has a rated voltage of 5 V and a rated current of 0.4 A. The motor can be driven by a variety of different driver boards, but the most common is the ULN2003A. This driver board provides the necessary current to the coils to produce the desired rotational force. The 28BYJ-48 stepper motor is a popular choice for small projects because it is low cost and easy to use it.
For more information, you can check out the datasheet here. 28BYJ-48 motor
Stepper motor details: 28KYJ-48
• Voltage: 5VDC
• Phase: 4
• Step Angle: 5.625° (1/64)
• Reduction ratio: 1/64
What is the ULN2003 Driver?
The motor usually comes with a ULN2003-based driver board.
The ULN2003 driver board allows us to easily control a 28BYJ-48 stepper motor with an Arduino Uno. The module has four Darlington arrays with common emitters. The driver module is used to control the stepping motor by Arduino. The seven Darlington arrays are used to control the motor coils. This driver board provides the necessary current to the coils to produce the desired rotational force.
The ULN2003 driver is made up of eight NPN Darlington pairs. Each pair has a common emitter resistor. The inputs of the driver are high-impedance TTL compatible. This means that the inputs will not load down the TTL circuit.
ULN2003 Stepper Driver Board Pinout

Circuit Diagram for 28BYJ-48 Stepper Motor with Arduino
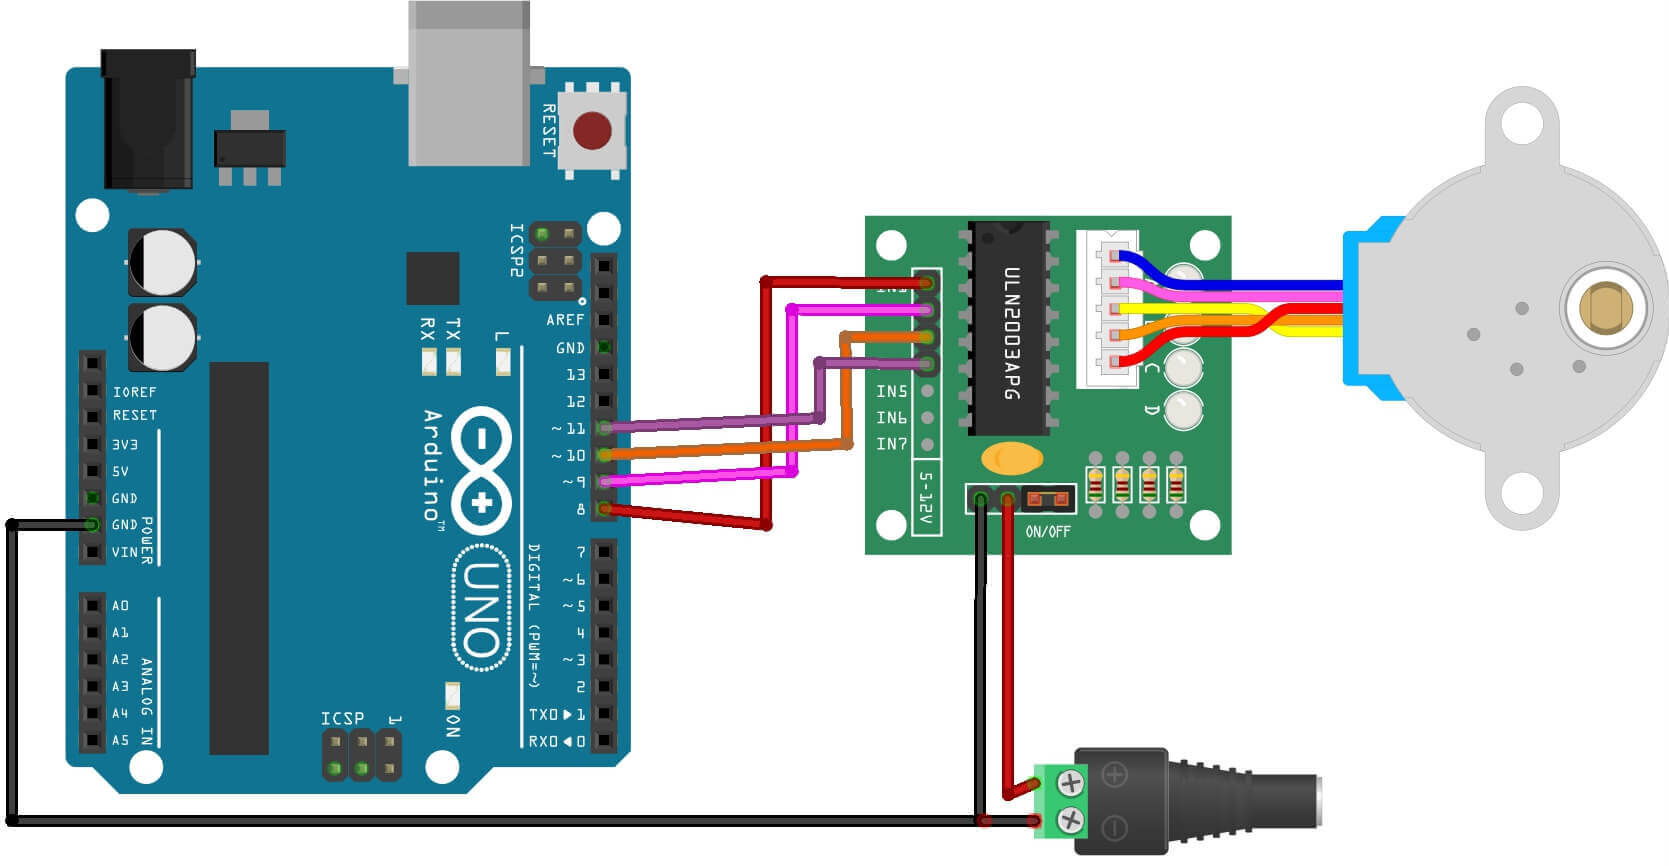
The circuit diagram/schematic below guides you on how to connect the ULN2003 driver board to the 28BYJ-48 stepper motor and the Arduino. The connections are also given in the table below.
Stepper Motor Connection
Connect stepper motor to this header. If you use one of our stepper motors they will just plug directly into the
header. If you have another brand without the correct header plug, you could solder the wires directly to the back of the PCB.
ULN2003 and 28BYJ-48 to Arduino Connections
| ULN2003 Driver Board | Connection |
|---|---|
| IN1 | Pin 8 Arduino |
| IN2 | Pin 9 Arduino |
| IN3 | Pin 10 Arduino |
| IN4 | Pin 11 Arduino |
| – | Logic GND Arduino |
| – | GND power supply |
| + | 5 V power supply |
MCU IO Code Wire Color
- IN1 A Blue
- IN2 B Pink
- IN3 C Yellow
- IN4 D Orange
I recommend you use a separated power supply for the motor since it may draw current beyond the power pins the Arduino can supply.
Code and libraries
firstly download the stepper.h library
Code for Arduino to control the Stepper Motor
Here’s the example code. Upload the following code into your Arduino program and try it out yourself!
|
1 2 3 4 5 6 7 8 9 10 11 12 13 14 15 16 17 18 19 20 21 22 23 24 25 26 27 28 29 30 31 32 33 34 35 36 |
/* Example sketch to control a 28BYJ- // Include the Arduino Stepper.h library: #include <Stepper.h> // Define number of steps per rotation: const int stepsPerRevolution = 2048; // Wiring: // Pin 8 to IN1 on the ULN2003 driver // Pin 9 to IN2 on the ULN2003 driver // Pin 10 to IN3 on the ULN2003 driver // Pin 11 to IN4 on the ULN2003 driver // Create stepper object called 'myStepper', note the pin order: Stepper myStepper = Stepper(stepsPerRevolution, 8, 10, 9, 11); void setup() { // Set the speed to 5 rpm: myStepper.setSpeed(5); // Begin Serial communication at a baud rate of 9600: Serial.begin(9600); } void loop() { // Step one revolution in one direction: Serial.println("clockwise"); myStepper.step(stepsPerRevolution); delay(500); // Step one revolution in the other direction: Serial.println("counterclockwise"); myStepper.step(-stepsPerRevolution); delay(500); } |
Using an AccelStepper Stepper Motor Library
The AccelStepper library is a great way to control a stepper motor. It’s easy to use and it has a lot of features. I would recommend it to anyone who is looking for a stepper motor library.
The AccelStepper library allows you to control a stepper motor with ease, and it can be used with a variety of Arduino boards. AccelStepper library is very extensive. It includes a lot of features that other stepper motor libraries don’t have. For example, it has support for multiple motors, and it can be used with a variety of Arduino boards. It’s also easy to use.
The next sketch rotates the 28BYJ-48 in one direction with a predetermined number of steps:
|
1 2 3 4 5 6 7 8 9 10 11 12 13 14 15 16 17 18 19 20 21 |
#include <AccelStepper.h> // Motor pin definitions #define motorPin1 8 // IN1 on the ULN2003 driver 1 #define motorPin2 9 // IN2 on the ULN2003 driver 1 #define motorPin3 10 // IN3 on the ULN2003 driver 1 #define motorPin4 11 // IN4 on the ULN2003 driver 1 // Initialize with pin sequence IN1-IN3-IN2-IN4 for using the AccelStepper with 28BYJ-48 AccelStepper stepper(HALF4WIRE , motorPin1, motorPin3, motorPin2, motorPin4); void setup() { stepper.setMaxSpeed(2000.0); stepper.setAcceleration(100.0); stepper.setSpeed(200); stepper.moveTo(2000); }//--(end setup )--- void loop() { stepper.runSpeedToPosition(); } |
Conclusion
In conclusion, the 28BYJ-48 stepper motor with Arduino using the ULN2003 driver is a great way to get started with Arduino. It is simple to set up and use and can be used for a variety of applications.


1 Comment
Pingback: How To Use An LDR Sensor With Arduino Tutorial 1