Introduction
A weighing machine using an Arduino with load cell hx711 module can be implemented by wiring the load cell to the HX711 amplifier, and the HX711 amplifier to the Arduino.
The load cell is a sensor that generates a proportional electrical signal to the weight applied to it. An HX711 amplifier is a unit which does both, it amplifies and converts an analog signal to a digital value that the Arduino can read. First, you’ll learn how to wire the load cell with the HX711 amplifier to the Arduino to build a digital scale.
The electronic weighing machine uses a load cell to calculate the weight produced by an object, here most load cells use pressure gauges to convert the pressure (force) into an electrical signal.
Load cells
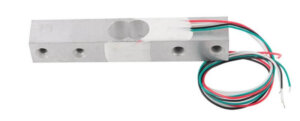
Load cells are devices that measure force. They are generally used in industrial and scientific applications to measure the weight of an object, the force exerted by a fluid on a surface, or the tension in a cable. A load cell commonly consists of a metal shaft or bar that is supported at each end by a strain gauge.
When a force is applied to the beam, the strain gauges measure the resulting distortion of the beam and produce a signal that is proportional to the force. There are various types of Load Cells, in various models.
Specifications
- Capacity: 5KG
- Zero Output: 0.05% FS
- Accuracy: 0.02% F.S.
- Accuracy-Temperature: 0.02% FS
- Working temperature: -10ºC to 50ºC
- Safe overload(%RO): 150
- Output: 4 wires (Wheatstone bridge)
- Method of connecting wire: Red(+),Black(-),Green(+),White(-)
HX711 Load Cell Transmitter
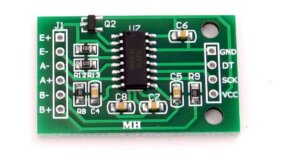
The HX711 load cell transmitter is a device that is used to measure the force exerted by a person or object. This module is the interface between the load cells and the microcontroller, allowing measurements to be read easily. Internally, it is in charge of reading the Wheatstone bridge formed by the load cell, converting the analog reading to digital with its internal 24-bit A/D converter.
HX711 communicates with the microcontroller via 2 pins (Clock and Data) in a serial way (similar to i2c).
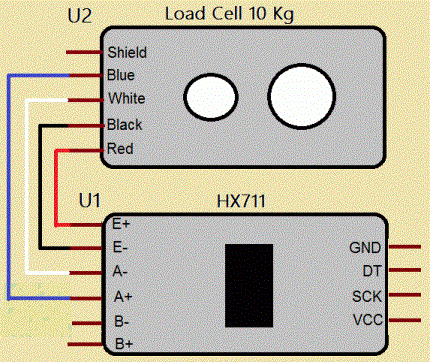
To connect a load cell to the HX711 module, 4 cables are required, the colours generally used are Red, Black, White and Green. Per colour corresponds to a signal as shown below:
- Red: Excitation voltage +, E+, VCC
- Black: Excitation voltage -, E-, GND
- Green: Amplifier -, Signal -, A-
- White: Amplifier +, Signal +, A+
Specifications:-
- Differential input voltage: ±40mV
- Data accuracy: 24-bit (24-bit A / D converter chip.)
- Refresh frequency: 10/80 Hz
- Operating Voltage: 2.7V to 5VDC
- Operating current: <10 mA
Interfacing Arduino With Load Cell & HX711 Module
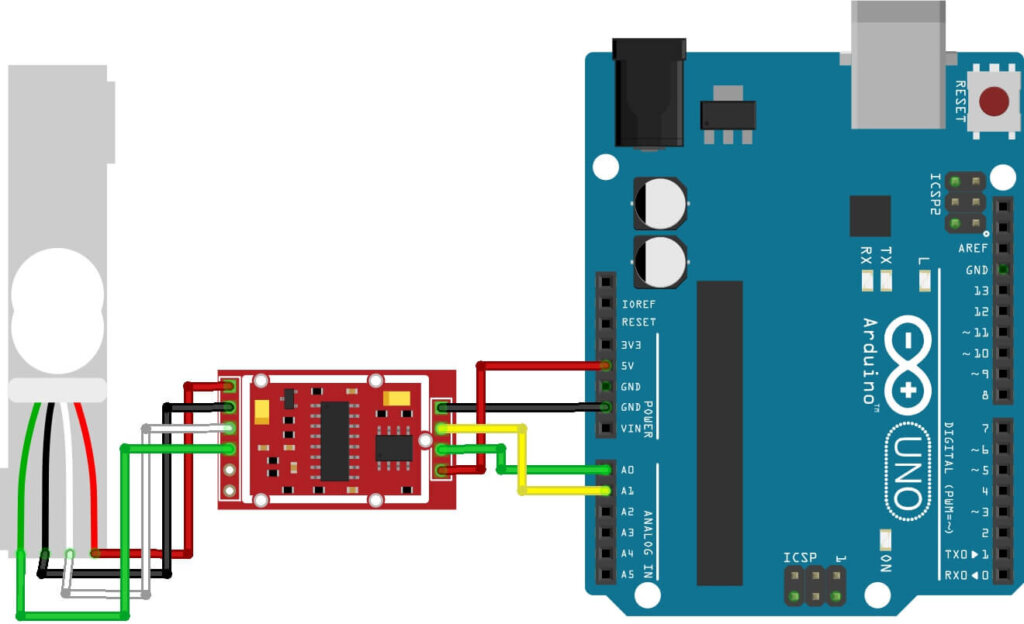
Connections between the Load Cell & HX711 With Arduino
The connection between the load cell, HX711 module and Arduino
| Load Cell | HX711 | HX711 | Arduino |
| Red (E+) | E+ | GND | GND |
| Black (E-) | E- | DT | Pin A0 |
| White (A-) | A- | SCK | Pin A1 |
| Green (A+) | A+ | VCC | 5V |
Installing the HX711 Library
There are many sources to get measurements from a load cell using the HX711 amplifier. We’ll use the HX711 library by bodge. It is compatible with Arduino, ESP32, and ESP8266.
Follow the following instructions to install the library in IDE.
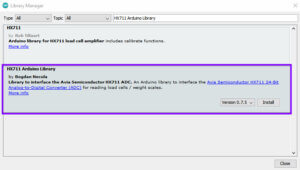
- Open Arduino IDE and go to Sketch > Include Library > Manage Libraries.
- Search for “HX711 Arduino Library” and install the library by Bogdan Necula.
Calibrating our – Arduino With Load Cell & HX711 Module
This time I assume you have wired the load cell to the HX711 amplifier and the amplifier to the Arduino board. You should also have your scale set up properly (use plates to connect the load cell) and the HX711 library installed.
The first thing to do is calibrate. Calibration is basically finding the value of the scale that will be used; that is, finding the conversion factor to convert the reading value into a value with weight units. The scale is different for each cell and has changed according to the way of installed or replaced. Even if the cell is the same model, it will not necessarily have the exact scale.
We will use an object with a known weight for the calibration. We usually calibrate the sensor with a weight that is very close to the maximum weight of the capacity of the load cell. In this example, we are going to calibrate a 5 kg load cell and we will be using a 4 kg weight.
Upload the following code to your Arduino board.
|
1 2 3 4 5 6 7 8 9 10 11 12 13 14 15 16 17 18 19 20 21 22 23 |
#include "HX711.h" const int DOUT=A1; const int CLK=A0; HX711 balanza; void setup() { Serial.begin(9600); balanza.begin(DOUT, CLK); Serial.print("ADC value reading: t"); Serial.println(balanza.read()); Serial.println("Do not put any object on the scale"); Serial.println("Starting..."); balanza.set_scale(); //The default scale is 1 balanza.tare(20); //The current weight is considered Tare. Serial.println("Enter a known weight:"); } void loop() { Serial.print("Valor de lectura: t"); Serial.println(balanza.get_value(10),0); delay(100); } |
The program must be able to run without the weight placed on it since it starts by calculating the tare.
After uploading, open the Serial Monitor at a baud rate of 9600 and then push the Arduino on-board RESET button.
After putting the weight on the scale, the serial monitor will show the readings, they are unscaled readings. So large numbers should appear on them.
The average of these data we calculate the value of the scale that we will use, for this we will use the following formula:
So the value of the Scale that we will use is:

The final code – Arduino With Load Cell & HX711
|
1 2 3 4 5 6 7 8 9 10 11 12 13 14 15 16 17 18 19 20 21 22 23 24 25 26 27 |
#include "HX711.h" const int DOUT=A1; const int CLK=A0; HX711 balanza; void setup() { Serial.begin(9600); balanza.begin(DOUT, CLK); Serial.print("ADC value reading"); Serial.println(balanza.read()); Serial.println("Do not put any objects on the scale"); Serial.println("Highlighting..."); Serial.println("..."); balanza.set_scale(439430.25); //set the scale balanza.tare(20); //The actual weight is considered. Serial.println("Ready to weigh"); } void loop() { Serial.print("Peso: "); Serial.print(balanza.get_units(20),3); Serial.println(" kg"); delay(500); } |
As noticed from the code, it is necessary to turn on the Arduino before placing the weights. Otherwise, the weights applied to the weighing scale would be considered as tare (weight zero references).
Conclusion
By following the instructions in this tutorial, you can easily build your own weight measurement system.




1 Comment
Pingback: Arduino Digital Weight Scale HX711 Load Cell Module