In this project, we’ll build a CO₂ Monitoring System with an MH-Z19 NDIR CO₂ Sensor, an Arduino, and an OLED Display! This system will measure the CO₂ levels in the air and display them on the OLED Display. We’ll also be using the Arduino to calculate the Air Quality Index (AQI) to see how good or bad the air quality is easily.
Why is CO2 bad?
High CO2 disrupts our body’s balance. We breathe in oxygen and exhale CO2. When this balance is off, our body’s waste removal suffers. It leads to feeling unhealthy, decreased performance, and overall body drunkenness affecting health and productivity.
Fresh air and ventilation are necessary for maintaining a healthy ratio, yet many choose poorly ventilated rooms, affecting fitness and productivity.
Required Components
- MH-Z19 CO₂ Sensor
- Arduino Board
- OLED Display
- Jumper Wires
MH-Z19 CO₂ Sensor
The MH-Z19C-DZ infrared gas module is a common type, small-size sensor, using the non-dispersive infrared (NDIR) principle to detect the existing CO2 in the air with good selectivity, non-oxygen dependent, and long life. It is provided with a built-in temperature balance. UART output and PWM output are available.
This sensor measures CO₂ levels from 400 to 5000 ppm. It’s compact, reliable, and uses infrared technology for accuracy. Plus, it survives up to 5 years! With built-in temperature balance and ADC, it’s user-friendly and works seamlessly with microcontrollers like Arduino and Raspberry Pi.
It’s super sensitive, energy-efficient, and offers quick responses. It resists water vapor interference, stays stable, and lasts long. Notably, it provides serial and analog outputs (0.4V-2VDC) through onboard converters.
Main Parameters
- Model: MH-Z19
- Detects: Carbon Dioxide (CO₂)
- Power Needed: 3.6 to 5.5 Volts (DC)
- Power Usage: Less than 18 milliamps on average
- Compatibility: Interface level of 3.3 Volts
- Measuring Range: Optional range from 0 to 0.5% volume
- Output Signals: Uses UART and PWM
- Preheat Time: Takes 3 minutes to warm up
- Response Time: Responds quickly – within 60 seconds for T90
- Working temperature: 0 ~ 50 ℃
- Working humidity: 0 ~ 90% RH
- Storage temperature: -20 ~ 60 ℃
- Size: 33mm x 20mm x 9mm (Length x Width x Height)
- Weight: Light at 21 grams
- Lifespan: Lasts for more than 5 years
Features
- Super sensitive and accurate.
- Saves energy.
- Sends data via UART and PWM.
- Adjusts for temperature for accuracy.
- Stable, durable, and water-resistant.
Applications
- Indoor air quality monitoring
- HVAC refrigeration
- Ventilation system
- Air cleaner devices
- Smart home applications
- School environments
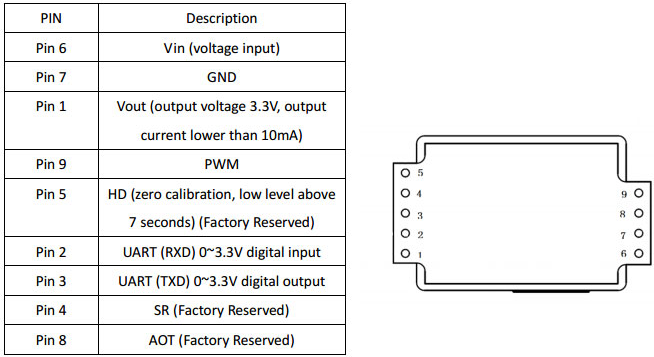
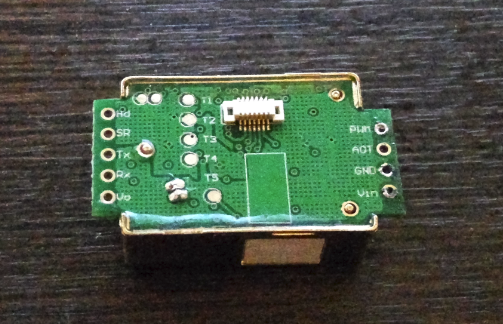
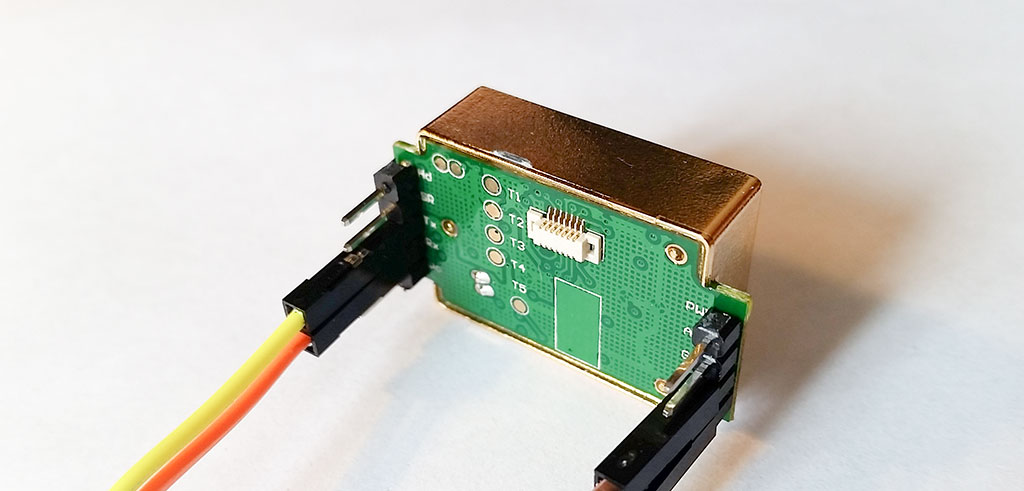
MH-Z19B Sensor Pinout
- Hd Pin: Using LOW for 7+ seconds triggers zero calibration; usually not needed.
- SR Pin: Not used.
- Tx (Transmit)
- Rx (Recieve): Work at 3.3V (can handle 5V but not advised for Rx).
- Vo Pin: Outputs 3.3V, max 10mA.
- PWM Data: 1004ms cycle; 2ms HIGH, variable middle corresponds to CO2 (0-5000ppm). CO2 ppm Calculation: C ppm = 5000 * (T high – 2ms) / (T high + T low – 4ms)
- AOT Pin: Not used.
- GND Pin: Ground connection.
- Vin Pin: 3.6 – 5.5V (works at 3.3V, but sticking to limits is advised).
Calibration Methods for MH-Z19 Sensor
- Absolute Zero Calibration: This special process applies by putting the sensor in pure nitrogen for about five minutes. A command starts calibration, storing results in the sensor’s memory for accurate future measurements. Nitrogen can be bought but can be costly.
- Span Calibration: A DIY method done by exposing the sensor to clean air (with about 400 ppm CO2). However, note that this 400 ppm value varies based on location and external factors. For proper calibration, investing in nitrogen is recommended.
I choose to get data digitally with a checksum rather than relying solely on PWM. Using UART, you can request CO2 concentration levels and gain calibration.
To request data, use these nine bytes at a speed of 9600 (8-bit, stop – 1, parity – none):
- 0xFF: Command start
- 0x01: First sensor (only one)
- 0x86: Command
- 0x00, 0x00, 0x00, 0x00, 0x00: Data
- 0x79: Checksum
The response might look like this:
- 0xFF: Start of response
- 0x86: Command
- 0x01, 0xC1: High and low values (256 * 0x01 + 0xC1 = 449)
- 0x3C, 0x04, 0x3C, 0xC1: The expected values might vary from the documentation.
- 0x7B: Checksum
The checksum is calculated by adding 7 response bytes (excluding first and last), then inverting the total, adding
1: Example: 0x86 + 0x01… + 0xC1 = 0x85, 0x85 xor 0xFF = 0x7A, 0x7A + 1 = 0x7B.
Upon startup, the sensor takes around three minutes to begin. Initially, it may show either 5000ppm or 400ppm.
The sensor responds to CO2 changes with about a minute delay. If CO2 exceeds 5000ppm (e.g., intense breathing for a minute), it may give false, lower readings for a while — even as low as 80ppm.
UART data more than once every 10 seconds, as frequent requests might cause erratic readings.
Interfacing MH-Z19B CO₂ Sensor With Arduino
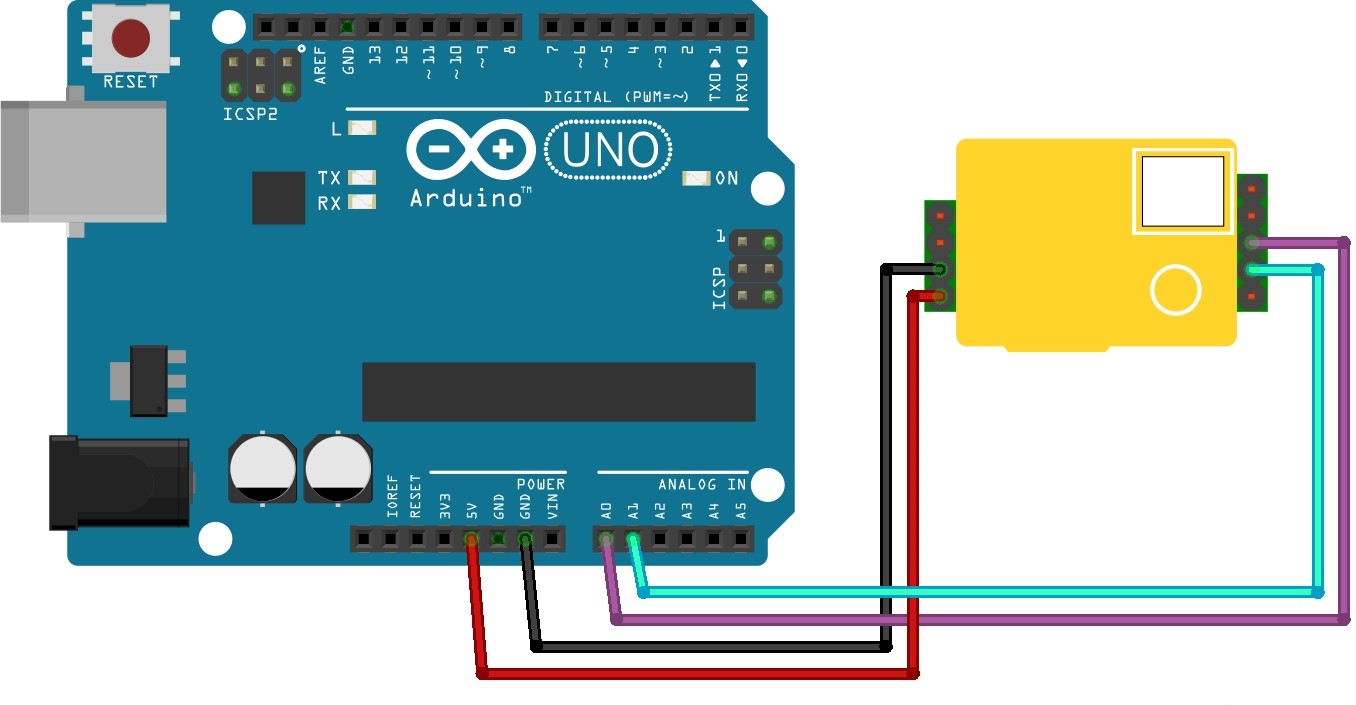
Let’s set up the sensor with the Arduino Uno using Software Serial. Connect the sensor’s TX to Arduino’s A0 and RX to A1. Power it up with 5V and ground it to GND.
Example code
|
1 2 3 4 5 6 7 8 9 10 11 12 13 14 15 16 17 18 19 20 21 22 23 24 25 26 27 28 29 30 31 32 33 34 35 36 37 38 |
#include <SoftwareSerial.h>; // Include the SoftwareSerial library SoftwareSerial mySerial(A0, A1); // A0 - connects to sensor's TX, A1 - connects to sensor's RX byte cmd[9] = {0xFF,0x01,0x86,0x00,0x00,0x00,0x00,0x00,0x79}; // Command to request data unsigned char response[9]; // Array to store sensor response void setup() { Serial.begin(9600); // Start serial communication with the computer mySerial.begin(9600); // Start Software Serial communication with the sensor } void loop() { mySerial.write(cmd, 9); // Send the command to the sensor memset(response, 0, 9); // Clear the response array mySerial.readBytes(response, 9); // Read sensor response // Calculate checksum int i; byte crc = 0; for (i = 1; i < 8; i++) { crc += response[i]; } crc = 255 - crc; crc++; // Check if the response is valid if (!(response[0] == 0xFF && response[1] == 0x86 && response[8] == crc)) { Serial.println("CRC error: " + String(crc) + " / "+ String(response[8])); // Print CRC error if found } else { // Calculate CO2 concentration unsigned int responseHigh = (unsigned int) response[2]; unsigned int responseLow = (unsigned int) response[3]; unsigned int ppm = (256 * responseHigh) + responseLow; Serial.println(ppm); // Print CO2 concentration } delay(10000); // Wait for 10 seconds before next reading } |
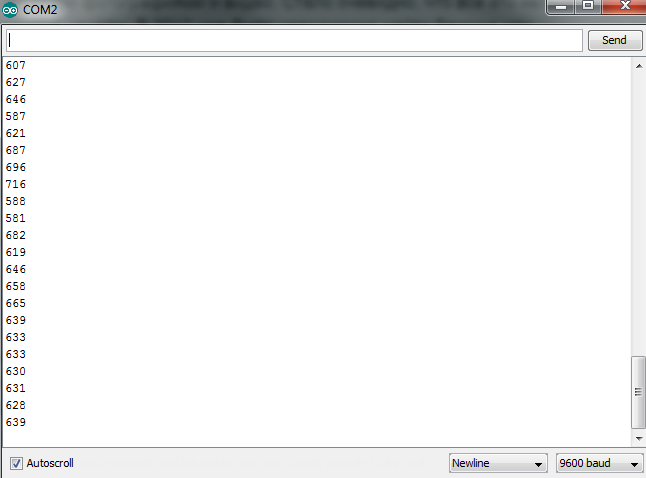
Upload the code to your Arduino and Open the serial monitor to check if the CO₂ levels are being read correctly from the sensor.
CO2 concentration
The device measures CO2 concentration in ppm (parts per million):
- 350 – 450 ppm: Normal outdoor levels.
- < 600 ppm: Acceptable indoors for bedrooms, and schools.
- 600 – 1000 ppm: Complaints about stuffy air.
- 1000 ppm: Maximum allowed by standards.
- 1000 – 2500 ppm: Fatigue, reduced focus.
- 2500 – 5000 ppm: Potential health issues.
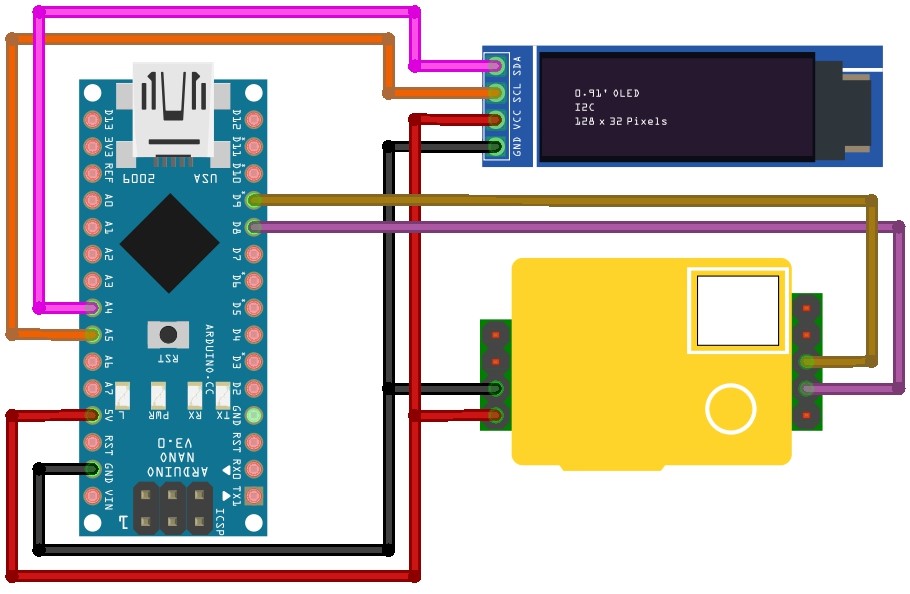
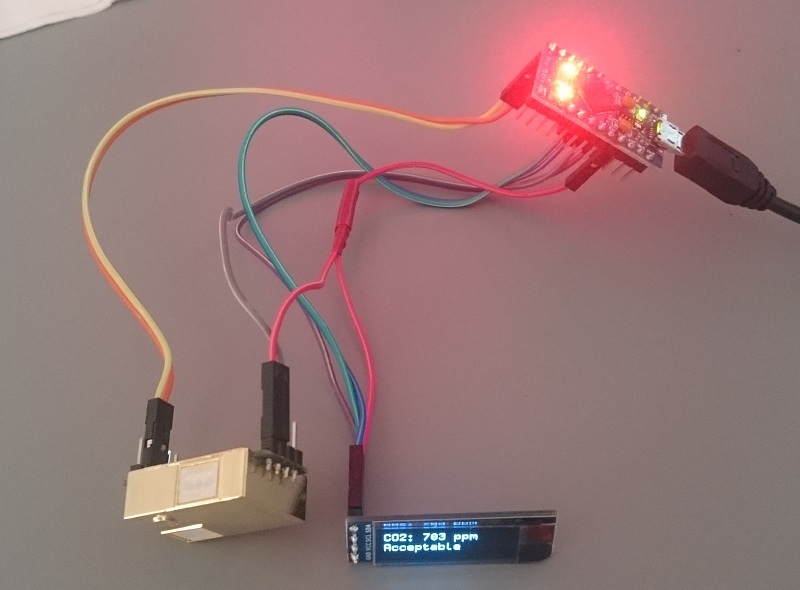
CO₂ Monitoring System with MH-Z19B Sensor, Arduino, and OLED
| Component | Arduino Pin | Description |
|---|---|---|
| CO2 Sensor RX | Pin 8 | Receives data from CO2 sensor |
| CO2 Sensor TX | Pin 9 | Transmits data to CO2 sensor |
| OLED I2C SDA | Analog A4 (SDA) | Serial Data Line for I2C |
| OLED I2C SCL | Analog A5 (SCL) | Serial Clock Line for I2C |
| CO2 Sensor VCC | 5V | Power supply for CO2 sensor |
| CO2 Sensor GND | GND | Ground for CO2 sensor |
Source Code
|
1 2 3 4 5 6 7 8 9 10 11 12 13 14 15 16 17 18 19 20 21 22 23 24 25 26 27 28 29 30 31 32 33 34 35 36 37 38 39 40 41 42 43 44 45 46 47 48 49 50 51 52 53 54 55 56 57 58 59 60 61 62 63 64 65 66 67 68 69 70 71 72 73 74 75 76 |
#include <SoftwareSerial.h> #include <Wire.h> // I2C OLED #include "SSD1306Ascii.h" #include "SSD1306AsciiWire.h" #define I2C_ADDRESS 0x3C SSD1306AsciiWire oled; // Initialize OLED display // CO2 sensor setup: SoftwareSerial mySerial(8,9); // RX,TX pins for the CO2 sensor byte cmd[9] = {0xFF,0x01,0x86,0x00,0x00,0x00,0x00,0x00,0x79}; // Command to request CO2 data unsigned char response[9]; // Array to store sensor response void setup() { // Serial communication Serial.begin(9600); // Start serial communication with the computer mySerial.begin(9600); // Start Software Serial communication with the CO2 sensor // OLED initialization Wire.begin(); // Start I2C communication oled.begin(&Adafruit128x32, I2C_ADDRESS); // Begin OLED communication oled.set400kHz(); // Set I2C frequency oled.setFont(ZevvPeep8x16); // Set OLED font oled.clear(); // Clear OLED display oled.println("setup::init()"); // Display setup initialization message on OLED } long t = 0; void loop() { mySerial.write(cmd, 9); // Send command to the CO2 sensor memset(response, 0, 9); // Clear the response array mySerial.readBytes(response, 9); // Read sensor response // Calculate checksum int i; byte crc = 0; for (i = 1; i < 8; i++) crc+=response[i]; crc = 255 - crc; crc++; oled.clear(); // Clear OLED display if (!(response[0] == 0xFF && response[1] == 0x86 && response[8] == crc)) { Serial.println("CRC error: " + String(crc) + " / "+ String(response[8])); // Print CRC error if found oled.println("Sensor CRC error"); // Display sensor CRC error on OLED } else { unsigned int responseHigh = (unsigned int) response[2]; unsigned int responseLow = (unsigned int) response[3]; unsigned int ppm = (256*responseHigh) + responseLow; Serial.print(String(t)); Serial.print(","); Serial.print(ppm); Serial.println(";"); // Print time and CO2 level to serial monitor if (ppm <= 400 || ppm > 4900) { oled.println("CO2: no data"); // Display "no data" if CO2 level is out of range } else { oled.println("CO2: " + String(ppm) + " ppm"); // Display CO2 level on OLED if (ppm < 450) { oled.println("Very good"); } else if (ppm < 600) { oled.println("Good"); } else if (ppm < 1000) { oled.println("Acceptable"); } else if (ppm < 2500) { oled.println("Bad"); } else { oled.println("Health risk"); } } } delay(10000); // Wait for 10 seconds before next reading t += 10; // Increment time } |
Working
The device is interesting, mainly for home computer users. While writing this post, the CO2 level in the room increased.
It’s important to improve ventilation by opening windows or considering better options. The kitchen needs good ventilation too, as using a gas burner quickly increases CO2 levels. In the bedroom, poor ventilation impacts sleep quality, affecting mental focus.

