Introduction
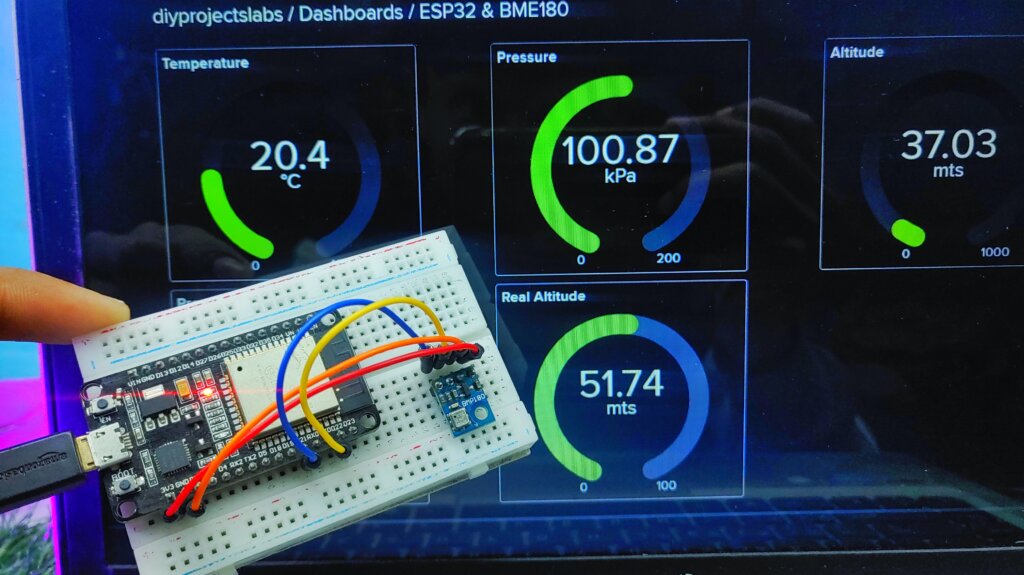
This guide will show you how to use the BMP180 Pressure sensor Monitor on adafruit with the ESP32. BME180 is a great way to measure both temperature and pressure in your IoT projects. This sensor is easy to use and can be easily connected to your ESP32 board. The BMP180 sensor is a great choice for measuring both temperature and pressure in your IoT projects.
Required Material
The materials that we will be using will be:
Overview
This guide will show you how to use the BMP180 Pressure Temperature Monitor on adafruit.io with the ESP32. The BMP180 sensor can measure both temperature and pressure. It is excellent for weather stations and other applications where you need to measure both temperature and pressure.
The sensor is too accurate and can be used to measure both static and dynamic pressure and temperature. The board has an I2C interface and is compatible with Arduino IDE. The board can be used with a type of application including weather stations, barometers, and altimeters.
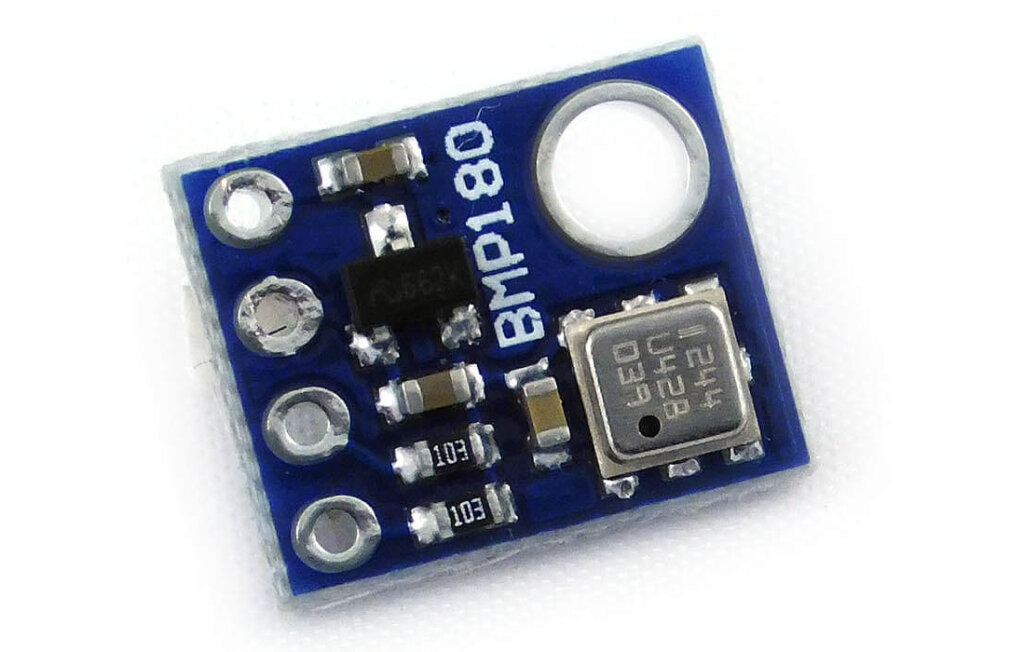
BMP180 Barometric Pressure Sensor
A barometric pressure sensor with an I2C (“Wire”) interface is a device used to measure atmospheric pressure
This reader introduces the BMP180 barometric pressure sensor. The sensor measures the complete pressure of the environment and can be used to estimate the altitude above sea level. The BMP180 is a small, lightweight, and low-power sensor that is ideal for use in mobile applications.
This barometric pressure sensor measures the pressure and temperature of the surrounding environment. The sensor is small and easy to use and provides accurate readings.
Specifications BMP180 Barometric Pressure Sensor
- 1.8V to 3.6V Supply Voltage
- Max I2C Speed: 3.5Mhz
- Low power consumption: 0.5uA at 1Hz
- This board/chip uses an I2C 7-bit address 0x77
- Low Power Consumption
- Fully calibrated
- Pressure Range: 300hPa to 1100hPa (+9000m to -500m)
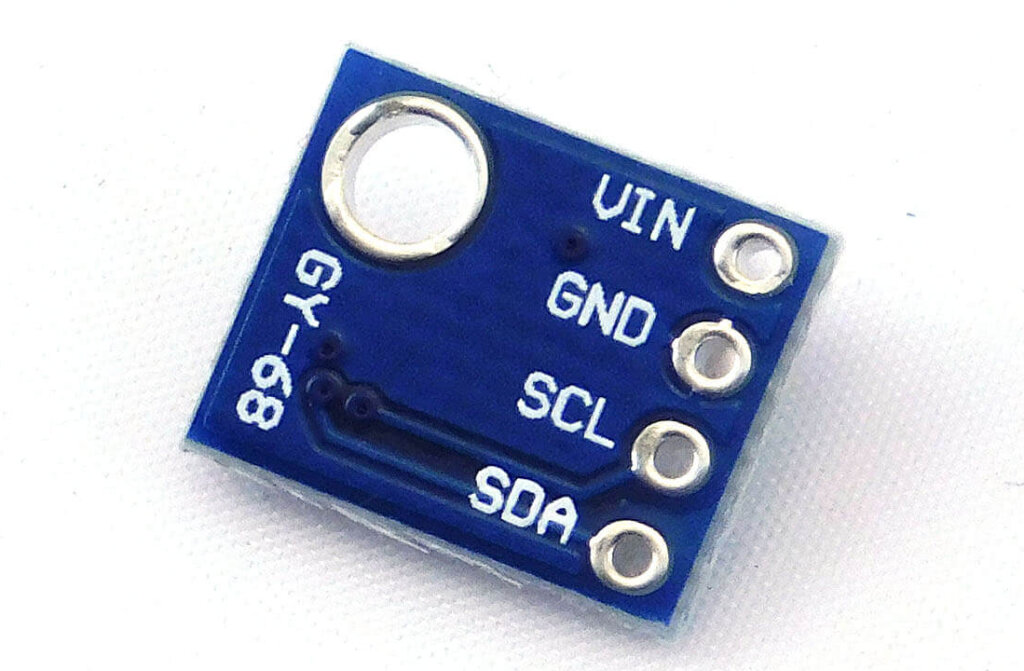
Pinout – BMP180 Barometric Pressure Sensor
Interfacing BMP180 Sensor with ESP32
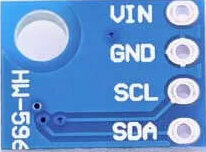
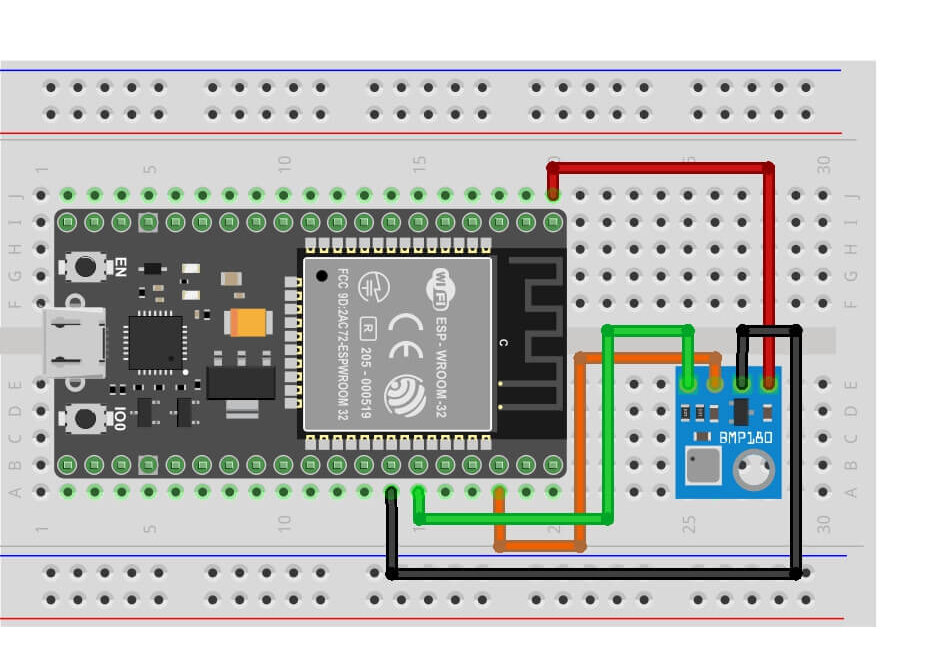
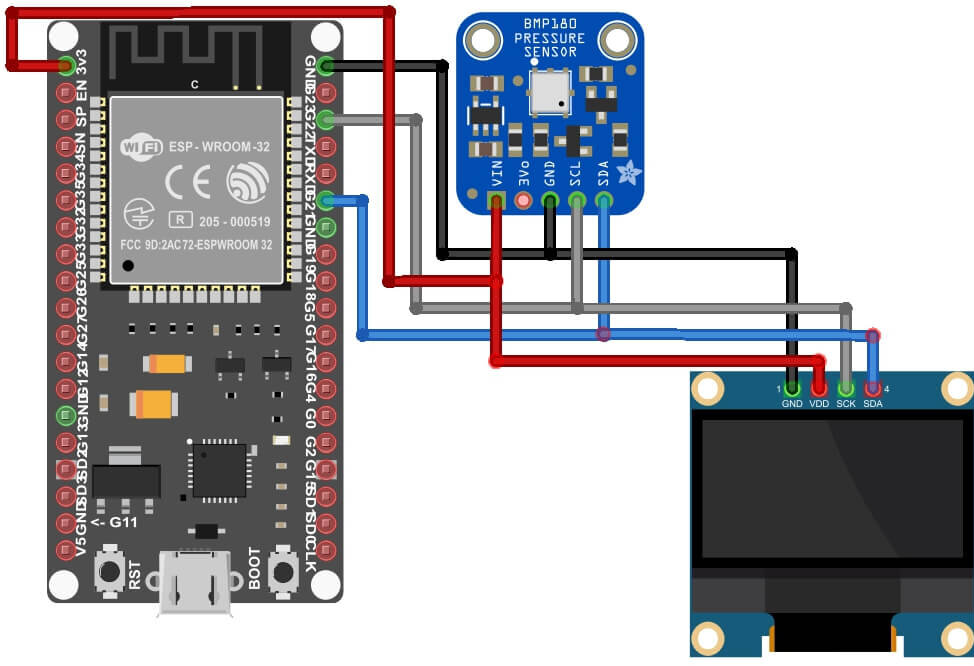
The BMP-180 Barometric pressure sensor has 4 pins, a supply voltage (3.3v – 5v), a ground (GND), a serial bus clock (SCL) and a serial bus data (SDA).
Source Code for BMP180 & ESP32
This is a code for interfacing BMP180 with the ESP32 board. You will require BMP180 Library for this. Simply download the BMP180 Library from the link below and add it to the Arduino IDE.
Source Code
|
1 2 3 4 5 6 7 8 9 10 11 12 13 14 15 16 17 18 19 20 21 22 23 24 25 26 27 28 29 30 31 32 33 34 35 36 37 38 39 40 41 42 43 44 |
#include <Wire.h> #include <Adafruit_BMP085.h> Adafruit_BMP085 bmp; void setup() { Serial.begin(9600); if (!bmp.begin()) { Serial.println("Could not find a valid BMP180 sensor, please check wiring!"); while (1) {} } } void loop() { Serial.print("Temperature = "); Serial.print(bmp.readTemperature()); Serial.println(" *C"); Serial.print("Pressure = "); Serial.print(bmp.readPressure()); Serial.println(" Pa"); // Calculate altitude assuming 'standard' barometric // pressure of 1013.25 millibar = 101325 Pascal Serial.print("Altitude = "); Serial.print(bmp.readAltitude()); Serial.println(" meters"); Serial.print("Pressure at sealevel (calculated) = "); Serial.print(bmp.readSealevelPressure()); Serial.println(" Pa"); // you can get a more accurate measurement of altitude // if you know the current sea level pressure which will // change with weather and such. If it is 1015 millibars // that is equal to 101500 Pascals. Serial.print("Real altitude = "); Serial.print(bmp.readAltitude(102000)); Serial.println(" meters"); Serial.println(); delay(1000); } |
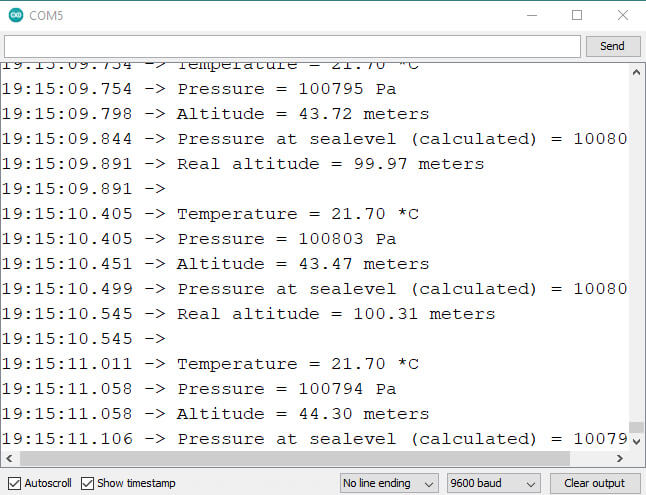
Once the code is uploaded you can open the serial monitor in IDE to see the following atmospheric parameters.
Interfacing BMP180 Sensor With ESP32 & OLED Display
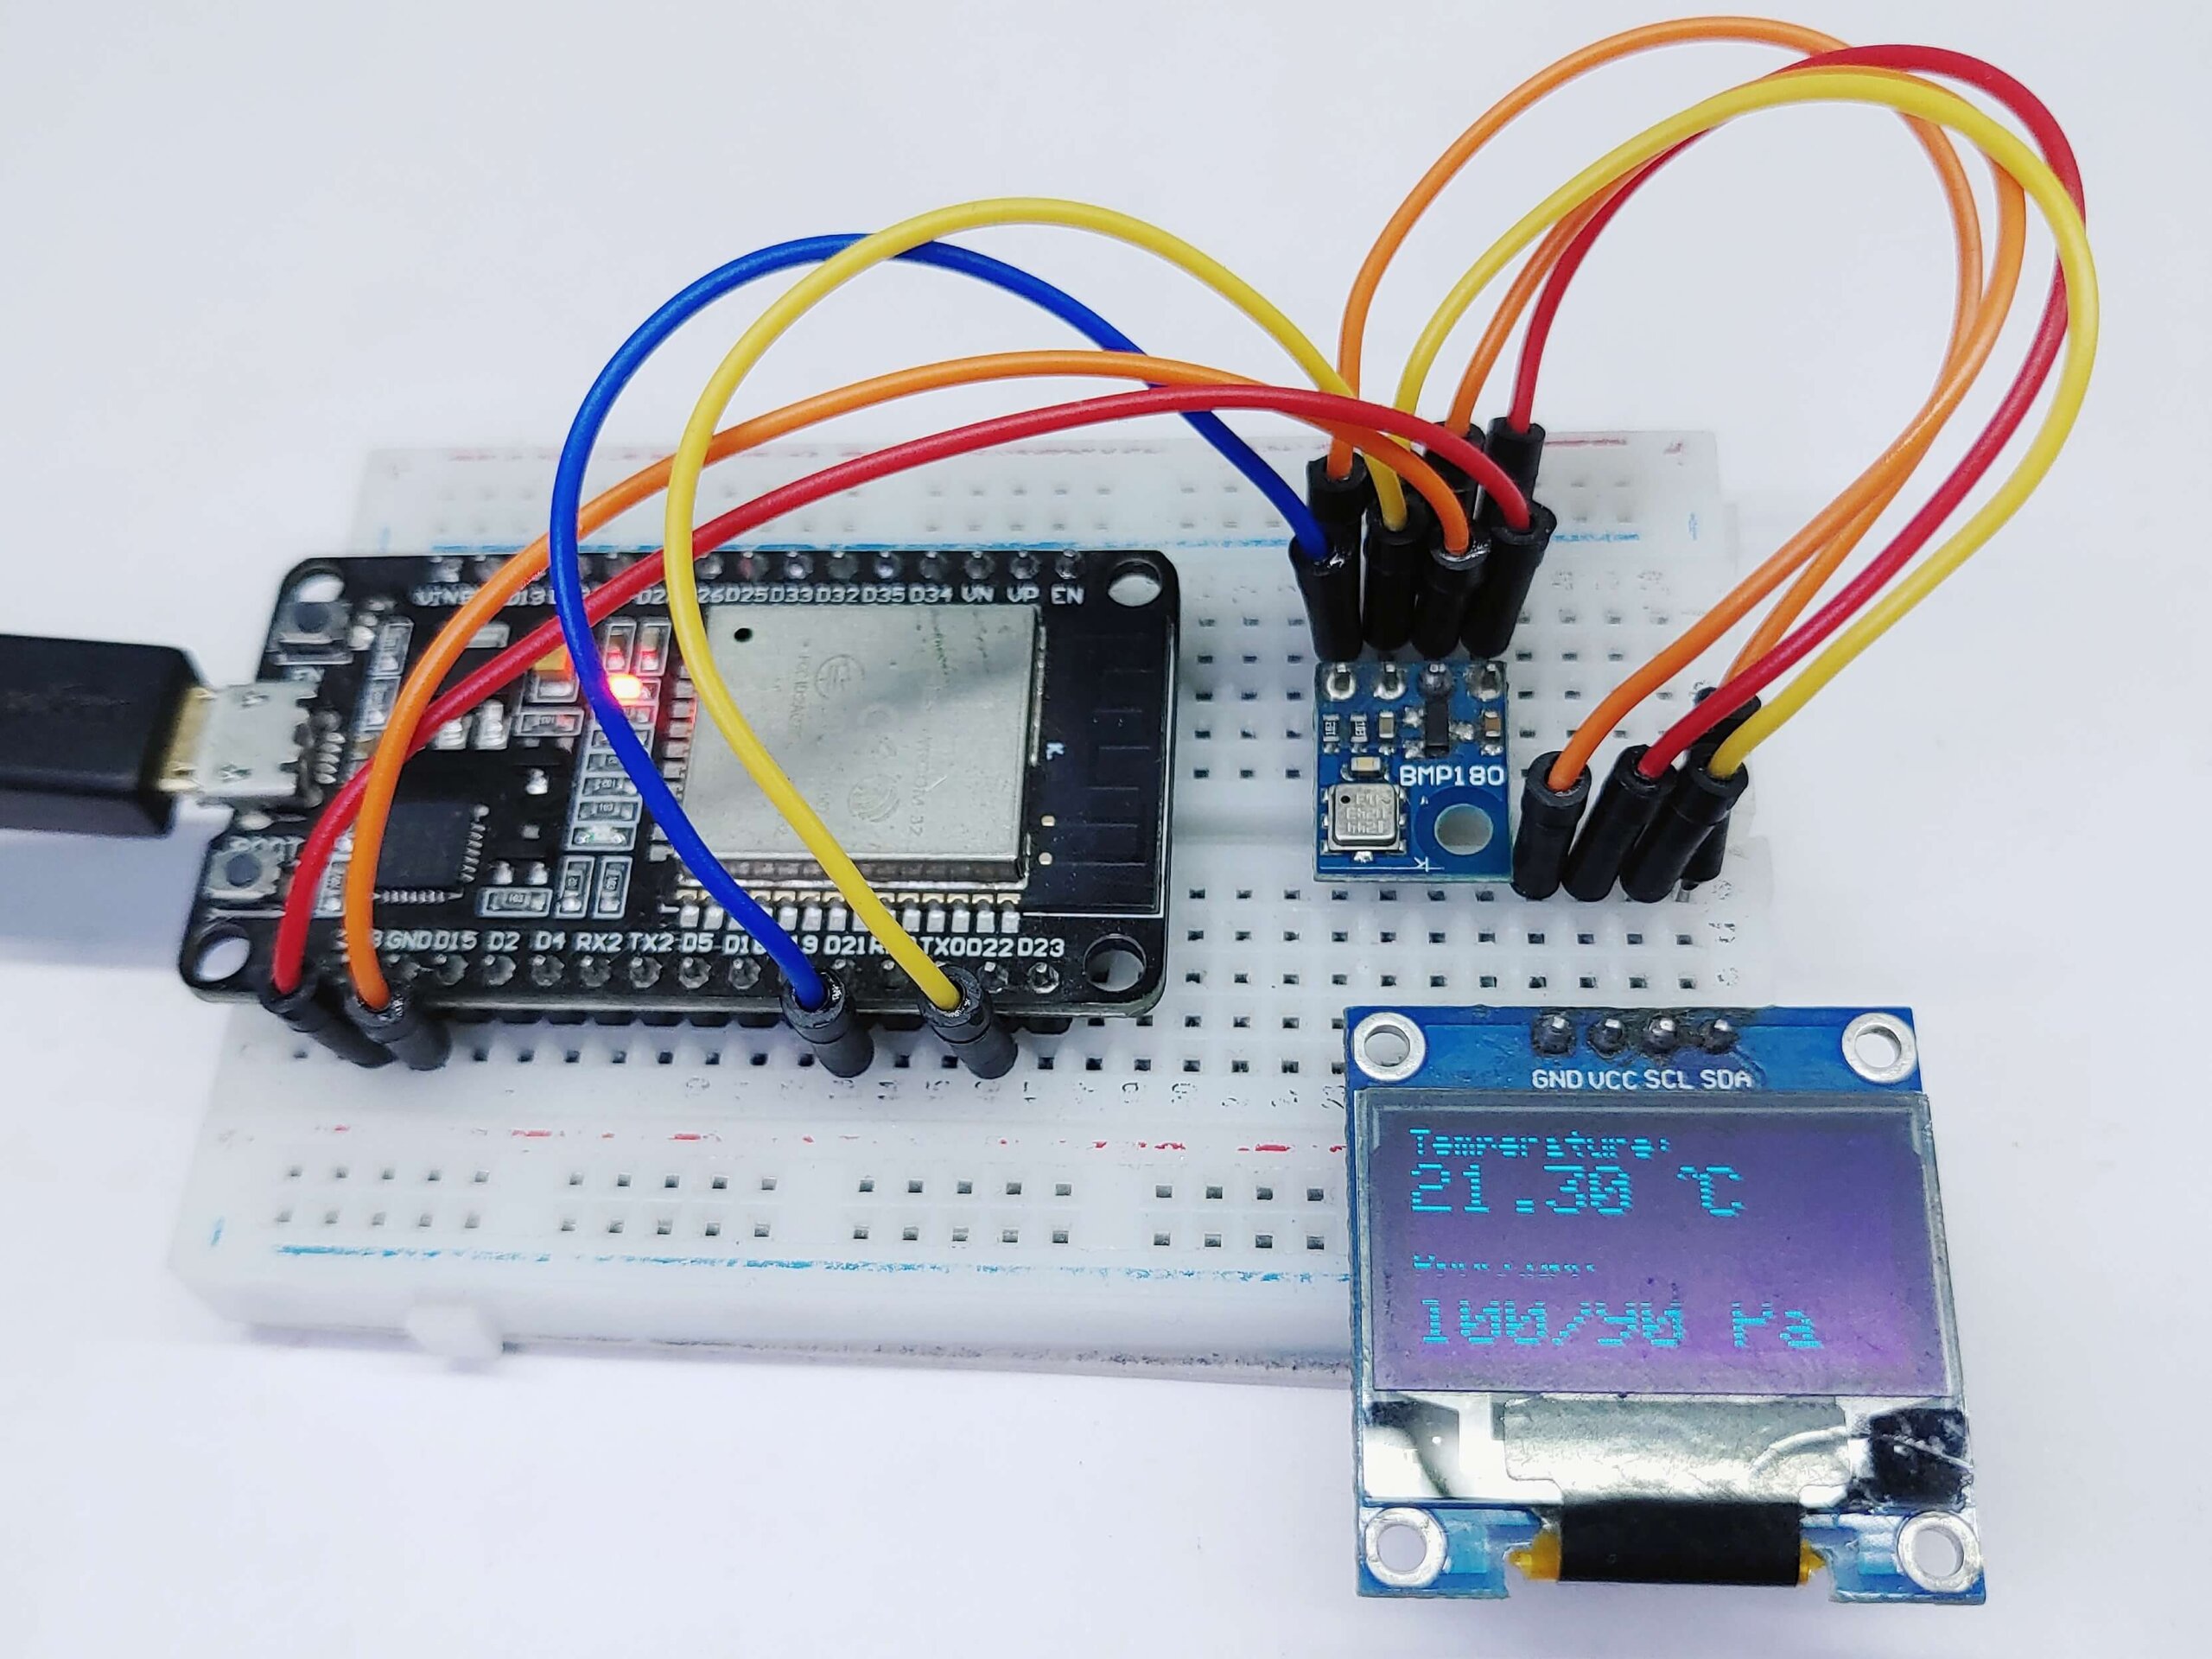
Let us add an extra OLED Display to the Circuit. We will use SSD1306 I2C OLED Display. Connect its SDA & SCL pins to D21 & D22 of ESP32. –
Source Code for BMP180 & ESP32 with OLED Display
|
1 2 3 4 5 6 7 8 9 10 11 12 13 14 15 16 17 18 19 20 21 22 23 24 25 26 27 28 29 30 31 32 33 34 35 36 37 38 39 40 41 42 43 44 45 46 47 48 49 50 51 52 53 54 55 56 57 58 59 60 61 |
#include <Wire.h> #include <Adafruit_BMP085.h> #include <Adafruit_GFX.h> #include <Adafruit_SSD1306.h> #define seaLevelPressure_hPa 1017 //In my area hPa Adafruit_BMP085 bmp; Adafruit_SSD1306 display = Adafruit_SSD1306(128, 64, &Wire, -1); void setup() { Serial.begin(115200); if (!bmp.begin()) { Serial.println("Could not find a valid BMP085/BMP180 sensor, check wiring!"); while (1) {} } display.begin(SSD1306_SWITCHCAPVCC, 0x3C); if(!display.begin(SSD1306_SWITCHCAPVCC, 0x3C)) { Serial.println(F("Could not find OLED Display")); for(;;); } delay(2000); display.clearDisplay(); display.setTextColor(WHITE); } void loop() { Serial.print("Temperature = "); Serial.print(bmp.readTemperature()); Serial.println(" *C"); Serial.print("Pressure = "); Serial.print(bmp.readPressure()); Serial.println(" Pa"); Serial.println(); display.setTextSize(1); display.setCursor(0,0); display.print("Temperature: "); display.setTextSize(2); display.setCursor(0,10); display.print(bmp.readTemperature()); display.print(" "); display.setTextSize(1); display.cp437(true); display.write(167); display.setTextSize(2); display.print("C"); display.setTextSize(1); display.setCursor(0, 35); display.print("Pressure: "); display.setTextSize(2); display.setCursor(0, 45); display.print(bmp.readPressure()); display.print(" Pa"); display.display(); delay(500); display.clearDisplay(); } |
When the code is uploaded you can see the following atmospheric parameters on OLED Display.
IoT-Based BMP180 Pressure Temperature Monitor on Adafruit Io With ESP32
Now let us make more modifications to the code and make the project IoT Based. To make the project IoT based we need a server where we can post the data through API. For that, I used Adafruit Io Server.
What is adafruit IO?
Adafruit IO is a cloud service that authorises you to connect your devices and sensors to the internet and share data with others. You can use Adafruit IO to build internet-of-thing projects, create dashboards to view data, and even control devices remotely. Adafruit IO is free to use and easy to get started with. The best part is that Adafruit IO is free.
Here are some functions that you can do with adafruit IO:
- Show your data in real-time and online
- Control motors, read data from sensors connected to the Internet
- Connect your projects to web services like Twitter, RSS feeds, weather services, etc.
- Connect your project to other devices with Internet access
To set up, up the Adafruit Server, visit adafruit IO Create an account or simply sign in if you created the account earlier. Then create a new channel.
Adafruit IO Setup
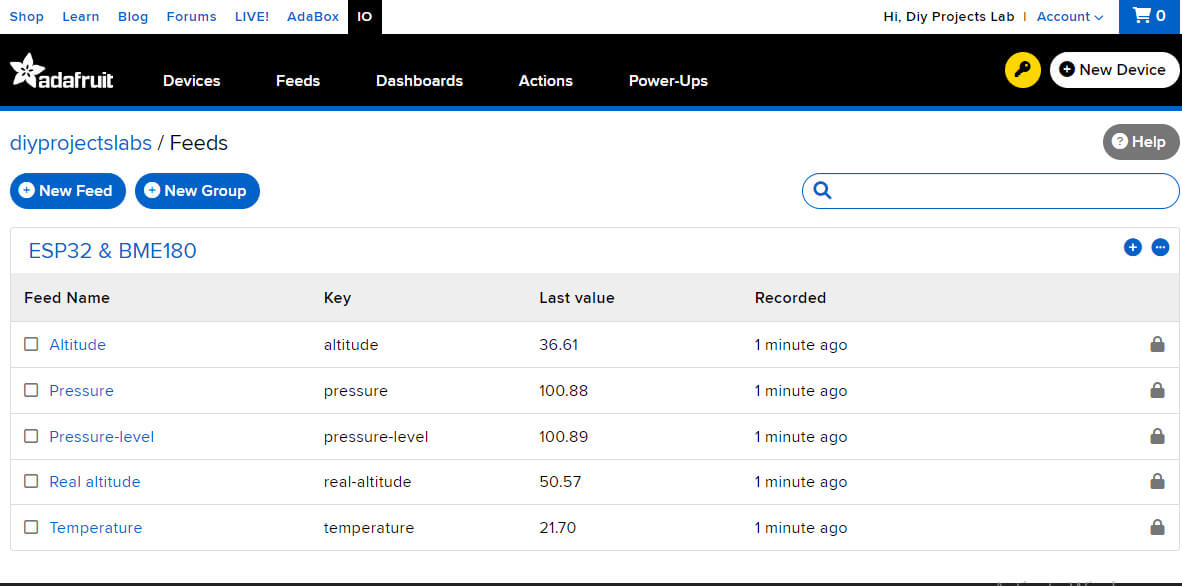
After creating your account and making a connection with ESP32 & bme180. Once this has been done, proceed to the creation of Feeds for the parameters of temperature, pressure, altitude, pressure above sea level and true altitude. Here is an example of how they should appear:
We’ll need to create a new feed to hold data from the BME280 sensor. The BME280 can output Temperature, Humidity, and Pressure data. To do this, navigate to the feeds page on Adafruit IO. Then click Actions -> Create New Feed, and name this feed ESP32 & BME180. If you do not already know how to create a feed. Start by reading (Adafruit IO Basics: Feeds.)
Note- You don’t need to create a feed If you upload the code first in your board then the feed will be auto-updated. (Don’t forget to add AIO Key in the code)
We will continue with the make of the Dashboard, where you can view:
- Ambient or surrounding temperature
- Barometric pressure
- approximate altitude
- Pressure above sea level
- actual altitude
when your dashboard has been created, click on the name of your new dashboard to load it. You should now see your unique empty dashboard.
Adding Blocks
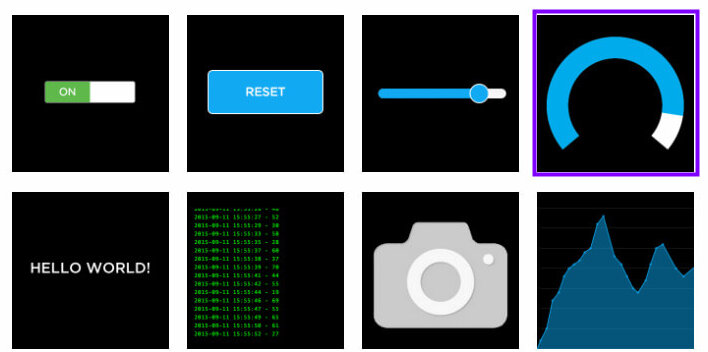
Blocks are widgets that you can add to your dashboard. To add a new block, you can hit the +(Create New Block) button on the upper right-hand side of the dashboard Setting.
You will then be shown with a list of block varieties to choose from, like the one seen below.
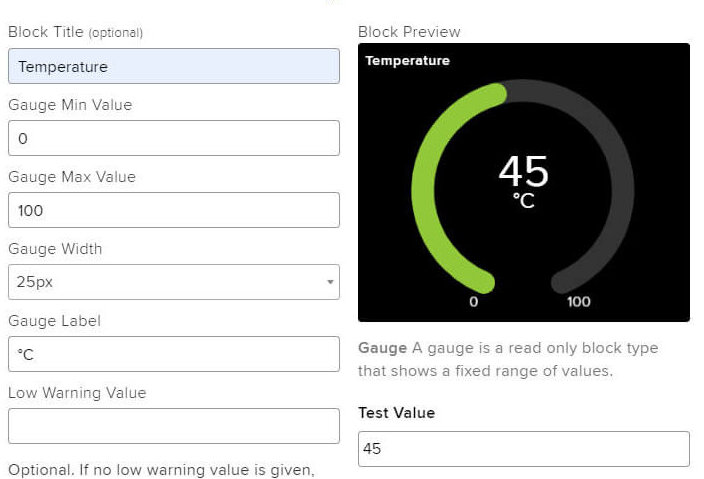
Gauge
The gauge block permits you to fast view the present value of a numeric feed.
Navigating the Create New Block Form
Select block type
Select feed(s)
Block settings
Final
There are three steps in the create block form:
Source Code
Before starting coding, I suggest to ready your network name, password, Adafruit username and IO key. These are required to secure your network and sign in to your Adafruit account.
Your username and key can be found by hitting “Adafruit IO Key” at the top right of the page.
Data to modify:
|
1 2 3 4 5 6 7 8 9 |
//Network name and password #define WLAN_SSID “Name_of_your_Internet” #define WLAN_PASS “Password” //Username and AIO Ket #define AIO_USERNAME “Replace with your username” #define AIO_KEY “Replace with your Project Authentication Key” |
Main Code
|
1 2 3 4 5 6 7 8 9 10 11 12 13 14 15 16 17 18 19 20 21 22 23 24 25 26 27 28 29 30 31 32 33 34 35 36 37 38 39 40 41 42 43 44 45 46 47 48 49 50 51 52 53 54 55 56 57 58 59 60 61 62 63 64 65 66 67 68 69 70 71 72 73 74 75 76 77 78 79 80 81 82 83 84 85 86 87 88 89 90 91 92 93 94 95 96 97 98 99 100 101 102 103 104 105 106 107 108 109 110 111 112 113 114 115 116 117 118 119 120 121 122 123 124 125 126 127 128 129 130 131 132 133 134 135 136 137 138 139 140 141 142 143 144 145 146 147 148 149 150 151 152 153 154 155 156 157 158 159 160 161 162 163 164 165 166 167 168 169 |
#include "Adafruit_MQTT.h" #include "Adafruit_MQTT_Client.h" #include <Adafruit_BMP085.h> #include <WiFi.h> float tempe,presion,alti,presion_nivel,altitud_real; float kpascal_1,kpascal_2; Adafruit_BMP085 bmp; #define WLAN_SSID "Romeo" #define WLAN_PASS "hackster" unsigned long previousMillis = 0; /************************* Adafruit.io Setup *********************************/ #define AIO_SERVER "io.adafruit.com" #define AIO_SERVERPORT 1883 #define AIO_USERNAME "diyprojectslabs" #define AIO_KEY "aio_eKmD73T4h1M0yZqFCHQz7Yuyy4RD" /************ ************ Global state (you don't need to change this! ) ***** ******************/ // Create an ESP8266 WiFiClient class to connect to the MQTT server WiFiClient client; //WiFiClientSecure client ; // Configure the MQTT client class by passing the WiFi client and MQTT server and login details Adafruit_MQTT_Client Adafruit_MQTT_Client mqtt(&client, AIO_SERVER, AIO_SERVERPORT, AIO_USERNAME, AIO_KEY); /****************************** Feeds ***************************************/ Adafruit_MQTT_Publish data1 = Adafruit_MQTT_Publish(&mqtt, AIO_USERNAME"/feeds/Temperature"); // FeedName Adafruit_MQTT_Publish data2 = Adafruit_MQTT_Publish(&mqtt, AIO_USERNAME"/feeds/Pressure"); // FeedName Adafruit_MQTT_Publish data3 = Adafruit_MQTT_Publish(&mqtt, AIO_USERNAME"/feeds/Altitude"); // FeedName Adafruit_MQTT_Publish data4 = Adafruit_MQTT_Publish(&mqtt, AIO_USERNAME"/feeds/Pressure-level"); // FeedName Adafruit_MQTT_Publish data5 = Adafruit_MQTT_Publish(&mqtt, AIO_USERNAME"/feeds/Real altitude"); // FeedName void MQTT_connect(); void setup() { Serial.begin(115200); if (!bmp.begin()) { Serial.println("Could not find valid BMP185 sensor, please check wiring!"); while (1) {} } delay(10); // Connect to the WiFi access point Serial.println(); Serial.println(); Serial.print("conectado a "); Serial.println(WLAN_SSID); WiFi.begin(WLAN_SSID, WLAN_PASS); while (WiFi.status() != WL_CONNECTED) { delay(500); Serial.print("."); } Serial.println(); Serial.println("WiFi connected"); Serial.println("IP address: "); Serial.println(WiFi.localIP()); } void loop() { MQTT_connect(); Serial.print("Temperature = "); tempe=bmp.readTemperature(); Serial.print(tempe); Serial.println("°C"); if (! data1.publish(tempe)) { Serial.println(F("Failed")); } else { Serial.println(F("OK!")); } delay(2000); Serial.print("Pressure = "); presion=bmp.readPressure(); kpascal_1=presion/1000; Serial.print(kpascal_1); Serial.println(" KPa"); if (! data2.publish(kpascal_1)) { Serial.println(F("Failed")); } else { Serial.println(F("OK!")); } delay(2000); // Calculate altitude assuming 'standard' barometric // pressure of 1013.25 millibars = 101325 Pascal Serial.print("Altitude = "); alti=bmp.readAltitude(); Serial.print(alti); Serial.println(" meters"); if (! data3.publish(alti)) { Serial.println(F("Failed")); } else { Serial.println(F("OK!")); } delay(2000); Serial.print("Pressure at sea level: "); presion_nivel=bmp.readSealevelPressure(); kpascal_2=presion_nivel/1000; Serial.print(kpascal_2); Serial.println("Pa"); if (! data4.publish(kpascal_2)) { Serial.println(F("Failed")); } else { Serial.println(F("OK!")); } delay(2000); // you can get a more accurate measurement of altitude // if you know the current sea level pressure which // will vary with weather and such. If it's 1015 millibars // that's it equal to 101500 pascals. Serial.print("Real altitude = "); altitud_real=bmp.readAltitude(101500); Serial.print(altitud_real); Serial.println("meters"); if (! data5.publish(altitud_real)) { Serial.println(F("Failed")); } else { Serial.println(F("OK!")); } delay(2000); } void MQTT_connect() { int8_t ret; // Stop if already connected. if (mqtt.connected()) { return; } Serial.print("Connecting to MQTT... "); uint8_t retries = 3; while ((ret = mqtt.connect()) != 0) { Serial.println(mqtt.connectErrorString(ret)); Serial.println("Retrying MQTT connection in 5 seconds.."); mqtt.disconnect(); delay(10000); retries--; if (retries == 0) { while (1); } } Serial.println("MQTT conectada!"); } |
Copy and paste the code to your Arduino IDE and hit upload. You should see this data at the serial monitor: temperature, pressure (Kpa), altitude (meters), pressure above sea level (Kpa) and the real altitude (meters).
Conclusion
In ending, the BMP180 pressure sensor is a good way to monitor pressure on Adafruit IO with an ESP32. The pressure readings are accurate and the sensor is very easy to use.

