In this tutorial, we will be using the internal RTC (Real Time Clock) feature of the Arduino UNO R4 Minima. We’ll use the internal RTC to keep track of time and date, and we’ll also learn how to operate it to trigger events at specific times and dates.
The Arduino UNO R4 Minima is a powerful little board that has a built-in Real-Time Clock. This feature makes it a powerful tool for developing IoT applications, as it can provide accurate timing information for connected devices.
In my previous post Getting Started with your Arduino UNO R4 Minima | Arduino IDE, I provided a complete guide to getting started with Arduino UNO R4 Minima. This time, I’m excited to explore a unique feature that sets the Arduino R4 Minima the addition of the RTC (Real-Time Clock). Arduino R3 didn’t have this functionality.
Required Components :
- Arduino UNO R4 Minima
- RTC module (Real-Time Clock module)
- 16×2 LCD (Liquid Crystal Display)
- Jumper wires
- Breadboard
RTC (Real Time Clock) function
The RTC (Real-Time Clock) function feature enables accurate clock time on the Arduino UNO R4 Minima. It allows for time-based actions, data logging, and accurate timestamps in different applications, making it a helpful upgrade from the Arduino R3.
In Arduino UNO R4 Minima’s built-in RTC (Real Time Clock)’ feature uses the Renesas core library ‘RA4M1‘ which can be controlled using the RTC library from the Renesas core, allowing exact timekeeping functionalities.
The UNO R4 Minima’s built-in RTC can be controlled using the RTC library from the Renesas core. This library allows you to manage time, set alarms, and trigger interrupts. The practical examples on this page are a great way to start using the RTC.
Data that can be obtained with an RTC (Real-Time Clock) includes the date (year,month,day) and time (hours,minutes,seconds).
Example Code to Set the Time Using Arduino Minima
Setting the time for the first time in RTC is simple. You create an RTCTime object where you specify the day, month, year, hour, minute, second, day of the week, and daylight saving mode. Then, you use the setTime() method to set the time.
Here’s an example:
|
1 2 3 4 5 6 7 8 9 10 11 12 13 14 |
#include "RTC.h" void setup() { Serial.begin(9600); RTC.begin(); RTCTime startTime(6, Month::NOVEMBER, 2023, 23, 00, 00, DayOfWeek::MONDAY, SaveLight::SAVING_TIME_ACTIVE); RTC.setTime(startTime); } void loop() { } |
In this code, we’re setting the RTC’s starting time to November 6, 2023, 23:00 PM on a Monday, with daylight saving time active.
Example Code to Retrieve Time Using Arduino Minima
In this example, we both set and retrieve the time, saving it in an RTCTime object named “currentTime.”
|
1 2 3 4 5 6 7 8 9 10 11 12 13 14 15 16 17 |
#include "RTC.h" void setup() { Serial.begin(9600); RTC.begin(); RTCTime startTime(6, Month::NOVEMBER, 2023, 23, 00, 00, DayOfWeek::MONDAY, SaveLight::SAVING_TIME_ACTIVE); RTC.setTime(startTime); } void loop() { RTCTime currentTime; // Obtain the current time from the RTC RTC.getTime(currentTime); } |
This code uses the RTC, sets the starting time, and then continuously retrieves the current time, storing it in the “currentTime” object.
Show Date & Time on Serial Monitor
Printing the Date and time is a simple process. The following examples demonstrate how to set, get, and print the time using various methods:
|
1 2 3 4 5 6 7 8 9 10 11 12 13 14 15 16 17 18 19 20 21 22 23 24 25 26 27 28 29 30 31 32 33 34 |
#include "RTC.h" void setup() { Serial.begin(9600); RTC.begin(); RTCTime startTime(6, Month::NOVEMBER, 2023, 23, 00, 00, DayOfWeek::MONDAY, SaveLight::SAVING_TIME_ACTIVE); RTC.setTime(startTime); } void loop() { RTCTime currentTime; // Get the current time from the RTC RTC.getTime(currentTime); // Print the date (DD/MM/YYYY) Serial.print(currentTime.getDayOfMonth()); Serial.print("/"); Serial.print(Month2int(currentTime.getMonth())); Serial.print("/"); Serial.print(currentTime.getYear()); Serial.print(" - "); // Print the time (HH:MM:SS) Serial.print(currentTime.getHour()); Serial.print(":"); Serial.print(currentTime.getMinutes()); Serial.print(":"); Serial.println(currentTime.getSeconds()); delay(1000); } |
In this code, we set the RTC time, retrieve the current time, and print both the date and time to the serial monitor. The delay(1000) adds a one-second delay between each print.
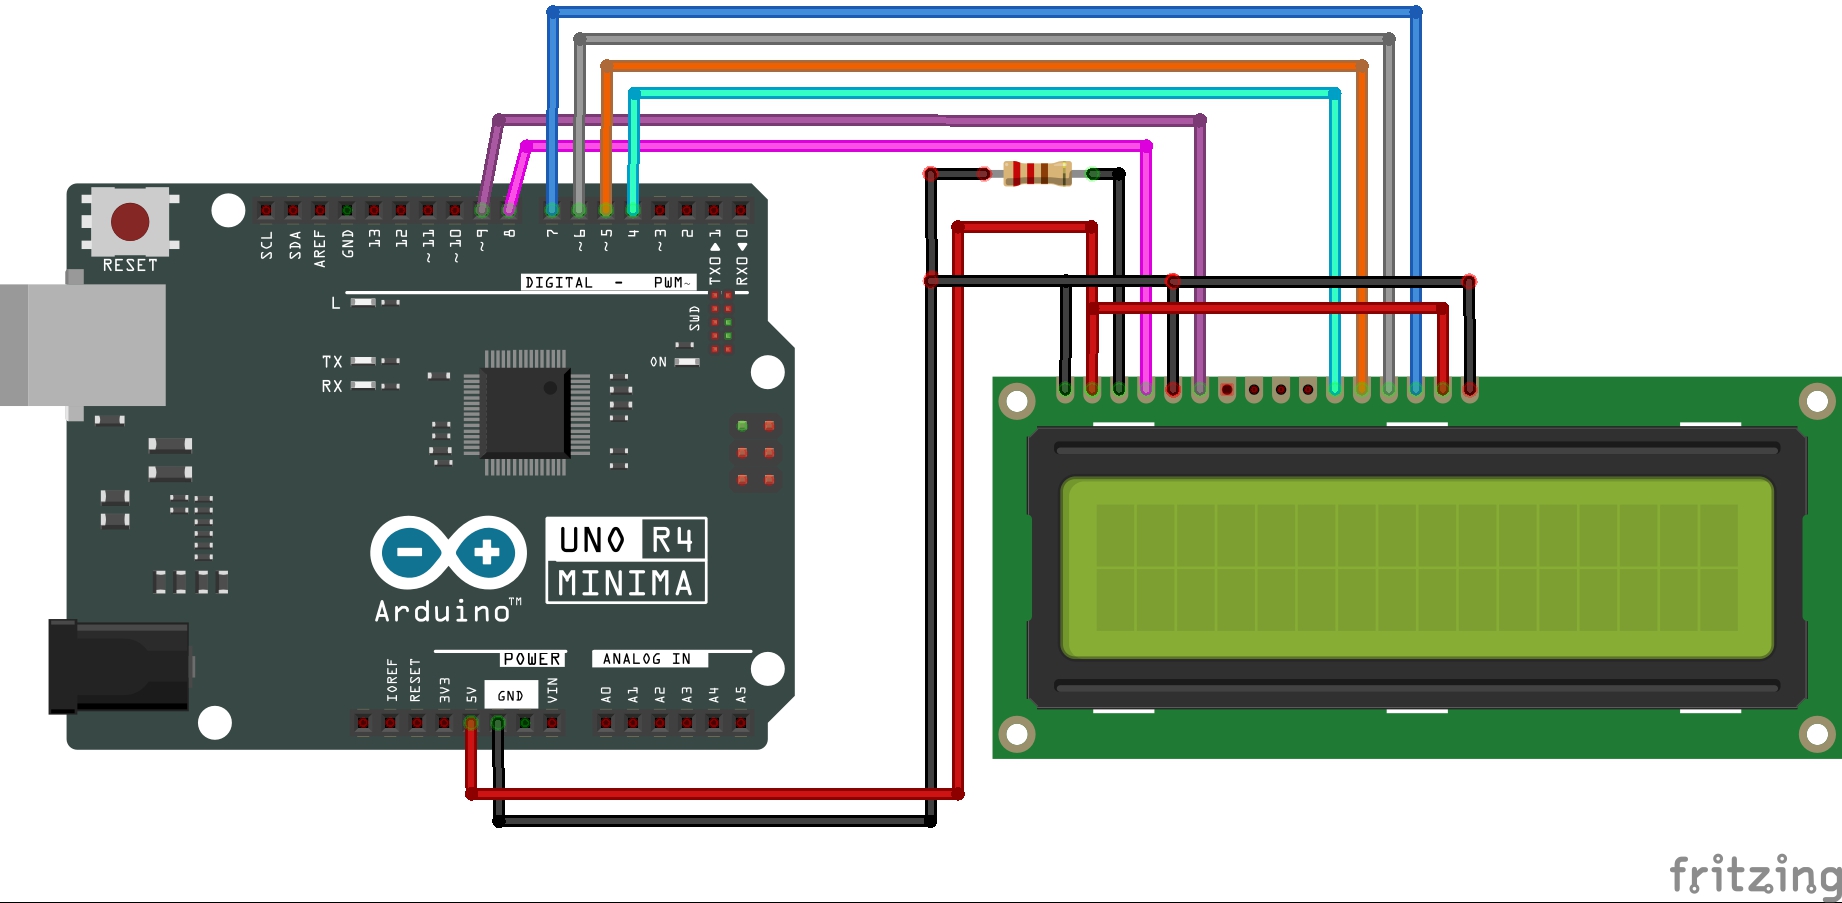
Displaying Time and Date from Arduino UNO R4 Minima’s Internal RTC on a 16×2 LCD
Source Code for Displaying Arduino UNO R4 Minima’s Internal RTC Time and Date
Below is a minimal example that shows how to obtain the date and time from the RTC:
|
1 2 3 4 5 6 7 8 9 10 11 12 13 14 15 16 17 18 19 20 21 22 23 24 25 26 27 28 29 30 31 32 33 34 35 36 37 38 39 40 41 42 43 44 45 46 47 48 |
#include <RTC.h> #include <LiquidCrystal.h> const int LCD_D4_SOCKET = 4; // Data bit D4 input socket number const int LCD_D5_SOCKET = 5; // Data bit D5 input socket number const int LCD_D6_SOCKET = 6; // Data bit D6 input socket number const int LCD_D7_SOCKET = 7; // Data bit D7 input socket number const int LCD_RS_SOCKET = 8; // Register selection input socket number const int LCD_E_SOCKET = 9; // Enable input socket number LiquidCrystal lcd(8, 9, 4, 5, 6, 7); // Assignment of LCD control pins void setup() { // Code executed only once when the program is started RTC.begin(); // Initialize the time // Set the starting time RTCTime startTime(27, Month::JULY, 2023, 19, 57, 00, DayOfWeek::THURSDAY, SaveLight::SAVING_TIME_ACTIVE); RTC.setTime(startTime); // Set the time lcd.begin(16, 2); // Specify the number of columns and rows for the LCD } void loop() { // Code executed in a loop after the program starts RTCTime currentTime; // Storage for the time RTC.getTime(currentTime); // Get clock data from the RTC lcd.clear(); // Clear the LCD display lcd.setCursor(0, 0); // Position the LCD cursor at the top-left lcd.print(currentTime.getYear()); // "Year" lcd.print("/"); lcd.print(Month2int(currentTime.getMonth())); // "Month" lcd.print("/"); lcd.print(currentTime.getDayOfMonth()); // "Day" lcd.setCursor(0, 1); // Position the LCD cursor at the bottom-left lcd.print(currentTime.getHour()); // "Hour" lcd.print(":"); lcd.print(currentTime.getMinutes()); // "Minutes" lcd.print(":"); lcd.print(currentTime.getSeconds()); // "Seconds" delay(200); // 0.2-second delay } |
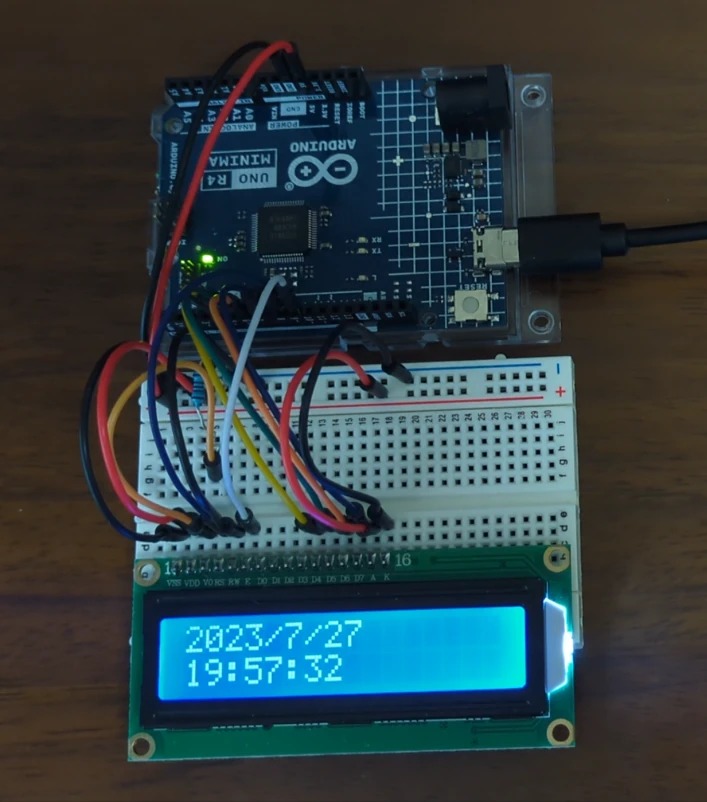
Working
Displaying RTC Time and Date on 16×2 LCD with Arduino UNO R4 Minima


