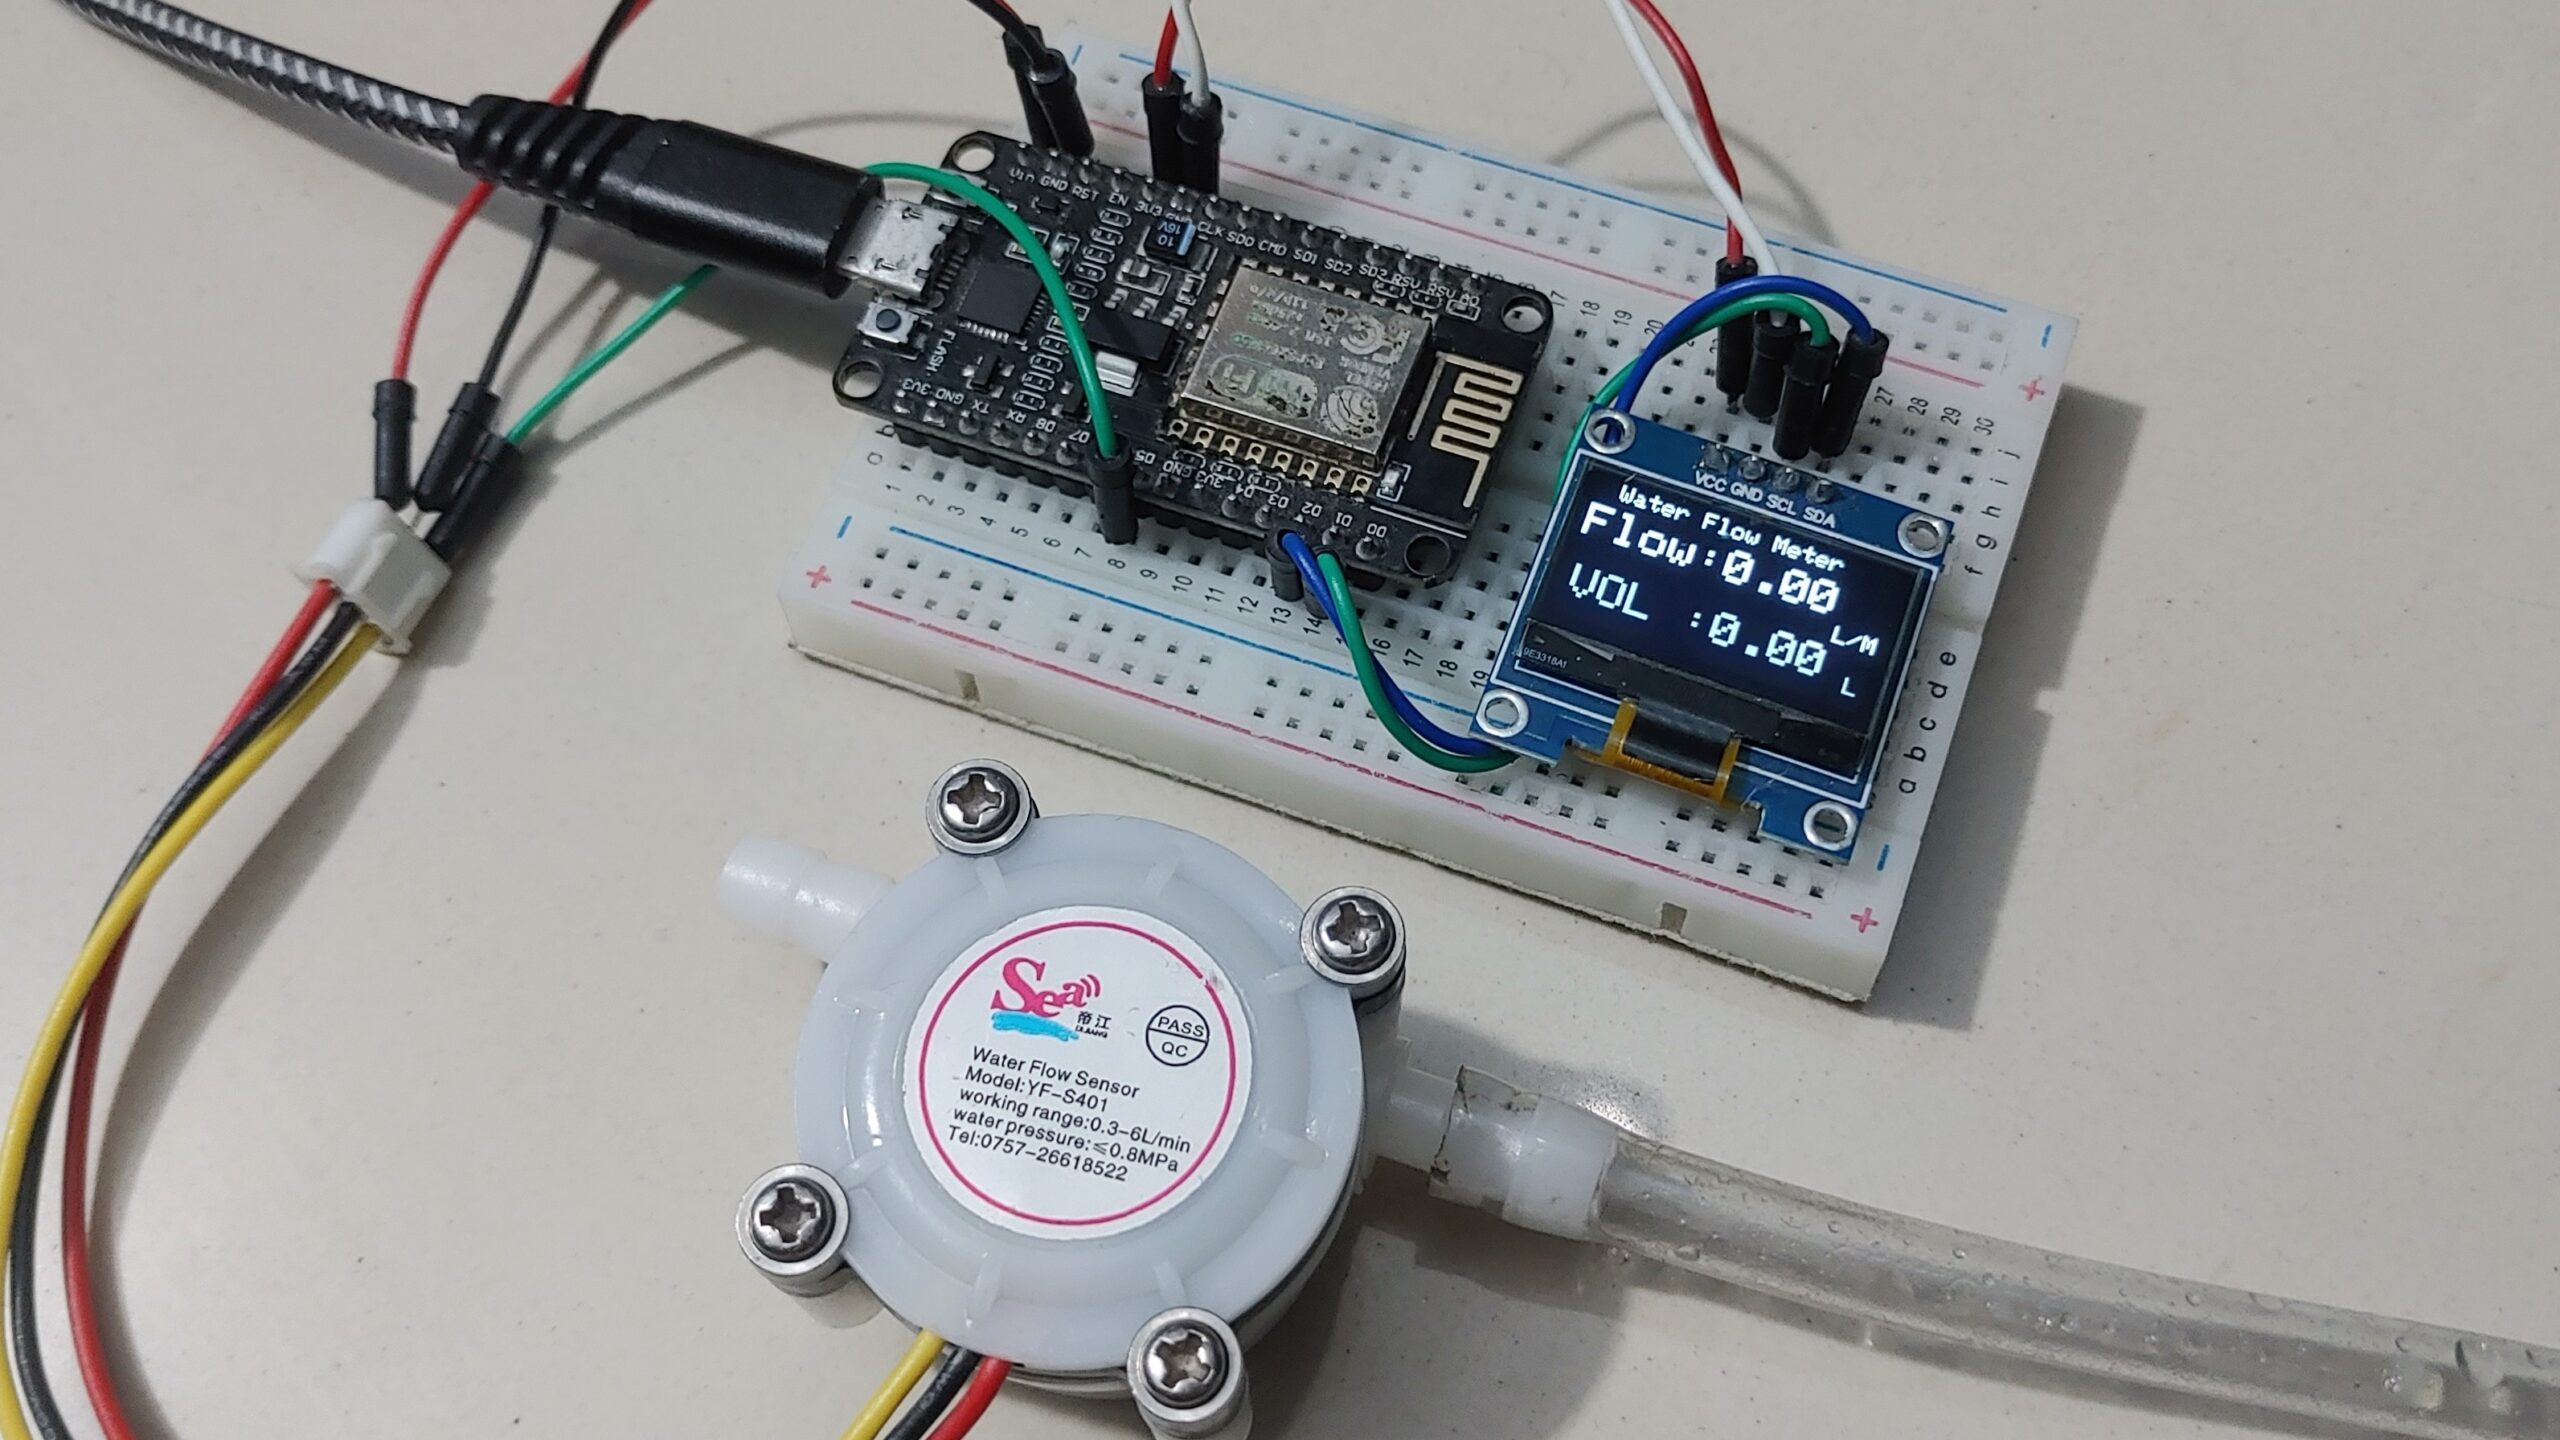
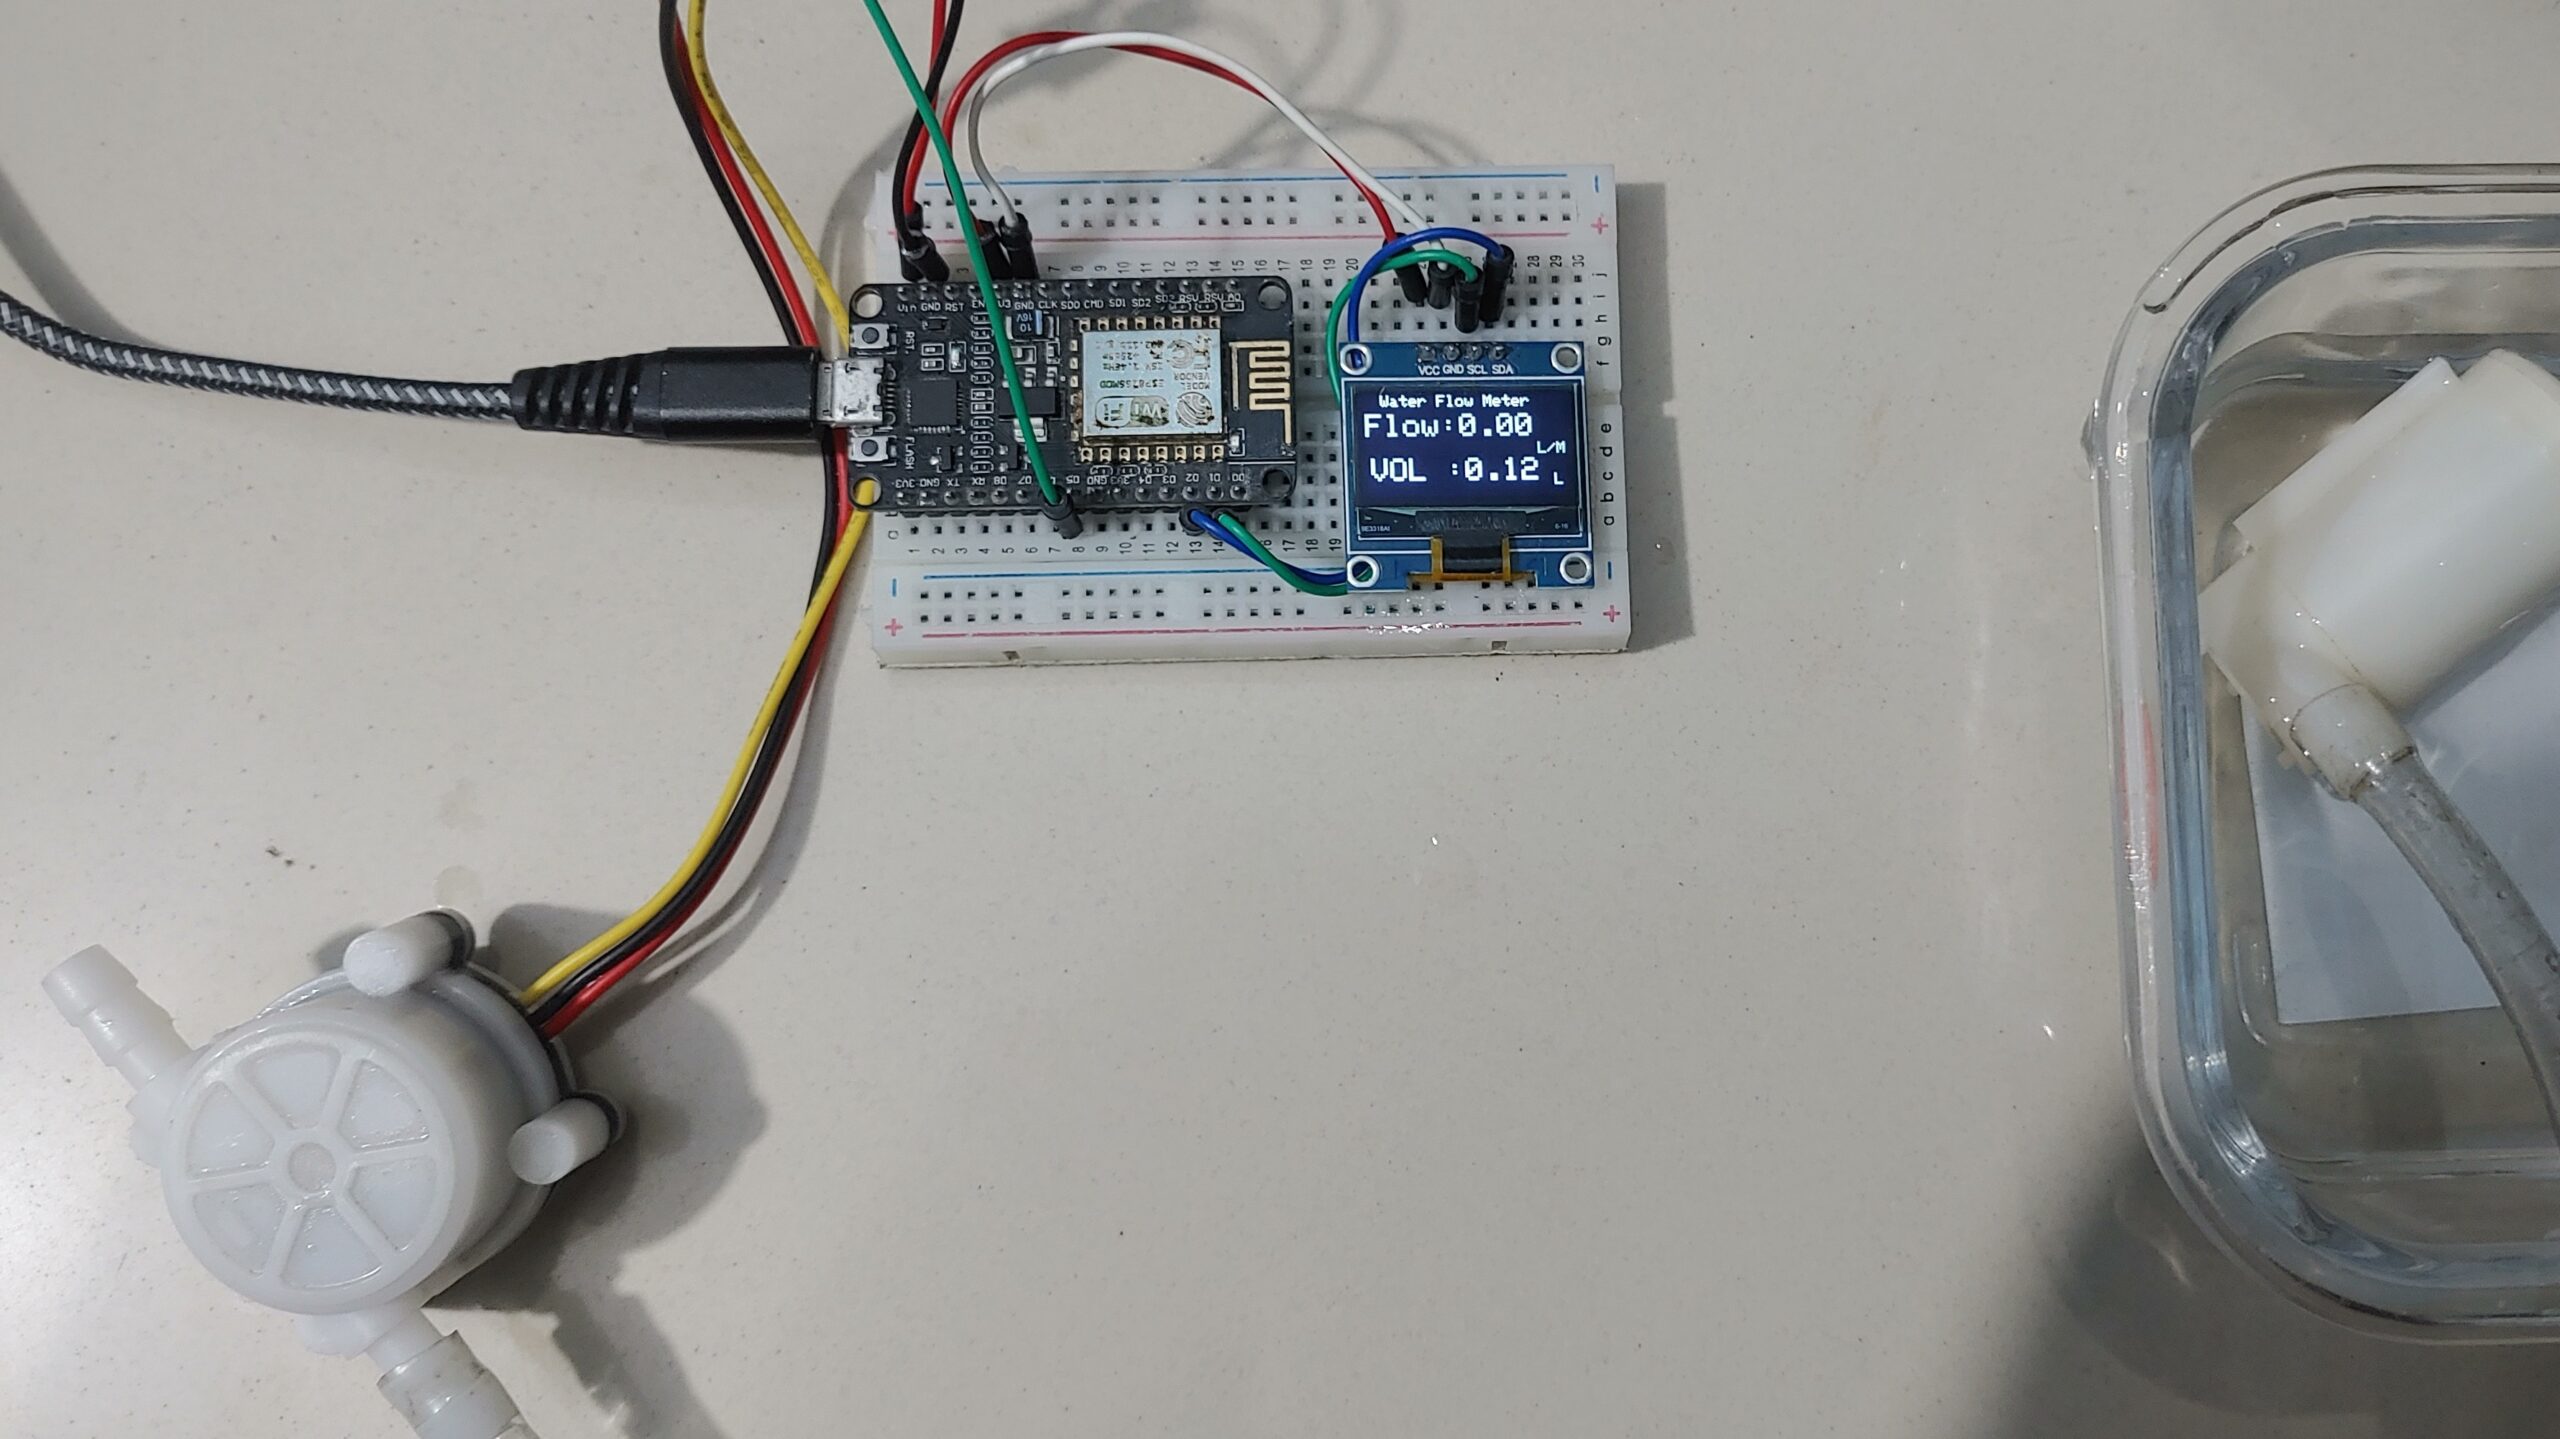
In this project, we’ll build an IoT-based Water Consumption and Flow Meter with an ESP8266 microcontroller and a Water Flow Sensor. We’ll use the YFS401 Hall Effect Water Flow Sensor to interface it with an ESP8266 and display their flow rate and total water on a 0.96″ OLED Display.
Also, We’ll use the Thingspeak App as our IoT Server. This platform allows us to upload water flow rate and volume data to the Thingspeak Server, remotely monitoring and viewing data from anywhere in the world.
Water management plays an important role in city management, providing water according to real-time requirements while minimizing waste. To achieve efficient water control, measuring parameters such as water flow rate and volume accurately is necessary.
Without this data, managing water becomes difficult. Remote monitoring of water volume, and flow rate via Internet Connectivity is now important.
Thank You, PCBWay
This project is completed because of the support and help from PCBWay. If you have a PCB project, please see their website and get exciting deals and coupons.
PCBway is the best prototype PCB company offering great quality PCB boards at affordable prices If you sign up using this link you will get a free coupon or rewards for your first order. https://www.pcbway.com
Multiple water flow sensors are available in the market, but many are costly and unusable for general use. Therefore, there’s a demand for affordable options. so we’ll use the YFS401 Hall Effect Water Flow Sensor with ESP8266 to create a simple and cost-effective IoT-Water Flow Meter.
Required Material
- NODEMCU ESP8266
- 0.96″ I2C OLED Display
- YFS401 Hall-Effect Water Flow Sensor
- Jumper Wire
- Breadboard
YFS401 Hall-Effect Water Flow Sensor
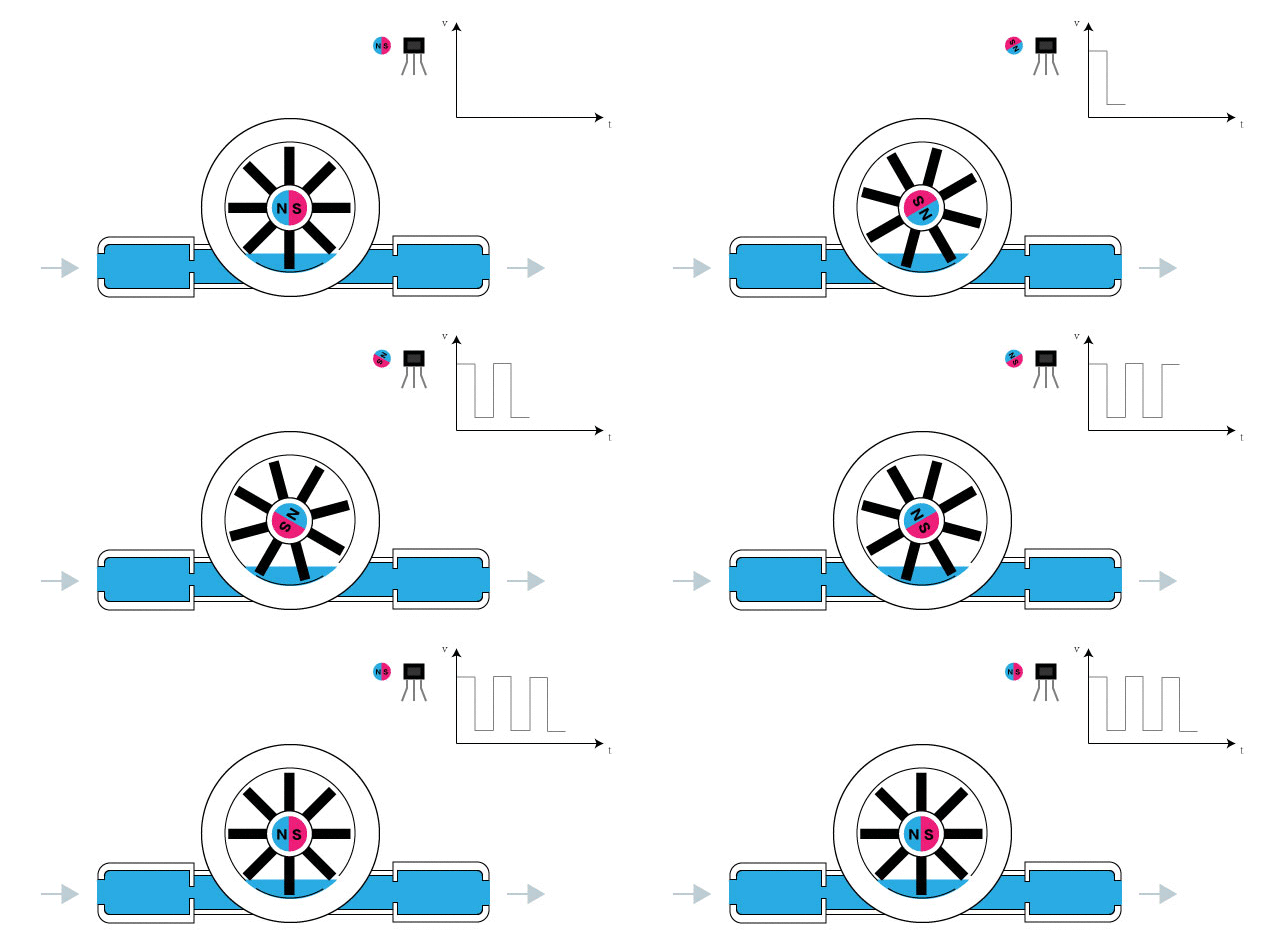
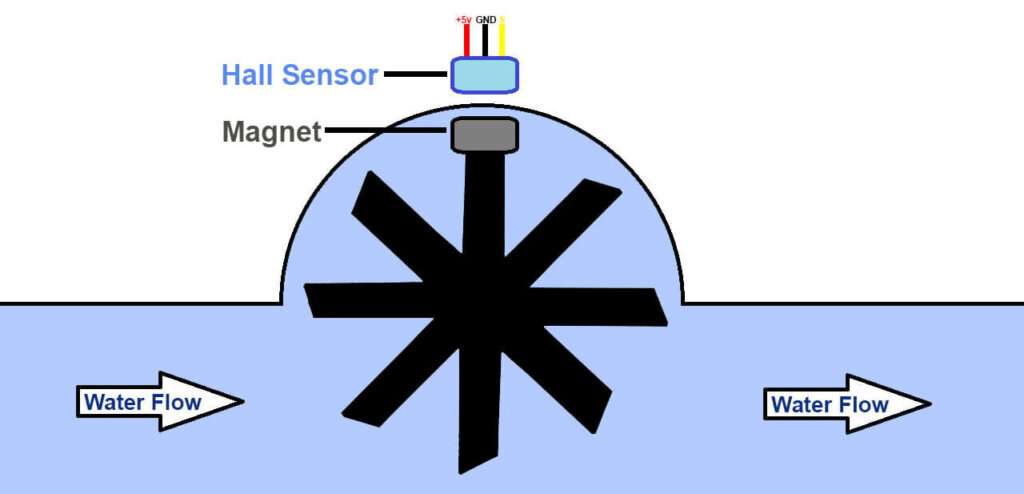
The YF-S401 water flow sensor measures liquid flow rate with its plastic valve body, flow rotor, and hall effect sensor. Placed at the basin, it gauges flow volume. As the liquid passes through, a magnetic rotor spins, its speed indicating the flow rate. Check out our previous post on Arduino Flow Sensor Tutorial: How to Measure Liquid Flow
The hall effect sensor emits a pulse width signal accordingly. Connect it to microcontrollers for monitoring and controlling various devices like coffee makers or sprinklers, adjusting water flow as needed!
Water-flow Formula:
- 1L = 5880 square waves
Specifications:
- Working Voltage: DC 5V~24V
- Working Current: 15mA (DC 5V)
- Max Water Pressure: <0.8 MPa
- Load Capacity: ≤10mA (DC 5V)
- Operating Temperature: ≤ 80°C
- Liquid Temperature: ≤120°C
- Operating Humidity: 35% – 90%RH
- Storage Temperature: -25°C to +80°C
- Storage Humidity: 25% – 95%RH
- Error: +/- 5%
- Insulation Resistance: > 100M ohm
- Output Pulse Duty Cycle: 50% ± 10%
- Output Pulse High Level: > DC 4.7V (Vsupp = 5V)
- Output Pulse Rise Time: 0.04μS
- Output Pulse Fall Time: 0.18μS
The sensor has three wires:
- Red 3.5-24VDC
- Black (ground)
- Yellow (Hall effect pulse output)
To calculate the water flow rate, count the pulses from the sensor output. Each pulse represents approximately 2.25 milliliters of flow.
While this sensor is cost-effective, it may not provide exact accuracy, as flow rate and volume can fluctuate based on factors like liquid pressure and sensor orientation. Achieving accuracy within 10% or better may require extensive calibration. However, you can make a basic IoT-based Water Flow Meter using this sensor.
IoT Water Flow Monitoring with ESP8266 & Water Flow Sensor
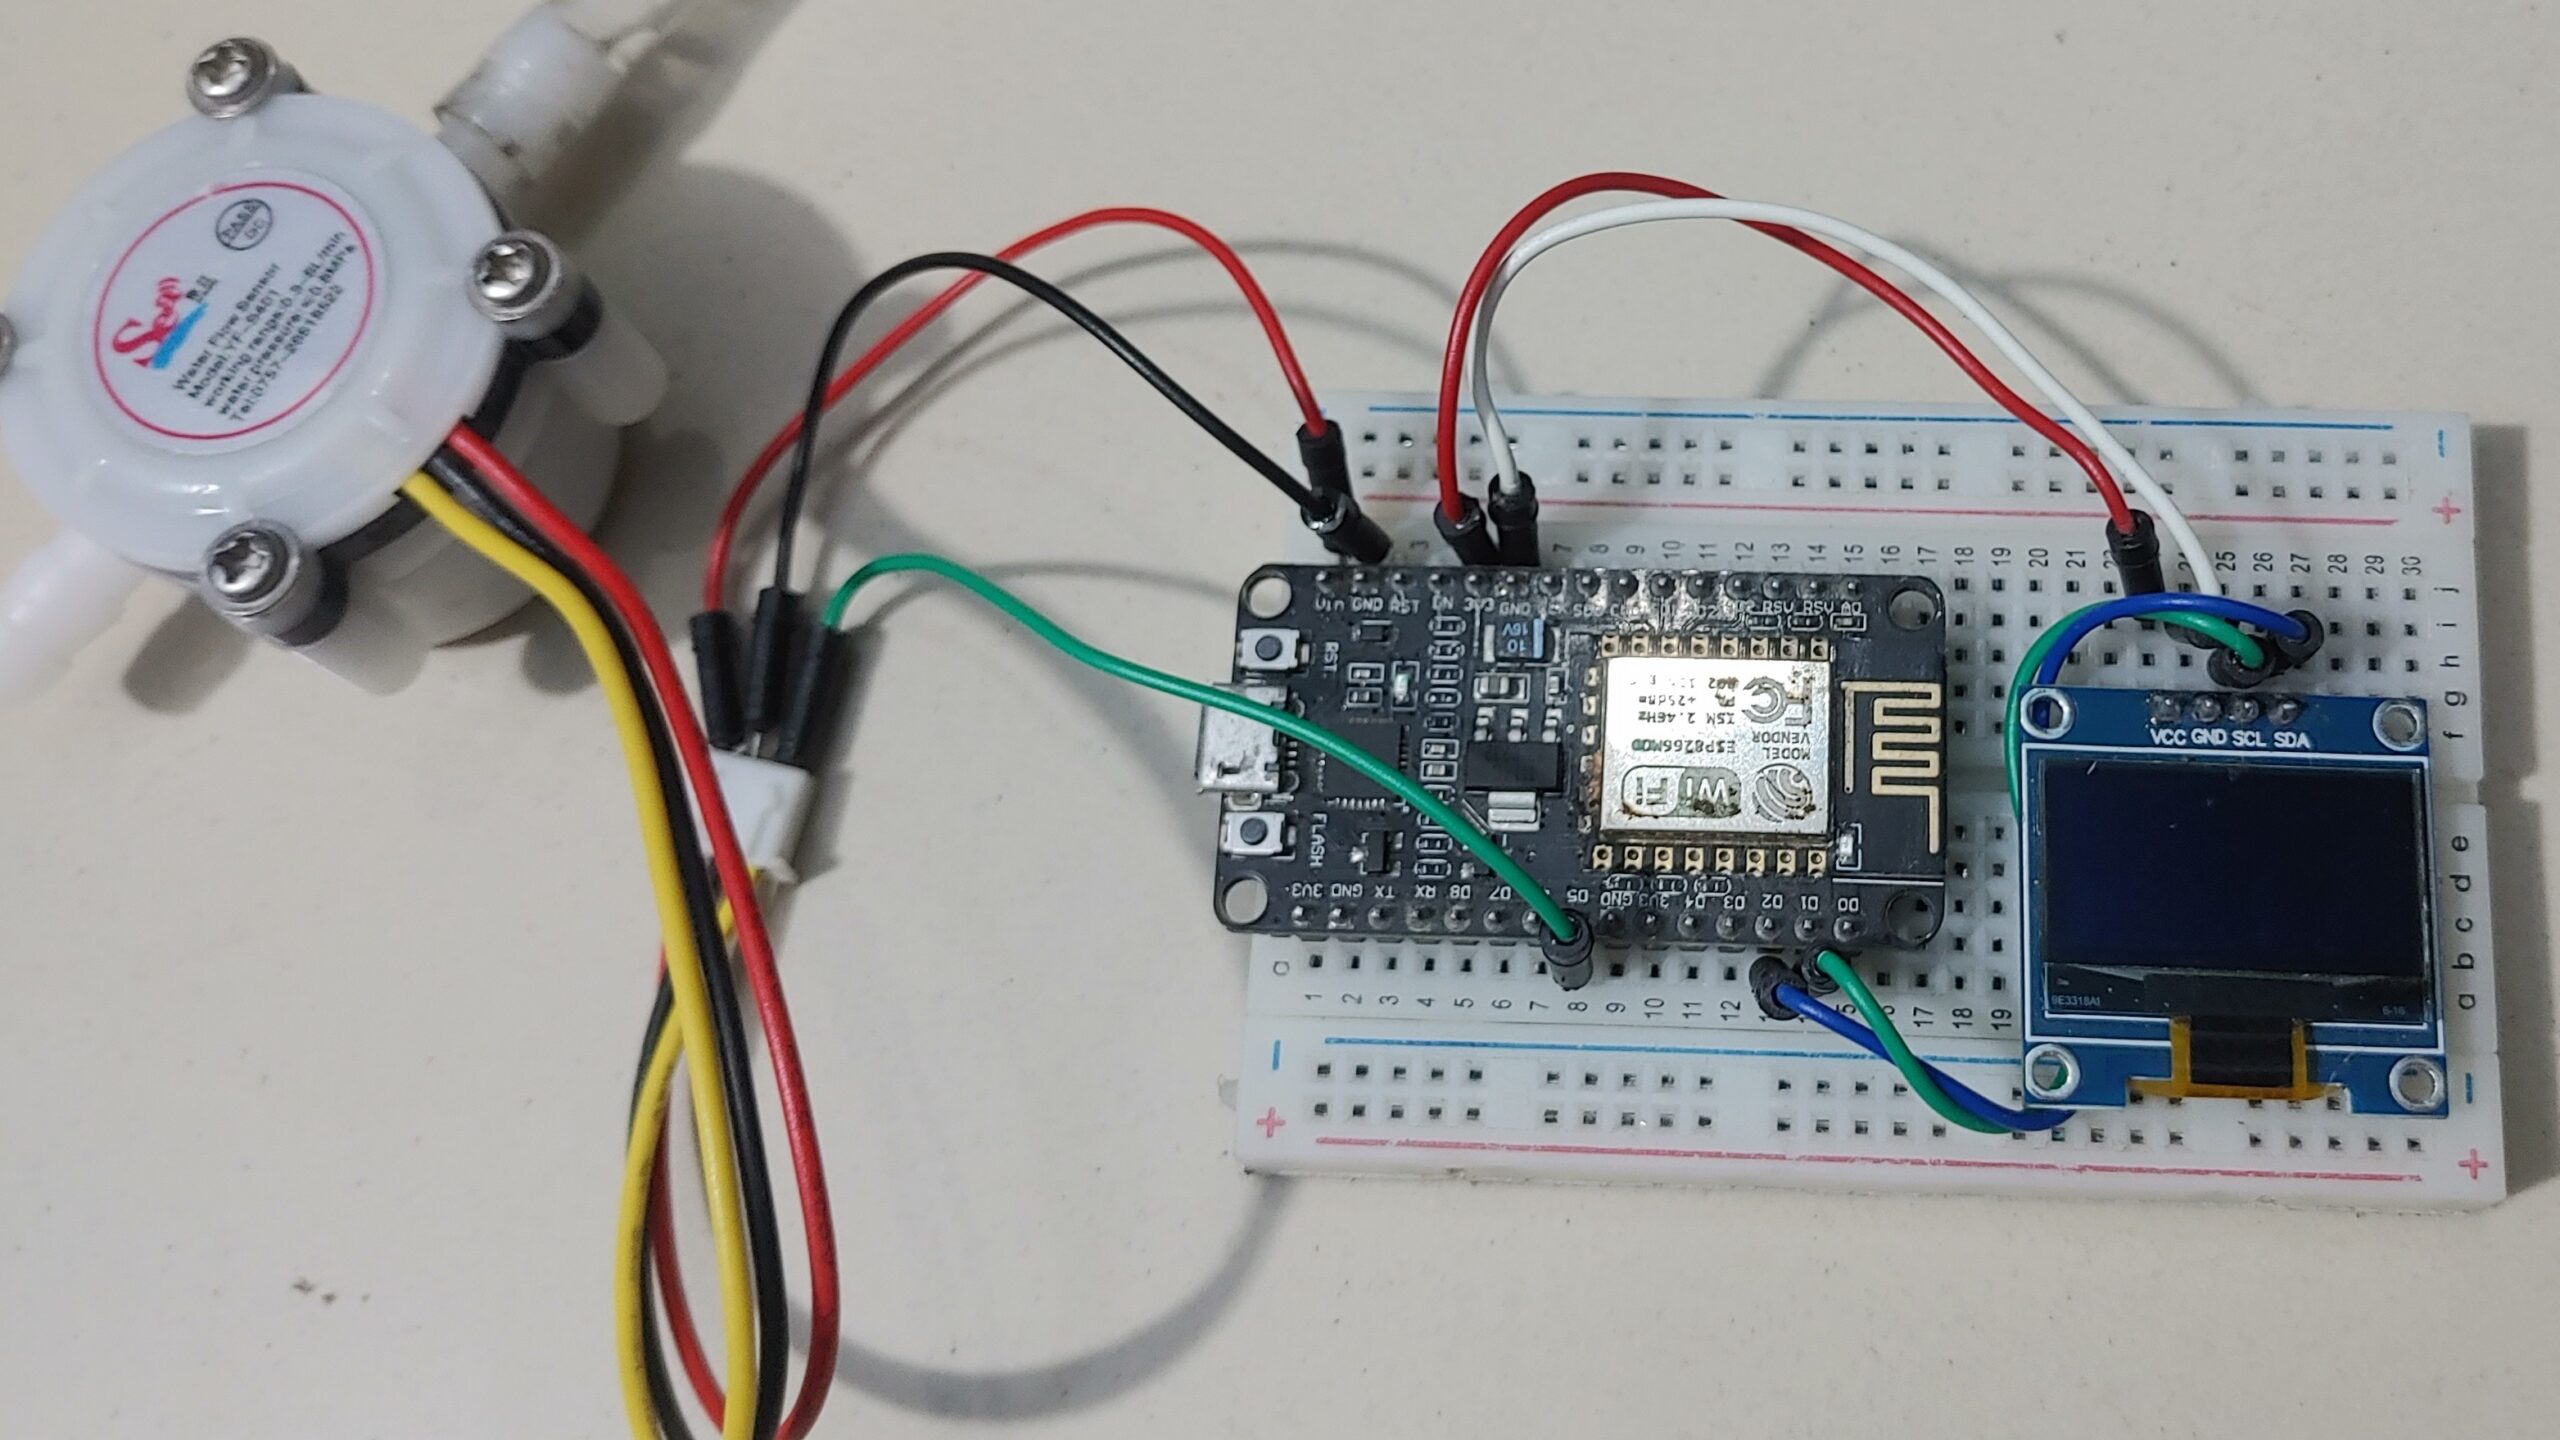
Let’s connect the Hall-Effect Water Flow Sensor to ESP8266 and the OLED Display. The display will show the Water Flow Rate and Total Volume of water flowing through the pipe. We’ll also send this data to the Thingspeak Server every 15 seconds.
The Water Flow Sensor is a digital sensor, allowing us to connect its output pin to any of the digital pins of the ESP8266 board.
In this setup, I’ve connected it to GPIO14, which corresponds to D5. The sensor operates at 3.3V also so it can be connected to the 3.3V pin of the ESP8266.
Similarly, the OLED Display’s SDA and SCL pins are connected to D2 and D1 of the ESP8266, respectively. Since the OLED Display operates at 3.3V, it can be connected to the 3.3V pin of the NodeMCU.
Flow Rate Calculations
- Model YF-S401-0207: 0.2 ~ 3L/min
- Model YF-S401-3507: 0.3 ~ 6L/min
Flow Rate Formula: F = (98 * Q) ± 2% Q = L / MIN
YF-S401 Technical Specifications:
- Based on YF-S401-3507 (3.5mm Intake / 7mm Out)
- The range of the Model YF-S401-3507 sensor is 300ml to 6liter per minute.
- At 1000ml, we get 5880 pulses.
- Pulses per second: 5880/60 = 98 Hz square wave.
- Period: 1/98 = 10.2 milliseconds.
- For 1ml, calculate 5880/1000 = 5.88/60 = 0.098Hz with a period of 10.2 seconds.
Configuring ThingSpeak
ThingSpeak is an open-source Internet of Things (IoT) application and API to store and retrieve data from things using the HTTP protocol over the Internet or via a Local Area Network. It allows you to store and access this data easily through an API.
Sign up for a ThingSpeak account for this.
- Visit https://thingspeak.com/ and create an account.
- Create a new channel by clicking on “Channel” and filling in the required details.
Now give it a suitable name as per your Application in the below image you can see we have given the name IoT Water Flow Monitoring and fill in some of the things like description and field1 and field2.
- Then Click on the Save Channel button to save all of your settings.
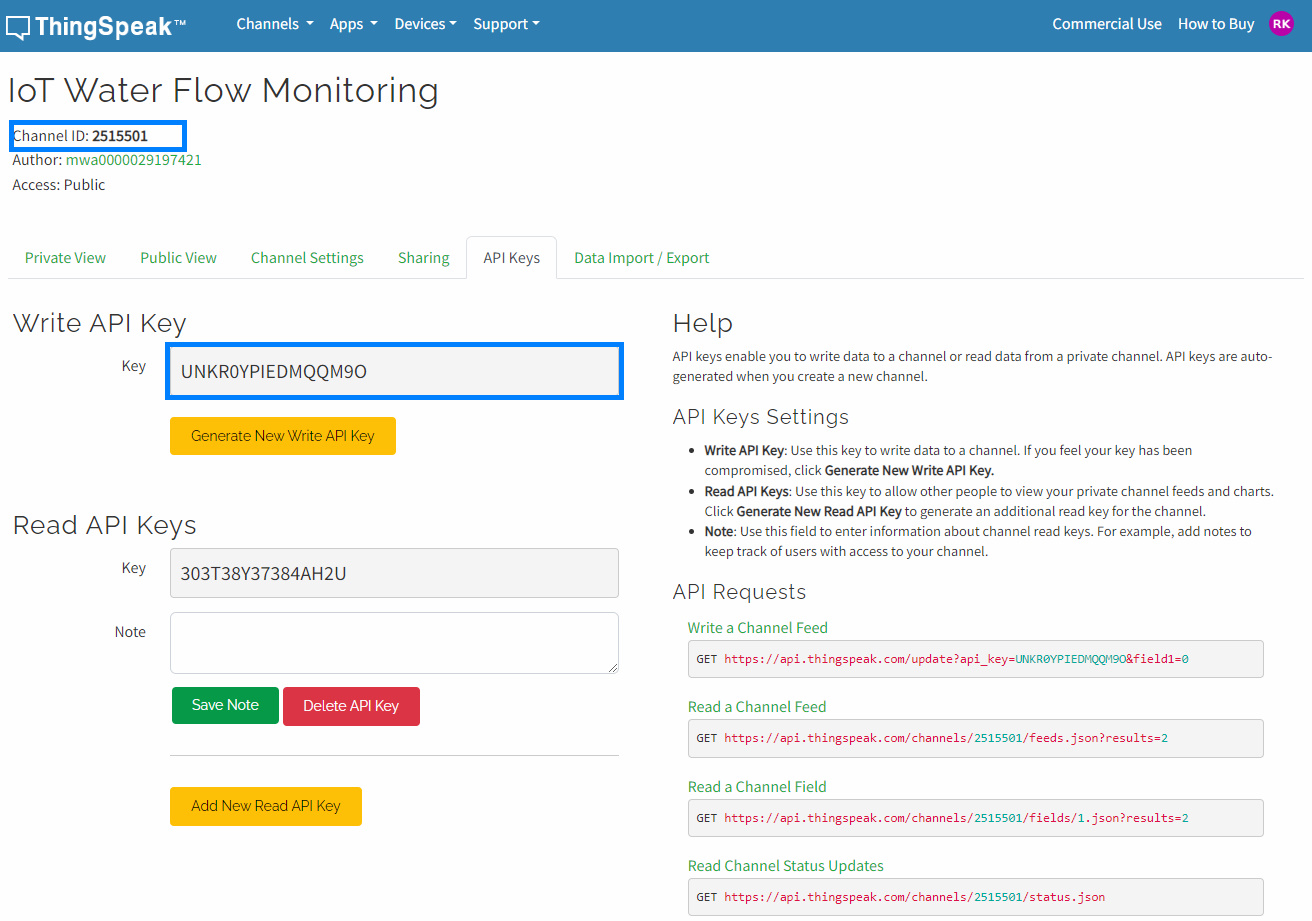
- Click on API Key to obtain the “Write API Key” and “Channel ID“. Copy this key, as it will be required in the code.
- Customize the display window by clicking on “Private View“.
Code
To set up the ESP8266 Water Flow Sensor code using Arduino IDE:
- Download and install the SSD1306 Library.
- Download and install the AdafruitGFX Library.
- Download and install the ThingSpeak Library.
After modifying the Thingspeak API Key, Thingspeak Channel ID, Wi-Fi SSID, and Password in the code move to upload it directly to the NodeMCU ESP8266.
|
1 2 3 4 5 |
const char* ssid = "TheSkywalker5g"; const char* password = "9708868689"; const char* server = "api.thingspeak.com"; const unsigned long myChannelNumber = 2515501; const char* myWriteAPIKey = "UNKR0YPIEDMQQM9O"; |
Here is the full code
|
1 2 3 4 5 6 7 8 9 10 11 12 13 14 15 16 17 18 19 20 21 22 23 24 25 26 27 28 29 30 31 32 33 34 35 36 37 38 39 40 41 42 43 44 45 46 47 48 49 50 51 52 53 54 55 56 57 58 59 60 61 62 63 64 65 66 67 68 69 70 71 72 73 74 75 76 77 78 79 80 81 82 83 84 85 86 87 88 89 90 91 92 93 94 95 96 97 98 99 100 101 102 103 104 105 106 107 108 109 110 111 112 113 114 |
#include <ESP8266WiFi.h> #include <Wire.h> #include <Adafruit_GFX.h> #include <Adafruit_SSD1306.h> #include "ThingSpeak.h" #define SCREEN_WIDTH 128 #define SCREEN_HEIGHT 64 #define OLED_RESET -1 #define SENSOR_PIN 14 const char* ssid = "TheSkywalker5g"; const char* password = "9708868689"; const char* server = "api.thingspeak.com"; const unsigned long myChannelNumber = 2515501; const char* myWriteAPIKey = "UNKR0YPIEDMQQM9O"; Adafruit_SSD1306 display(SCREEN_WIDTH, SCREEN_HEIGHT, &Wire, OLED_RESET); volatile unsigned long totalPulses = 0; unsigned long lastPulseTime = 0; const int numReadings = 120; float flowRate; float totalLitres; const float calibrationFactor = 4.5; // Calibration factor for flow sensor WiFiClient client; void IRAM_ATTR pulseCounter() { totalPulses++; } void setup() { Serial.begin(115200); display.begin(SSD1306_SWITCHCAPVCC, 0x3C); display.clearDisplay(); pinMode(SENSOR_PIN, INPUT_PULLUP); attachInterrupt(digitalPinToInterrupt(SENSOR_PIN), pulseCounter, RISING); WiFi.mode(WIFI_STA); WiFi.begin(ssid, password); while (WiFi.status() != WL_CONNECTED) { delay(500); Serial.print("."); } Serial.println(""); Serial.println("WiFi connected"); Serial.println("IP address: "); Serial.println(WiFi.localIP()); ThingSpeak.begin(client); } void loop() { unsigned long currentMillis = millis(); if (currentMillis - lastPulseTime >= 1000) { detachInterrupt(digitalPinToInterrupt(SENSOR_PIN)); // Calculate flow rate in liters per minute flowRate = (totalPulses * (1.0 / calibrationFactor) * 60) / 1000; // Flow rate in liters per minute // Calculate total litres passed totalLitres += (totalPulses * 2.25) / 1000 / 60; // Accumulate total litres totalPulses = 0; lastPulseTime = currentMillis; attachInterrupt(digitalPinToInterrupt(SENSOR_PIN), pulseCounter, RISING); display.clearDisplay(); display.setCursor(10, 0); display.setTextSize(1); display.setTextColor(WHITE); display.print("Water Flow Meter"); display.setCursor(0, 12); display.setTextSize(2); display.print("Flow:"); display.print(flowRate); display.setCursor(110, 30); display.setTextSize(1); display.print("L/M"); display.setCursor(3, 40); display.setTextSize(2); display.print("VOL :"); display.print(totalLitres); display.setCursor(120, 50); display.setTextSize(1); display.print("L"); display.display(); if (currentMillis / 1000 % 60 == 0) { // Every minute sendToThingSpeak(); } } } void sendToThingSpeak() { Serial.println("Sending data to ThingSpeak..."); ThingSpeak.setField(1, flowRate); ThingSpeak.setField(2, totalLitres); int statusCode = ThingSpeak.writeFields(myChannelNumber, myWriteAPIKey); if (statusCode == 200) { Serial.println("Channel update successful."); } else { Serial.print("Problem updating channel. HTTP error code: "); Serial.println(statusCode); } } |
Working water Flow Monitoring with ESP8266
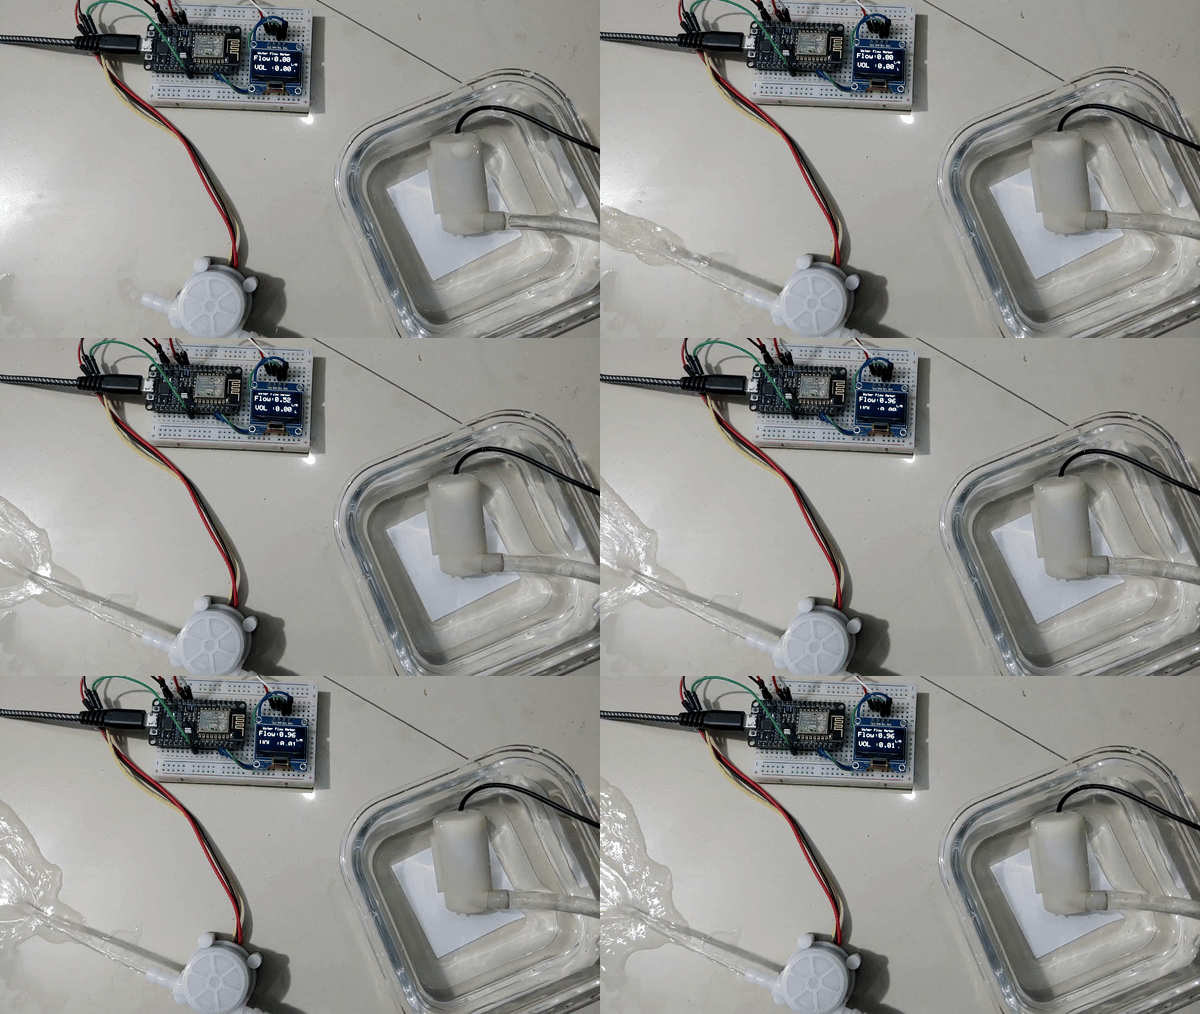
After uploading the code, the OLED Display will activate and display the flow rate and volume. Initially, the flow rate will be shown as 0 liters per minute (L/M), and the total volume displayed will be 0 liters (L).
Once the motor starts and the water flows, the OLED display will show the flow rate (F) and volume (V).
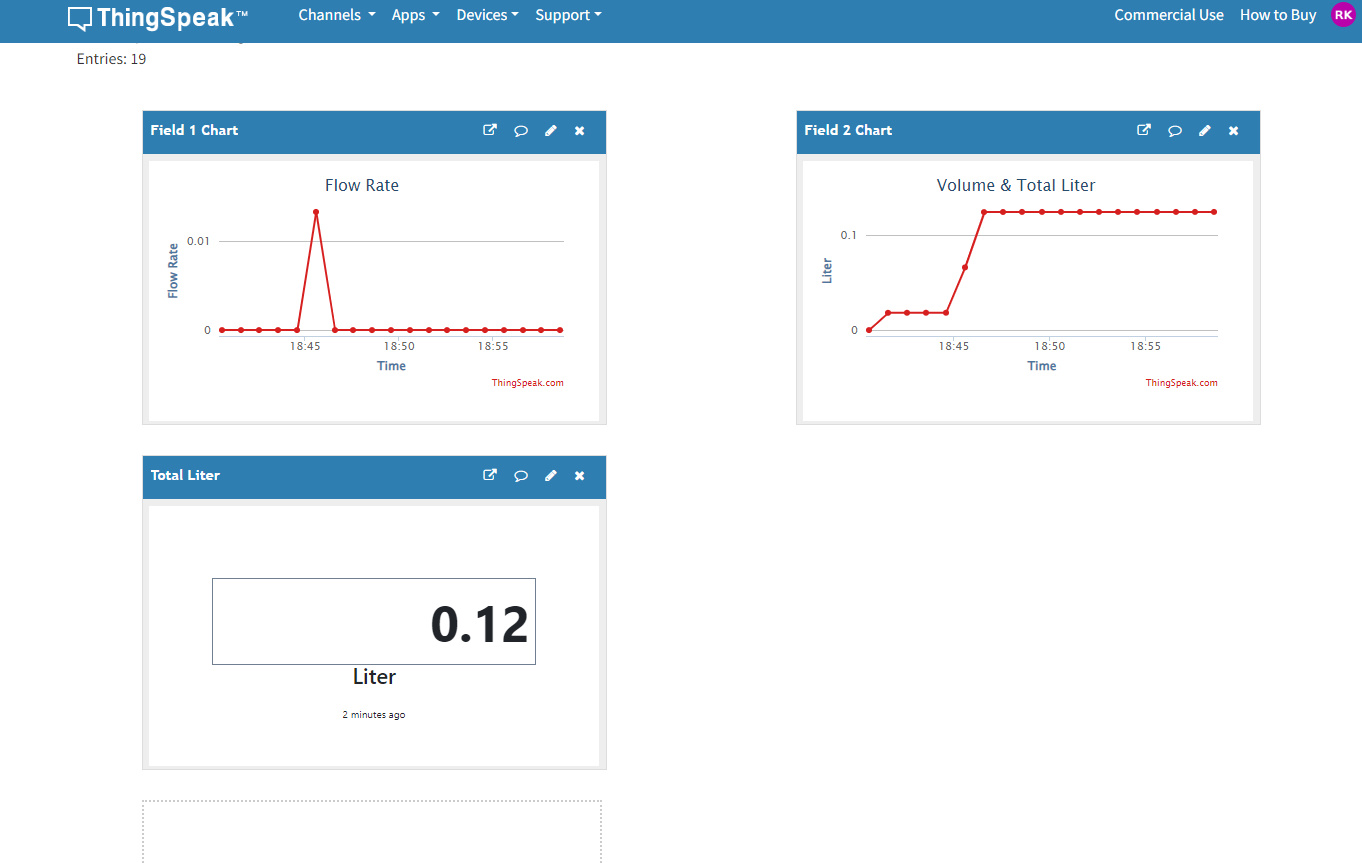
Now, you can easily monitor the water flow rate and volume data on the Thingspeak Server by visiting the Private View of the Thingspeak Dashboard
Working Video

