LoRa (Long Range) is a wireless communication technology that is excellent for Internet of Things applications, where battery-powered devices are required to send data to a main area. It allows long-range communication with low power consumption.
It is similar to Bluetooth but has a much faster connection. You can use LoRa radios to create LoRa applications that use data handlers and health monitoring platforms to collect data about your environment and system.
Here we will introduce you to LoRa communication technology and also demonstrate how to use LoRa with Arduino. By the end of this post, you will have full knowledge of how LoRa technology works and how to use it with Arduino to build your own IoT Projects including data collection, controlling devices, and monitoring sensors.
Required Material
To interface a LoRa module with Arduino, you will need the following components:
- Arduino board
- LoRa module (SX1278 or SX1276)
- Breadboard
- Jumper wires
- Antenna (for the LoRa module)
What is LoRa Communication
LoRa technology is a wireless communication technology that allows long-range communication with the lowest power consumption. The range is up to 10 kilometers in open spaces and much less when there are obstacles between the transmitter and the receiver.
It uses spread spectrum modulation techniques to send data over long distances without the need for a high-power transmission. LoRa is optimized for sending small packets of data and is often used in IoT applications such as sensors and devices.
The LoRa® modulation technique was created by a French startup called Cycleo in 2010. Two years later, in 2012, Semtech acquired Cycleo and took over the technology.
LoRa is a radio communication technology that is characterized by allowing transmission over extended ranges and low energy consumption. It is an excellent choice for use in IoT projects and embedded systems since its low energy consumption allows it to be powered only by batteries.
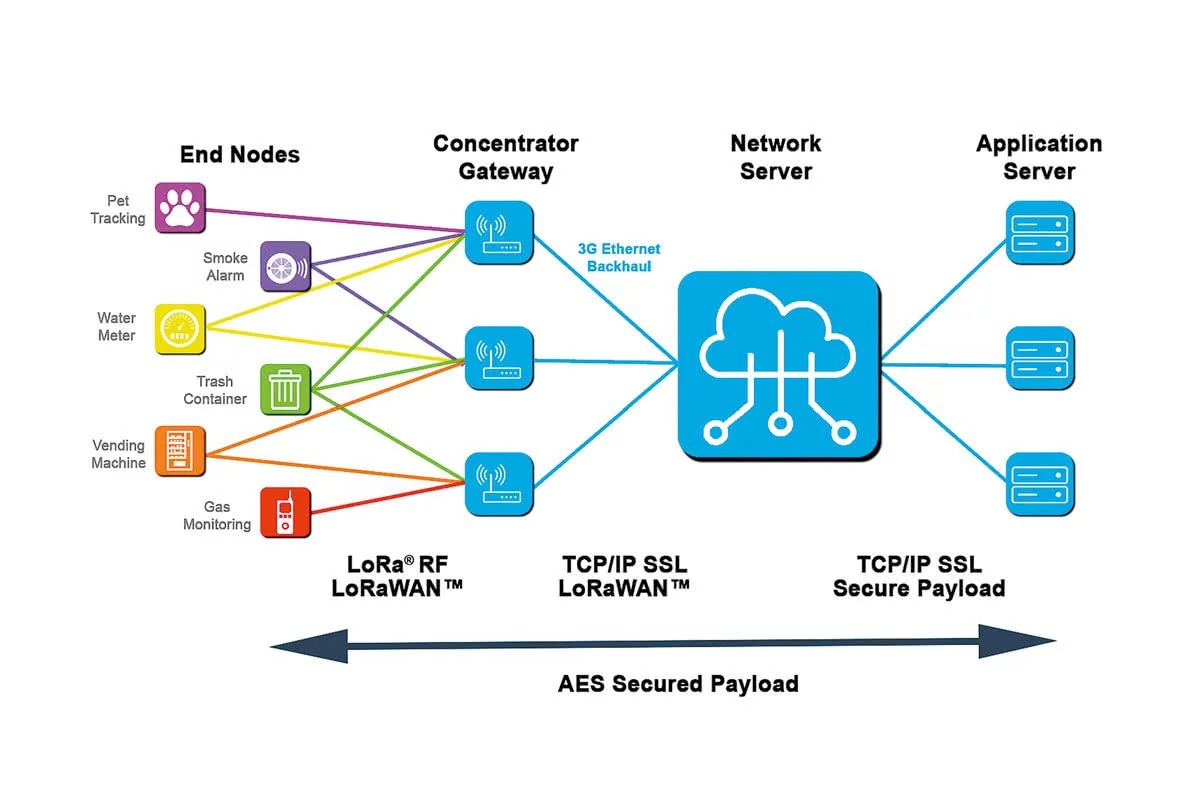
The following table shows some of the primary characteristics of the LoRa protocol.
| Feature | Description |
|---|---|
| Modulation | Chirp Spread Spectrum (CSS) |
| Frequency Bands | Sub-GHz bands (433 MHz, 868 MHz, 915 MHz) |
| Range | Up to 10 km in rural areas, 1-3 km in urban areas |
| Data Rate | 0.3 kbps – 50 kbps |
| Capacity | Can support thousands of devices in a single network |
| Battery Life | Can operate on a single battery for several years |
| Security | End-to-end AES encryption |
| Interference Immunity | Can operate in noisy RF environments |
| Network Topology | Supports star, mesh, and point-to-point topologies |
| Cost | Low-cost hardware and infrastructure |
LoRa® can work on three specific frequency bands that are reserved internationally for non-communication uses, known as ISM (Industrial, Scientific, and Medical) bands. These frequency bands are 433 MHz, 868 MHz, and 915 MHz, and they do not demand a license to use them.
Do you think if LoRa is so good, why don’t I use it instead of Wi-Fi to transfer my data?
While LoRa technology has many advantages, it is important to note that it is not a replacement for WiFi, and there are certain situations where WiFi may be a better option for sending data
- Speed: LoRa is optimized for low data rates and can transmit data at rates of up to a few hundred kilobits per second. Wi-Fi, in comparison, can transmit data at rates of several megabits per second, making it much faster.
- Range: LoRa is designed for long-range communication, but its range is limited by factors such as geography, buildings, and signals from other devices. Wi-Fi generally has a shorter range than LoRa, but it can be easily extended with the use of repeaters and access points.
- Compatibility: Wi-Fi is the most widely adopted standard for wireless networking, with most devices supporting it. LoRa, on the other hand, is a fairly new technology that may only be supported by a limited number of devices.
- Cost: LoRa technology is commonly used in devices and applications, the cost of LoRa modules and gateways may become more expensive if you need to cover a large range. for larger applications, it is advisable to flip sides to Wi-Fi.
The image below presents this well

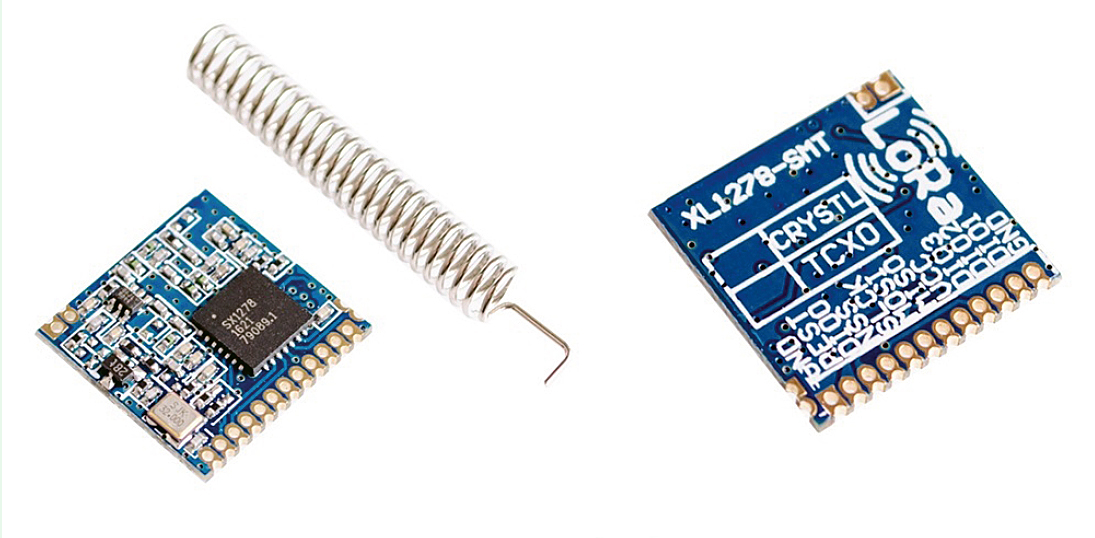
Semtech LoRa SX1278 Transceiver
LoRa is a wireless protocol developed by Semtech that uses chirp spread-spectrum (CSS) modulation to perform long-range communication with low power consumption. The CSS modulation technique involves sending signals that vary in frequency over time, which makes the signal resistant to interference and noise.
LoRa is a great application that requires long-range wireless communication with low power consumption.
SX1278 Pin Description
| Pin | Pin Name | Pin Description |
| 1 | GND | Ground (0 V) |
| 2 | D101 | Digital I/O |
| 3 | D102 | Digital I/O |
| 4 | D103 | Digital I/O |
| 5 | VCC | Power (3.6 V Maximum) |
| 6 | MISO | SPI Data Output |
| 7 | MOSI | SPI Data Input |
| 8 | SLCK | SPI Clock |
| 9 | NSS | SPI Chip Select |
| 10 | D100 | Digital I/O |
| 11 | REST | Reset |
| 12 | GND | Ground (0 V) |
| 13 | GND | Ground (0 V/ANT GND) |
| 14 | ANT | Antenna (50-Ω Impedance) |
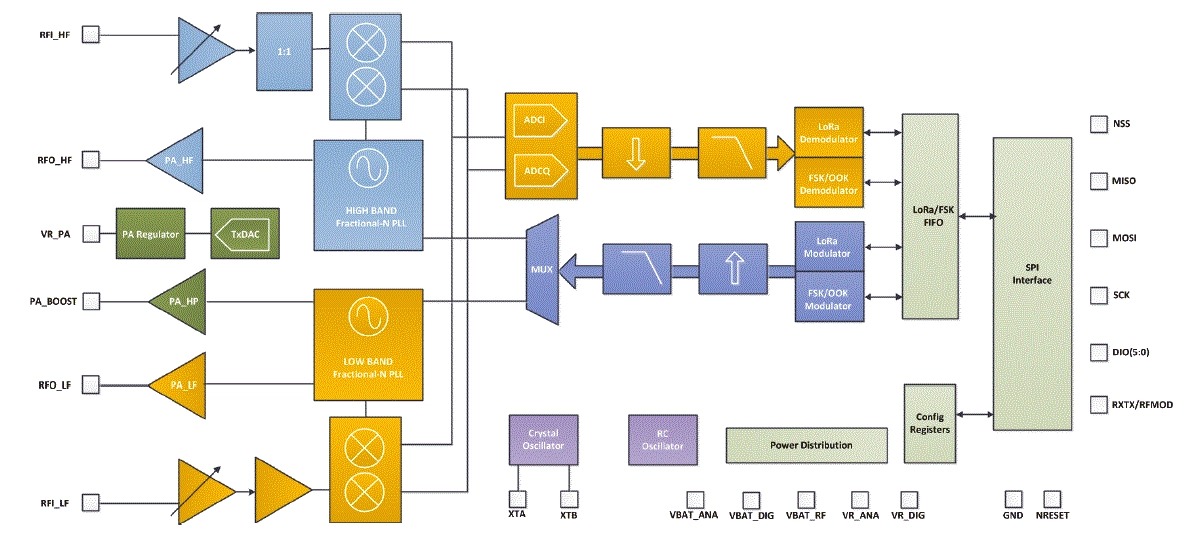
Block Diagram of SX1278 Chip
SX1278 Features
- LoRa Model
- Operating Voltage: 1.8-3.7v
- Operating Frequency: 433Mhz
- Half-Duplex SPI communication
- Modulation Technique FSK, GFSK, MSK, GMSK, LoRa
- Packet size: 256 byte
- Sensitivity: -148db
SX1278 LoRa breakout module
The SX1278 LoRa module is a wireless transceiver module that operates on the Long Range (LoRa) Communication process. This specific model operates at the 433MHz frequency & the module uses SX1278 IC which is designed to deliver low-power, long-range wireless communication.
The SX1278 has a decent sensitivity of –148 dBm with a calm power output of +20 dBm and a long transmission distance. the module communicates with the microcontroller through an SPI interface, allowing for easy-to-connect.
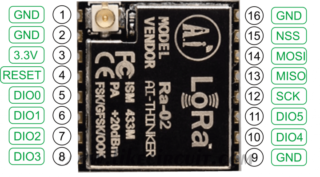
LoRa SX1278 Pinout
- GND: Ground pin
- VCC: Power supply pin (1.8-3.7v)
- MOSI: Master Out Slave In pin for SPI interface
- MISO: Master In Slave Out pin for SPI interface
- SCK: Clock pin for SPI interface
- NSS: Slave Select pin for SPI interface
- DIO0-DIO5: Digital Input Output pins for LoRa data transmission and reception
- RESET: Reset the pin for the SX1278 chip
- CLK: Clock pin for the SX1278 chip
- ANT: Antenna pin for transmitting and receiving signals
Features of SX1278 LoRa Module
- LoRa Spread Spectrum modulation technology
- Supports FSK, GFSK, MSK, GMSK, LoRa, and OOK modulation methods
- Constant RF power output at + 20dBm-100mW voltage change
- Half-duplex SPI communication
- Automatic RF signal detection
- CAD mode, and very high-speed AFC
- Packet engine with CRC up to 256 bytes
Specifications of SX1278 LoRa
- Frequency range: 433MHz
- Sensitivity: -148dBm
- Output power: up to 20dBm (100mW)
- Modulation: LoRa
- Modulation bandwidth: 125kHz, 250kHz, 500kHz
- Spreading factor: 6 to 12
- Maximum data rate: 300kbps
- Operating voltage: 1.8~3.6V DC
- Current consumption: 120mA (transmission), 15mA (receive), 1.5uA (sleep mode)
- Interface: SPI
- Dimensions: 16mm x 16mm
Application of SX1278 LoRa module
- Internet of Things (IoT)applications
- Wireless sensor networks
- Smart agriculture and farming
- Asset tracking
- Industrial monitoring
- Smart city applications,
- Home automation
- Security systems
- Environmental monitoring
LoRa frequency bands by country
LoRa operates in specific frequency bands, which are available for unlicensed use in different regions around the world. The frequency bands and maximum power levels authorized for LoRa transmissions by region. It’s important to verify suitable rules before using LoRa devices.
| Country | LoRa Frequency Band |
|---|---|
| United States | 902 – 928 MHz |
| Canada | 915 MHz |
| Mexico | 902 – 928 MHz |
| Brazil | 902 – 904 MHz and 915 – 928 MHz |
| European Union | 863 – 870 MHz |
| Russia | 864 – 870 MHz and 868 – 869 MHz |
| India | 865 – 867 MHz |
| China | 433 MHz, 470 – 510 MHz, 779 – 787 MHz, and 470 – 510 MHz |
| Japan | 920 – 928 MHz |
| South Korea | 920 – 923 MHz |
| Australia | 915 – 928 MHz |
| New Zealand | 915 – 928 MHz |
Accordingly, it’s always recommended to check the local laws before using LoRa devices.
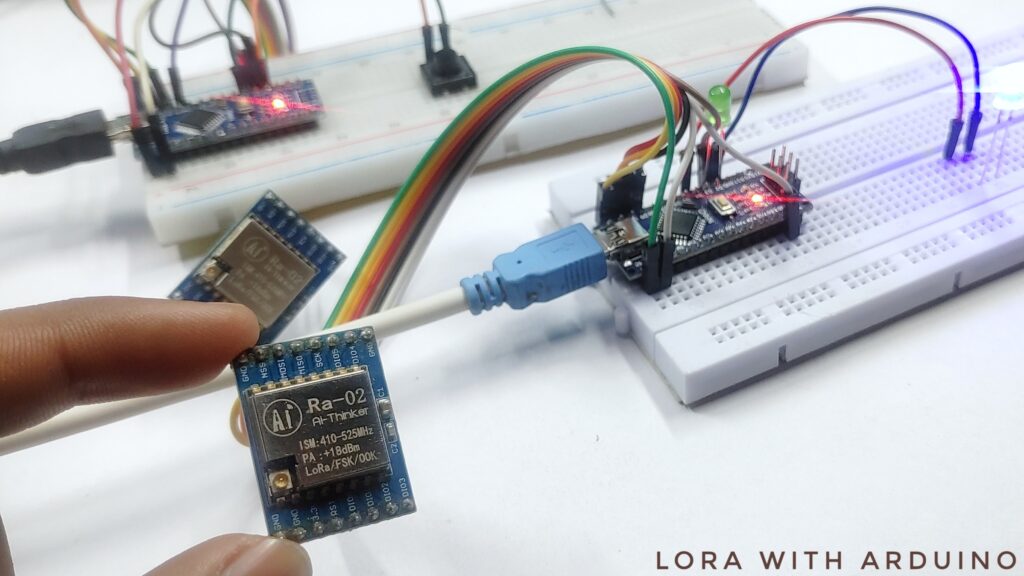
The LoRa module that I am currently using is the SX1278 Ra-02, which operates on the 433MHz frequency. However, as a resident of India, I am familiar with the unlicensed frequency range approved for use here band between 865MHz to 867MHz. ,
I am not allowed to use the 433MHz frequency module, such as the SX1278 Ra-02 module that I am currently using, for a short period unless it is for educational purposes.
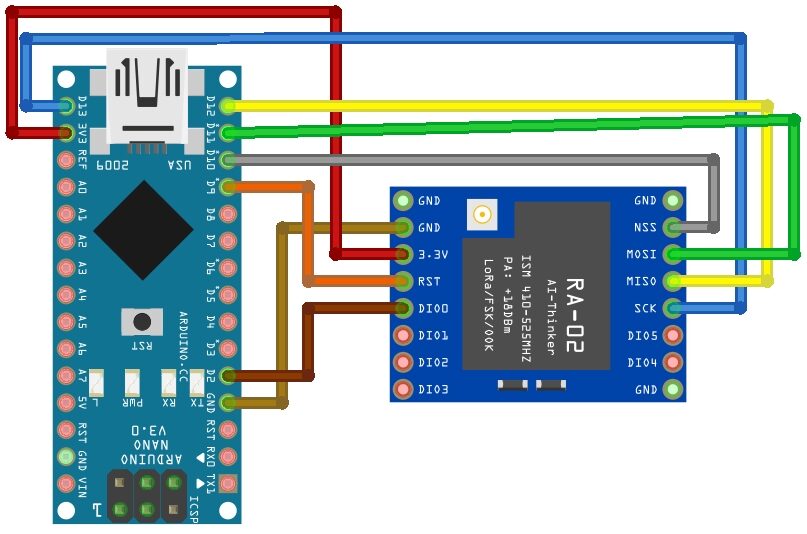
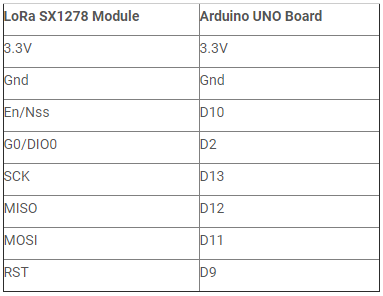
Interfacing SX1278 LoRa With Arduino
The SX1278 LoRa module can be connected to the Arduino using the following pins:
Code & Library for LoRa Module
Install the LoRa Arduino library
To use the SX1278 LoRa module With Arduino, you will need to download the LoRa library first. You can download the library from this link: https://github.com/sandeepmistry/arduino-LoRa, then extract the downloaded file to the libraries folder of your Arduino IDE.
Source Code for Transmitter & Receiver
Transmitter Example Code
|
1 2 3 4 5 6 7 8 9 10 11 12 13 14 15 16 17 18 19 20 21 22 23 24 25 26 27 28 29 30 31 32 33 34 |
#include <SPI.h> #include <LoRa.h> int counter = 0; void setup() { Serial.begin(9600); while (!Serial); Serial.println("LoRa Sender"); if (!LoRa.begin(433E6)) { Serial.println("Starting LoRa failed!"); while (1); } LoRa.setTxPower(20); } void loop() { Serial.print("Sending packet: "); Serial.println(counter); // send packet LoRa.beginPacket(); LoRa.print("hello "); LoRa.print(counter); LoRa.endPacket(); counter++; delay(5000); } |
Receiver Example Code
|
1 2 3 4 5 6 7 8 9 10 11 12 13 14 15 16 17 18 19 20 21 22 23 24 25 26 27 28 29 30 31 32 33 34 35 36 37 38 39 40 41 42 43 44 45 46 47 48 49 50 51 52 53 54 55 |
#include <LoRa.h> void setup() { Serial.begin(9600); while (!Serial); Serial.println("LoRa Receiver"); if (!LoRa.begin(433E6)) { Serial.println("Starting LoRa failed!"); while (1); } } void loop() { // try to parse packet int packetSize = LoRa.parsePacket(); if (packetSize) { // received a packet Serial.print("Received packet '"); // read packet while (LoRa.available()) { Serial.print((char)LoRa.read()); } // print RSSI of packet Serial.print("' with RSSI "); Serial.println(LoRa.packetRssi()); } } |
Control LED Using SX1278 LoRa Module With Arduino
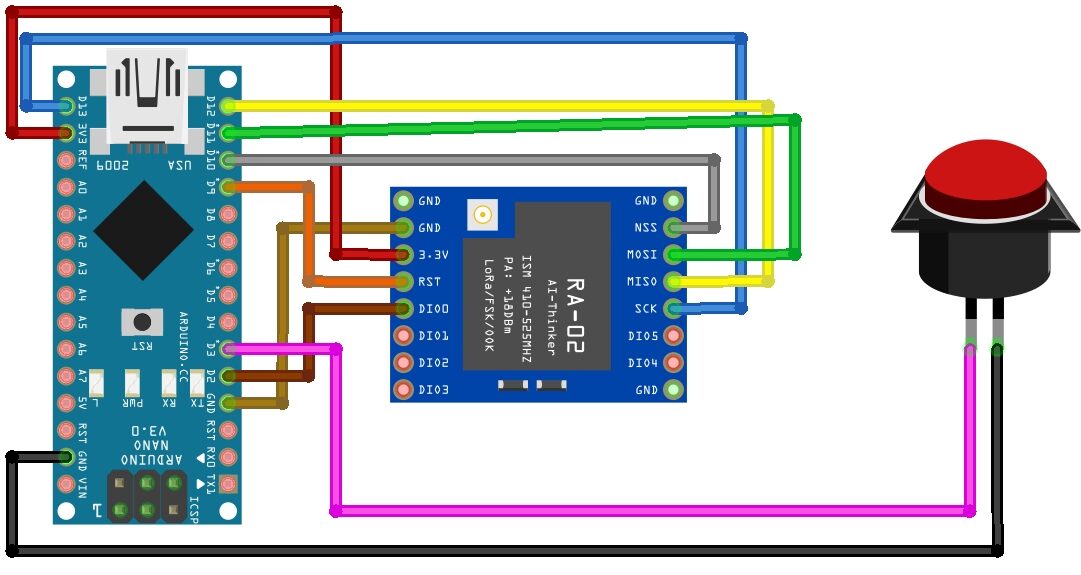
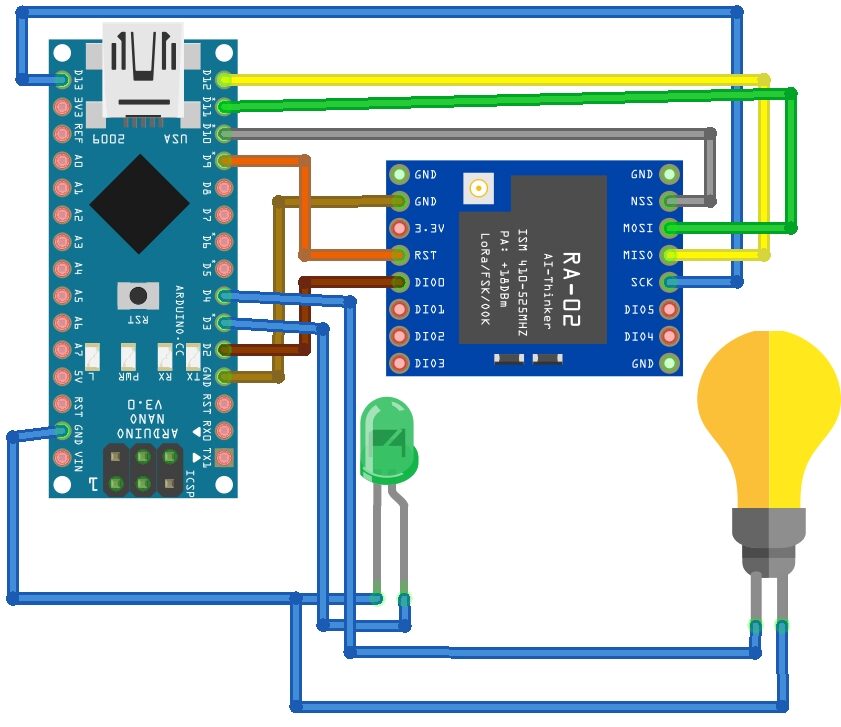
To control the LED using the SX1278 LoRa module, First, connect an LED and button to the Arduino
Transmitter Wiring Diagram Using Sx1278 Lora
LoRa –> Arduino
- GND to GND
- VCC to 3.3V
- MOSI to pin 11
- MISO to pin 12
- SCK to pin 13
- NSS to pin 10
- DIO0 to pin 2
- RST to pin 9
Switch –> Arduino
- GND –> GND
- Out –> 3
Receiver Wiring Diagram Using Sx1278 Lora
LoRa Module –> Arduino
- GND to GND
- VCC to 3.3V
- MOSI to pin 11
- MISO to pin 12
- SCK to pin 13
- NSS to pin 10
- DIO0 to pin 2
- RST to pin 9
Signal Green LED–> Arduino
- Negative Terminal –> GND
- Positive Terminal –> 3
Bulb –> Arduino
- GND –> GND
- VCC –> 4
LoRa Arduino code
Sx1278 Lora Transmitter Code
|
1 2 3 4 5 6 7 8 9 10 11 12 13 14 15 16 17 18 19 20 21 22 23 24 25 26 27 28 29 30 31 32 33 34 35 36 37 38 39 40 41 42 43 44 45 46 47 48 49 50 51 52 53 54 55 56 57 58 59 60 61 62 63 64 65 66 67 68 69 70 71 72 73 74 75 76 77 78 79 80 81 82 83 84 85 86 87 88 89 90 91 92 93 94 95 96 97 98 99 100 101 102 103 104 |
#include <LoRa.h> //int pot = A0; const int SW1 = 3; int SyncWord = 0x22; void setup() { Serial.begin(9600); pinMode(SW1,INPUT_PULLUP); cli(); //stop interrupts //set timer1 interrupt at 1Hz = 1sec TCCR1A = 0; // set entire TCCR1A register to 0 TCCR1B = 0; // same for TCCR1B TCNT1 = 0; // initialize counter value to 0 // set compare match register for 1hz increments OCR1A = 15624; // = (16*10^6) / (1*1024) - 1 (must be <65536) TCCR1B |= (1 << WGM12); // turn on CTC mode TCCR1B |= (1 << CS12) | (1 << CS10); // Set CS10 and CS12 bits for 1024 prescaler TIMSK1 |= (1 << OCIE1A); // enable timer compare interrupt sei(); //allow interrupts while (!Serial); Serial.println("LoRa Sender"); if (!LoRa.begin(433E6)) { // or 915E6, the MHz speed of yout module Serial.println("Starting LoRa failed!"); while (1); } LoRa.setSpreadingFactor(12); // ranges from 6-12,default 7 see API docs LoRa.setSignalBandwidth(62.5E3 ); // for -139dB (page - 112) LoRa.setCodingRate4(8); // for -139dB (page - 112) LoRa.setSyncWord(SyncWord); /* Serial.print("current spreading factor : "); Serial.println(LoRa.getSpreadingFactor()); Serial.print("current bandwidth : "); Serial.println(LoRa.getSignalBandwidth()); Serial.println("LoRa init succeeded."); */ } int priviousSwitchValue1 = 1; int liveSwitchValue1 = 0; bool switchPressFlag1 = false; bool gLedPin = 0; int data = 1; void loop() { //static int data = 1; liveSwitchValue1 = digitalRead(SW1); if( (liveSwitchValue1 == 0) and (switchPressFlag1 == false) ) { delay(50); data = 11; Serial.println("11"); switchPressFlag1 = true; priviousSwitchValue1 = !priviousSwitchValue1; LoRa.beginPacket(); LoRa.print(data); LoRa.endPacket(); } if( (liveSwitchValue1 == 1) and (switchPressFlag1 == true) ) { delay(50); data = 22; Serial.println("22"); switchPressFlag1 = false; LoRa.beginPacket(); LoRa.print(data); LoRa.endPacket(); } if(gLedPin == 1) { data = 55; Serial.println("55"); gLedPin = 0; LoRa.beginPacket(); LoRa.print(data); LoRa.endPacket(); } // LoRa.beginPacket(); // LoRa.print(data); // LoRa.endPacket(); } ISR(TIMER1_COMPA_vect){//timer1 interrupt 1Hz toggles pin 13 (LED) //generates pulse wave of frequency 1Hz/2 = 0.5kHz (takes two cycles for full wave- toggle high then toggle low) static volatile int ledFlag = 0; if(++ledFlag >= 5) { gLedPin = 1; ledFlag = 0; } } |
Sx1278 Lora Receiver Code
|
1 2 3 4 5 6 7 8 9 10 11 12 13 14 15 16 17 18 19 20 21 22 23 24 25 26 27 28 29 30 31 32 33 34 35 36 37 38 39 40 41 42 43 44 45 46 47 48 49 50 51 52 53 54 55 56 57 58 59 60 61 62 63 64 65 66 67 68 69 70 71 72 73 74 75 76 77 78 79 |
#include <LoRa.h> const int Signal_LED = 3; // indicator LED const int LED = 4; // relay 1 String inString = ""; // string to hold input int val = 0; int SyncWord = 0x22; void setup() { Serial.begin(9600); pinMode(Signal_LED,OUTPUT); pinMode(LED,OUTPUT); digitalWrite(Signal_LED , LOW); digitalWrite(LED , HIGH); while (!Serial); Serial.println("LoRa Receiver"); if (!LoRa.begin(433E6)) { // or 915E6 Serial.println("Starting LoRa failed!"); while (1); } LoRa.setSpreadingFactor(12); // ranges from 6-12,default 7 see API docs LoRa.setSignalBandwidth(62.5E3); // for -139dB (page - 112) LoRa.setCodingRate4(8); // for -139dB (page - 112) LoRa.setSyncWord(SyncWord); // ranges from 0-0xFF, default 0x12, see API docs /* Serial.print("current spreading factor : "); Serial.println(LoRa.getSpreadingFactor()); Serial.print("current bandwidth : "); Serial.println(LoRa.getSignalBandwidth()); Serial.println("LoRa init succeeded."); */ } bool i=0; int priviousValue = 0; int liveValue = 0; void loop() { // try to parse packet int packetSize = LoRa.parsePacket(); if (packetSize) { // read packet while (LoRa.available()) { int inChar = LoRa.read(); inString += (char)inChar; val = inString.toInt(); digitalWrite(Signal_LED , HIGH); delay(10); digitalWrite(Signal_LED , LOW); delay(10); } inString = ""; LoRa.packetRssi(); } Serial.println(val); liveValue = val; if(priviousValue != liveValue) { priviousValue = liveValue; if(val == 11) { digitalWrite(LED , LOW); } if(val == 22) { digitalWrite(LED , HIGH); } } delay(50); } |
Conclusion – SX1278 LoRA With Arduino
In conclusion, the SX1278 LoRa module is a perfect choice for long-range wireless communication tasks that require low power consumption and high data rates.

