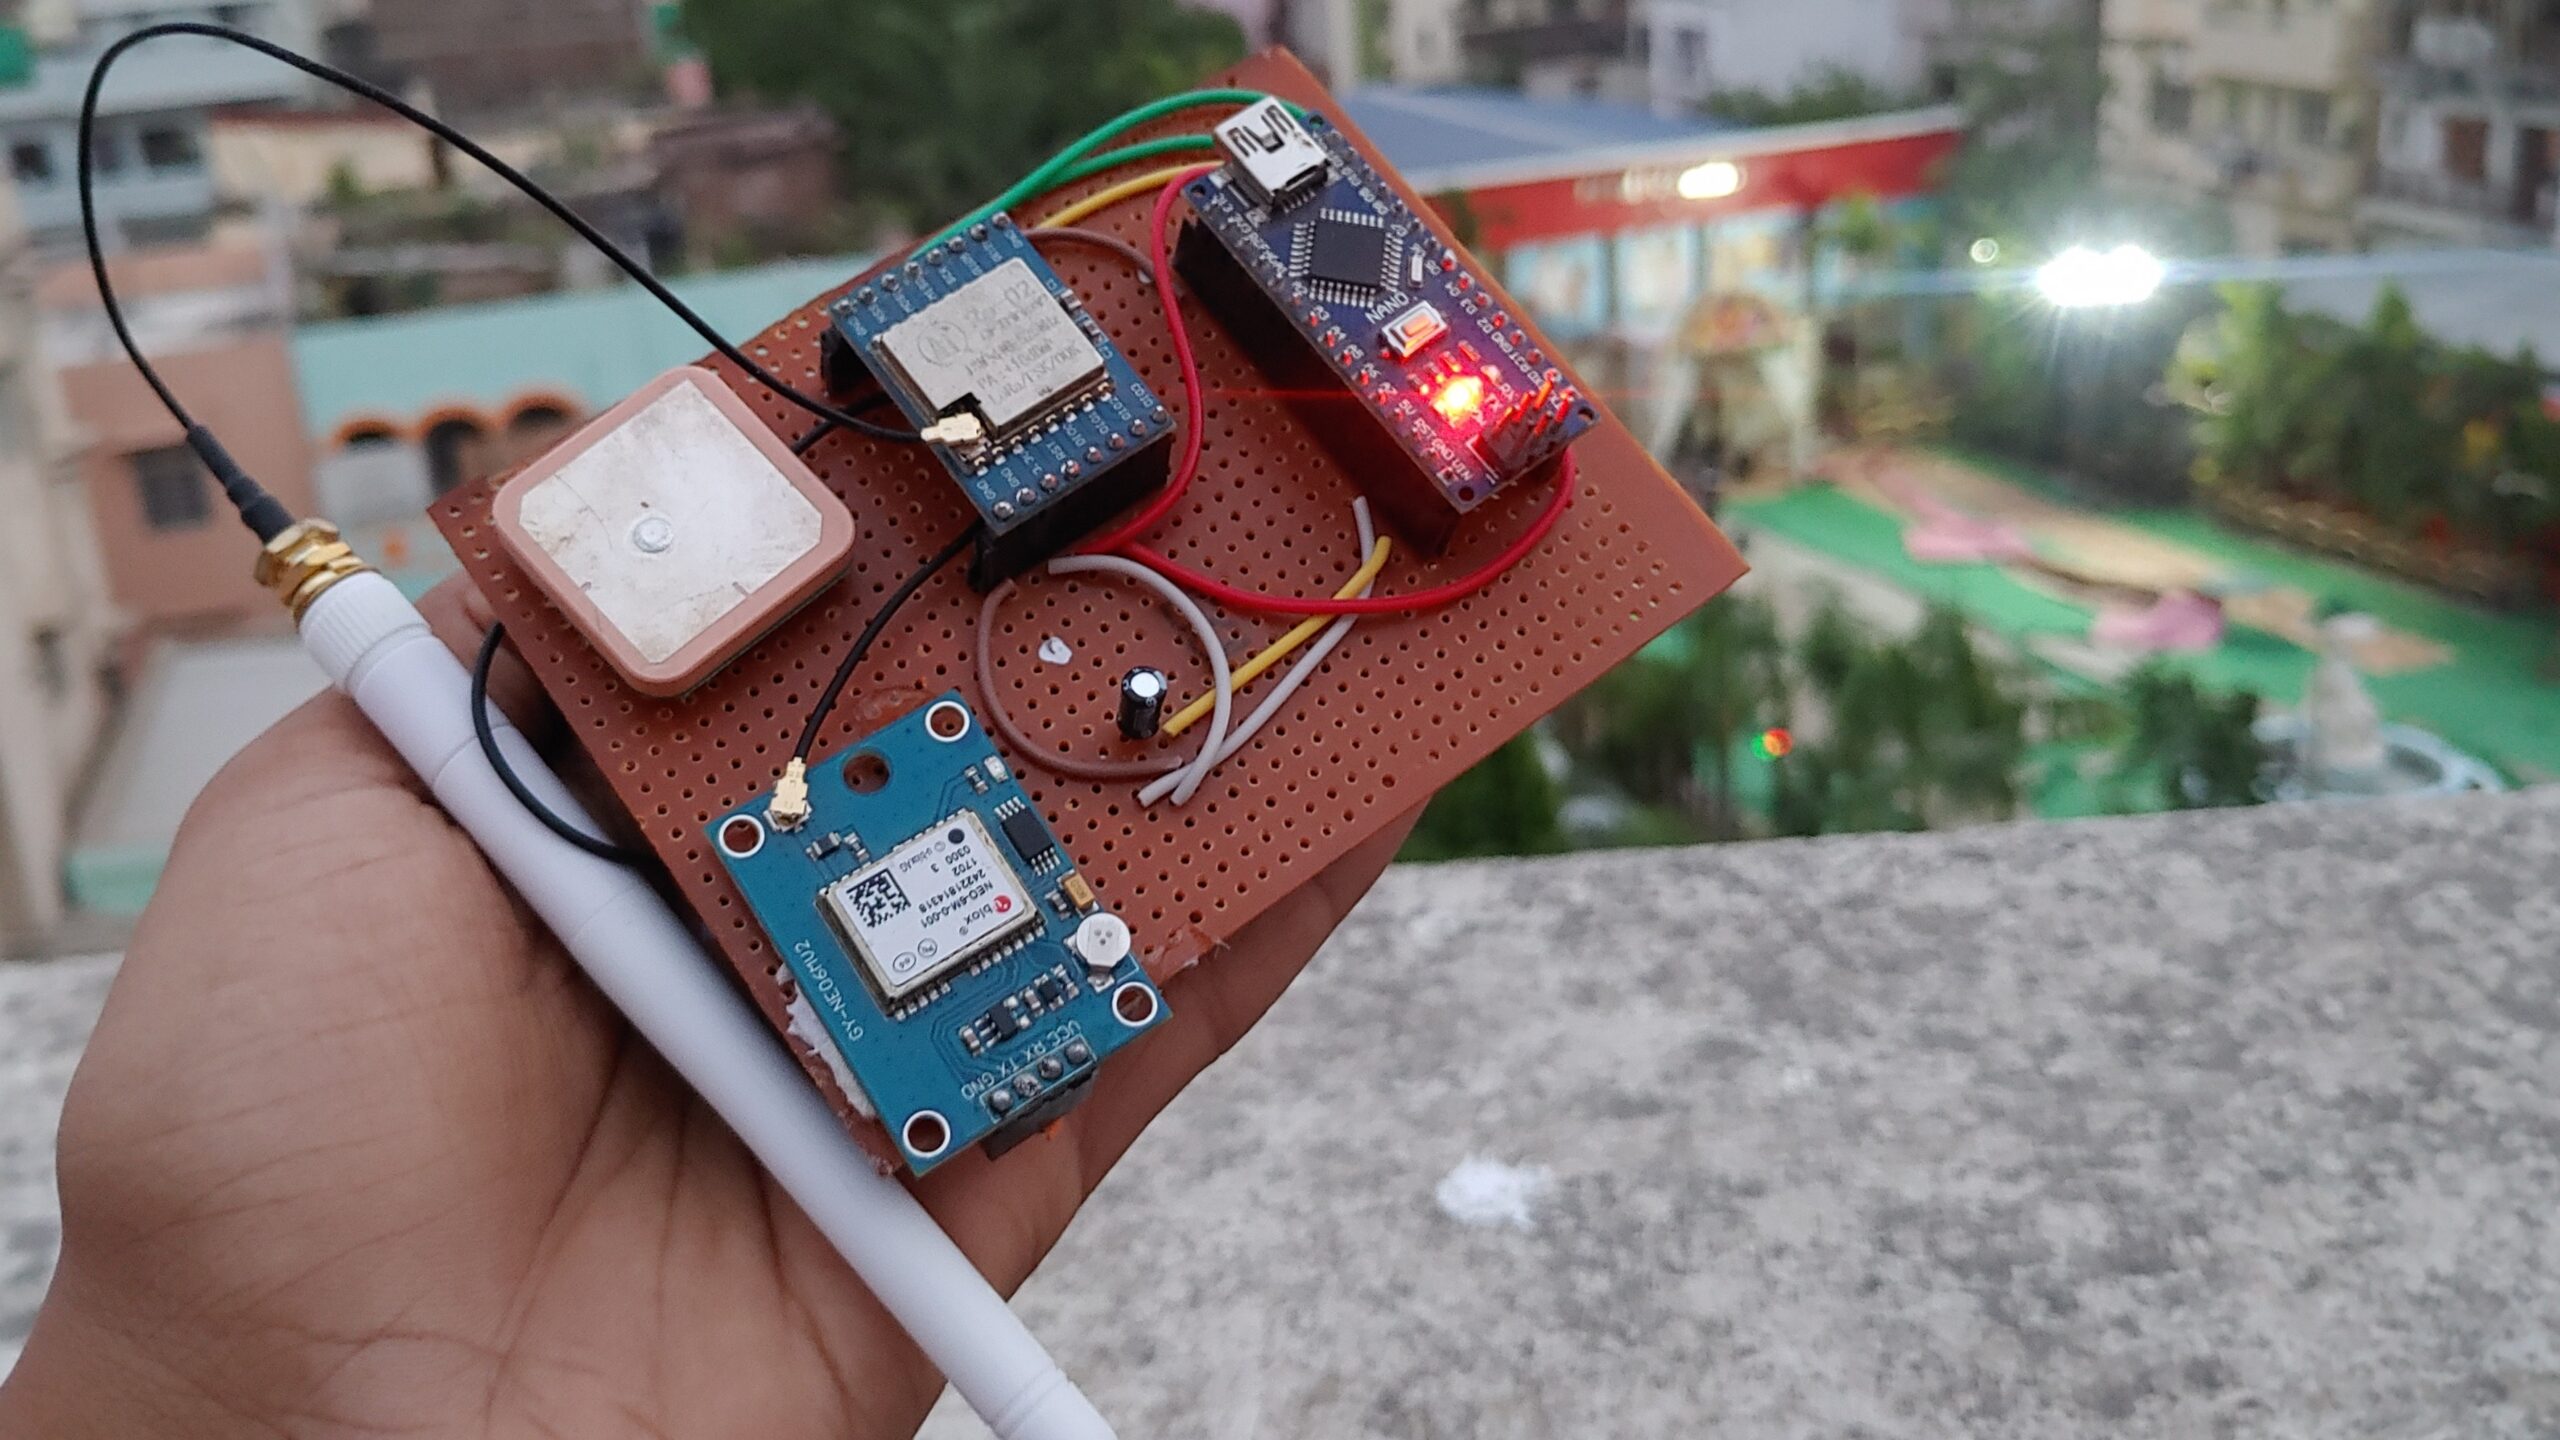
Hi there in this tutorial I’ll show you how to build LoRa Based IoT Geo-Fencing Using Arduino, GPS, and ESP32. We’ve built a simple tracking monitoring solution, We use a geofencing system, which creates a virtual boundary. If a pet crosses this boundary, the system sends a message to the owner. We’ll be using simple components like GPS, Arduino, and ESP32 for communication, we use LoRa technology.
Geo-fence is a virtual boundary on a map created using GPS or RFID technology. It makes software and hardware to react when device enters or leaves a specific area.
Example – When your pet leaves the safe zone, it sends a text to the webserver. This way, you’ll know right away if your pet crosses a certain boundary.
Creating geofencing systems which is easy to do and has many uses. With this device, we’ll set a starting point and a distance limit. When the device moves too far, the ESP32 sends a message to the webserver to let them know it crossed the set distance.
Required material
- ESP32
- Arduino
- SX1278 LoRa Module
- GPS Module
- Wires
- Breadboard or ZeroBoard
What is Geofencing?
Geofence is a virtual fence border drawn around a point by a GPS tracking system. Once it is set up, it triggers alerts or actions when something enters or leaves the area. For example, you can receive notifications when a vehicle crosses into or out of the zone. Geofences can be any shape or size, like circles, rectangles, or irregular shapes.
Geofencing is a powerful technology with many uses in the current world. It’s easy to track cars, find packages, and much more.
Here are some common applications of Geofencing:
- Tracking livestock and different animals
- Monitoring prisoners or people on house arrest
- Protecting valuable items
- Keeping an eye on kids
- Tracking rental cars
Developing a circular Geofence is simple. We define the circle’s center using the initial latitude and longitude values. Then, we compare these coordinates with those received from the GPS module.
Once the distance is calculated, we compare it with the pre-defined distance value. If the calculated distance overreaches this value, it indicates that the object has moved outside the Geofence. At this point, you can decide what action you want the controller board to take.
LoRa Technology
LoRa, known for its long-distance communication and low power consumption, is the primary part. Using an Arduino and GPS module, we transmit location data over long distances using LoRa communication.
This data is received by the LoRa module combined with ESP32, which processes it and checks if it’s within a user-defined virtual boundary.
In our project, we’re making a circular fence with a 50-meter radius around a certain spot. If the GPS shows coordinates outside this fence, a LoRa transmitter tells another ESP32 LoRa receiver, which then sends data to the web server.
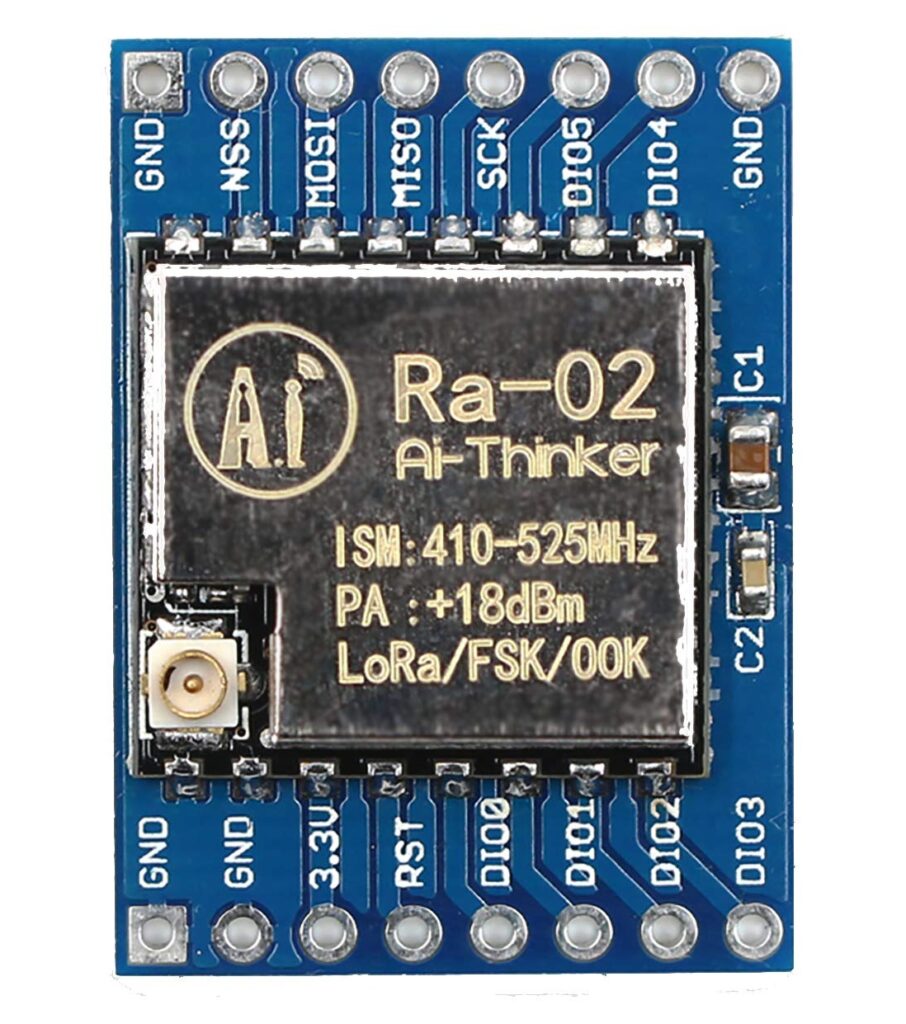
SX1276 LoRa module
Since we’re using LoRa Technology for our project, we opted for the widely-used SX1276 LoRa module. In Europe and some other regions, LoRa operates at 868MHz, while in the USA & Canada, it’s 915MHz, and in Asia, it’s often 433MHz.
As we’re in India, we chose the SX1278 module, which supports 433MHz frequencies. This chip, made by Semtech Corporation, is popular for its long-range and low-power capabilities, making it perfect for IoT devices like ours.
This project uses SX1278 LoRa modules for both the transmitter and receiver. The SX1278 LoRa module combines the Semtech RF transceiver chip SX1278, using LoRa™ Spread Spectrum modulation With its long-distance capabilities and high sensitivity (-139dBm).
This module operates at 100mW power and is ultra-compact in size, making it useful in areas such as Automatic Meter Reading (AMR) and remote industrial control fields.
Home Automation Using Arduino and LoRa Technology
LoRa-Based Smart Agriculture and Remote Monitoring System
Features:
- Long-range communication with LoRa Spread Spectrum Modulation
- Consistent RF power output despite voltage changes
- Bidirectional communication via Half-Duplex SPI
- Supports multiple modulation modes: FSK, GFSK, MSK, GMSK, LoRa, and OOK
- Automatic signal detection and high-speed AFC
- Packet engine with CRC for data integrity
- Compact design with shielded housing and spring antenna
Specifications:
- Communication Distance: Up to 15km
- Sensitivity: -148dBm
- Programmable Bit Rates: Up to 300kbps
- RSSI Dynamic Range: 127dB
- Wireless Frequency: 433MHz
- Working Voltage: 1.8V – 3.7V
- Working Temperature: -40°C to +80°C
Applications:
- Remote control
- Industrial control
- Home security alarm
- Home automation remote sensing
- Sensor network
- Health monitoring
- Tag reading and writing
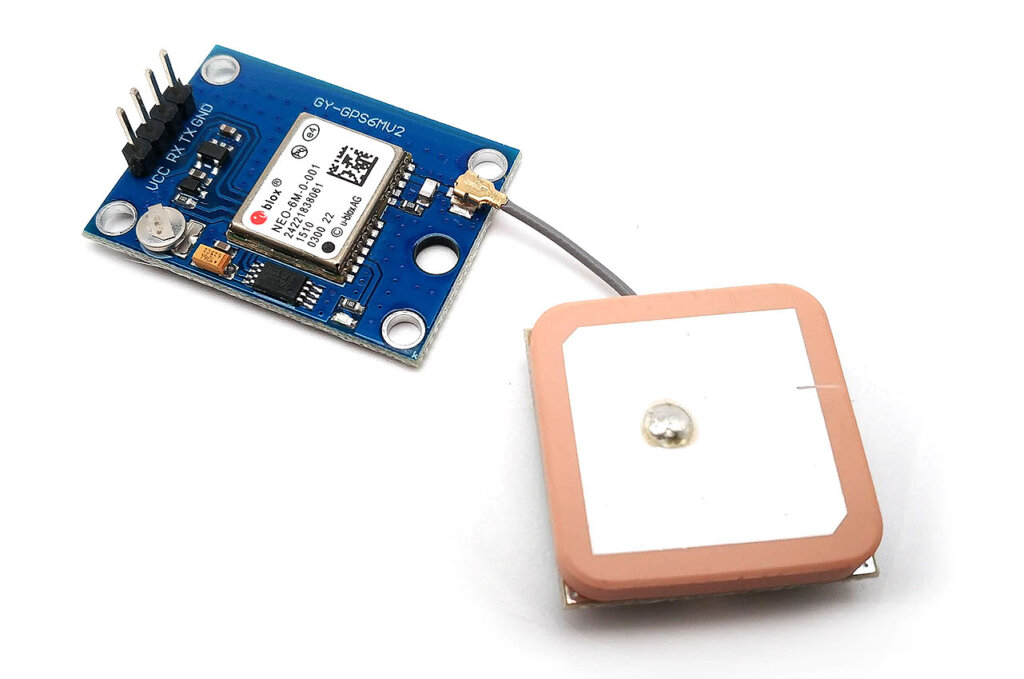
Neo 6M GPS Module
The Neo 6M GPS Module provides accurate location and time information worldwide, allowing navigation in different vehicles and applications. It uses satellite signals to choose Longitude and Latitude coordinates accurately. Check our previous post-NEO-6 M GPS Module with Arduino | Tutorial, Raspberry Pi Pico GPS Tracker Using NEO-6M & OLED Display
Circuit Diagram – ESP32 LoRa GPS Based IoT Geo-Fencing Arduino
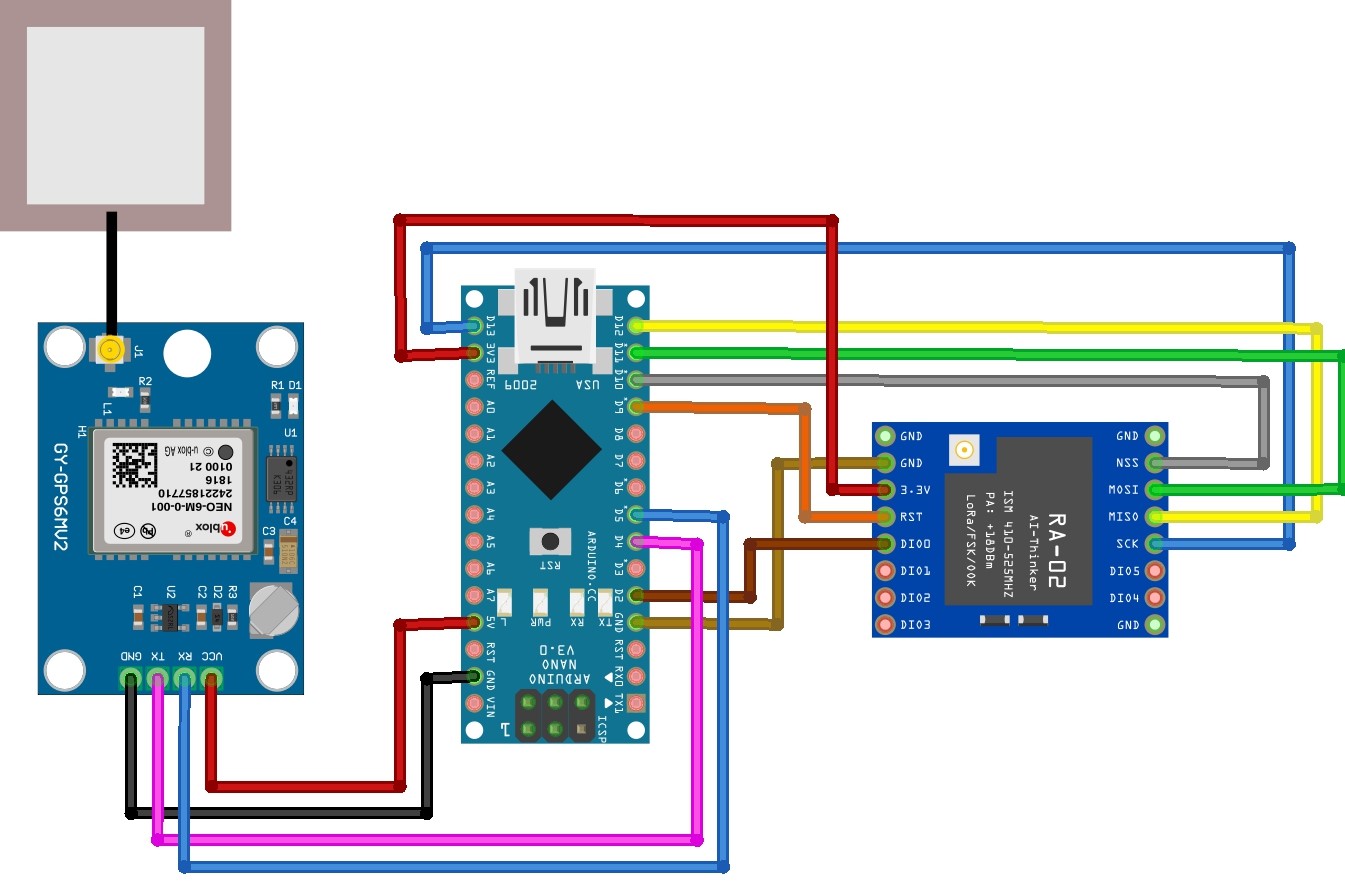
Here’s the circuit diagram for the LoRa transmitter (Server) and receiver (Client) sections. We’re transmitting GPS data from the Arduino Nano through the LoRa SX1278 module.
LoRa Geo-Fencing Sender Circuit
On the transmitting side, we use Arduino with the LoRa module and GPS Module. The circuit diagram for the same is shown below.
|
LoRa SX1278 Module |
Arduino Nano Board |
|
3.3V |
3.3V |
|
GND |
GND |
|
En/Nss |
D10 |
|
G0/DIO0 |
D2 |
|
SCK |
D13 |
|
MISO |
D12 |
|
MOSI |
D11 |
|
RST |
D9 |
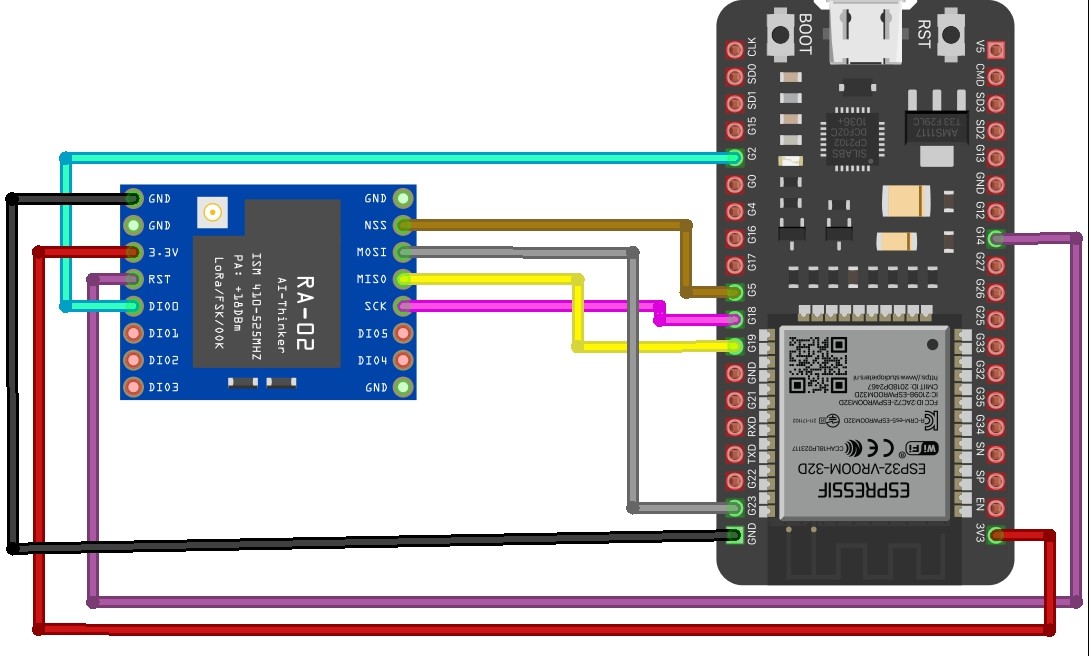
LoRa Geo-Fencing Receiver Circuit
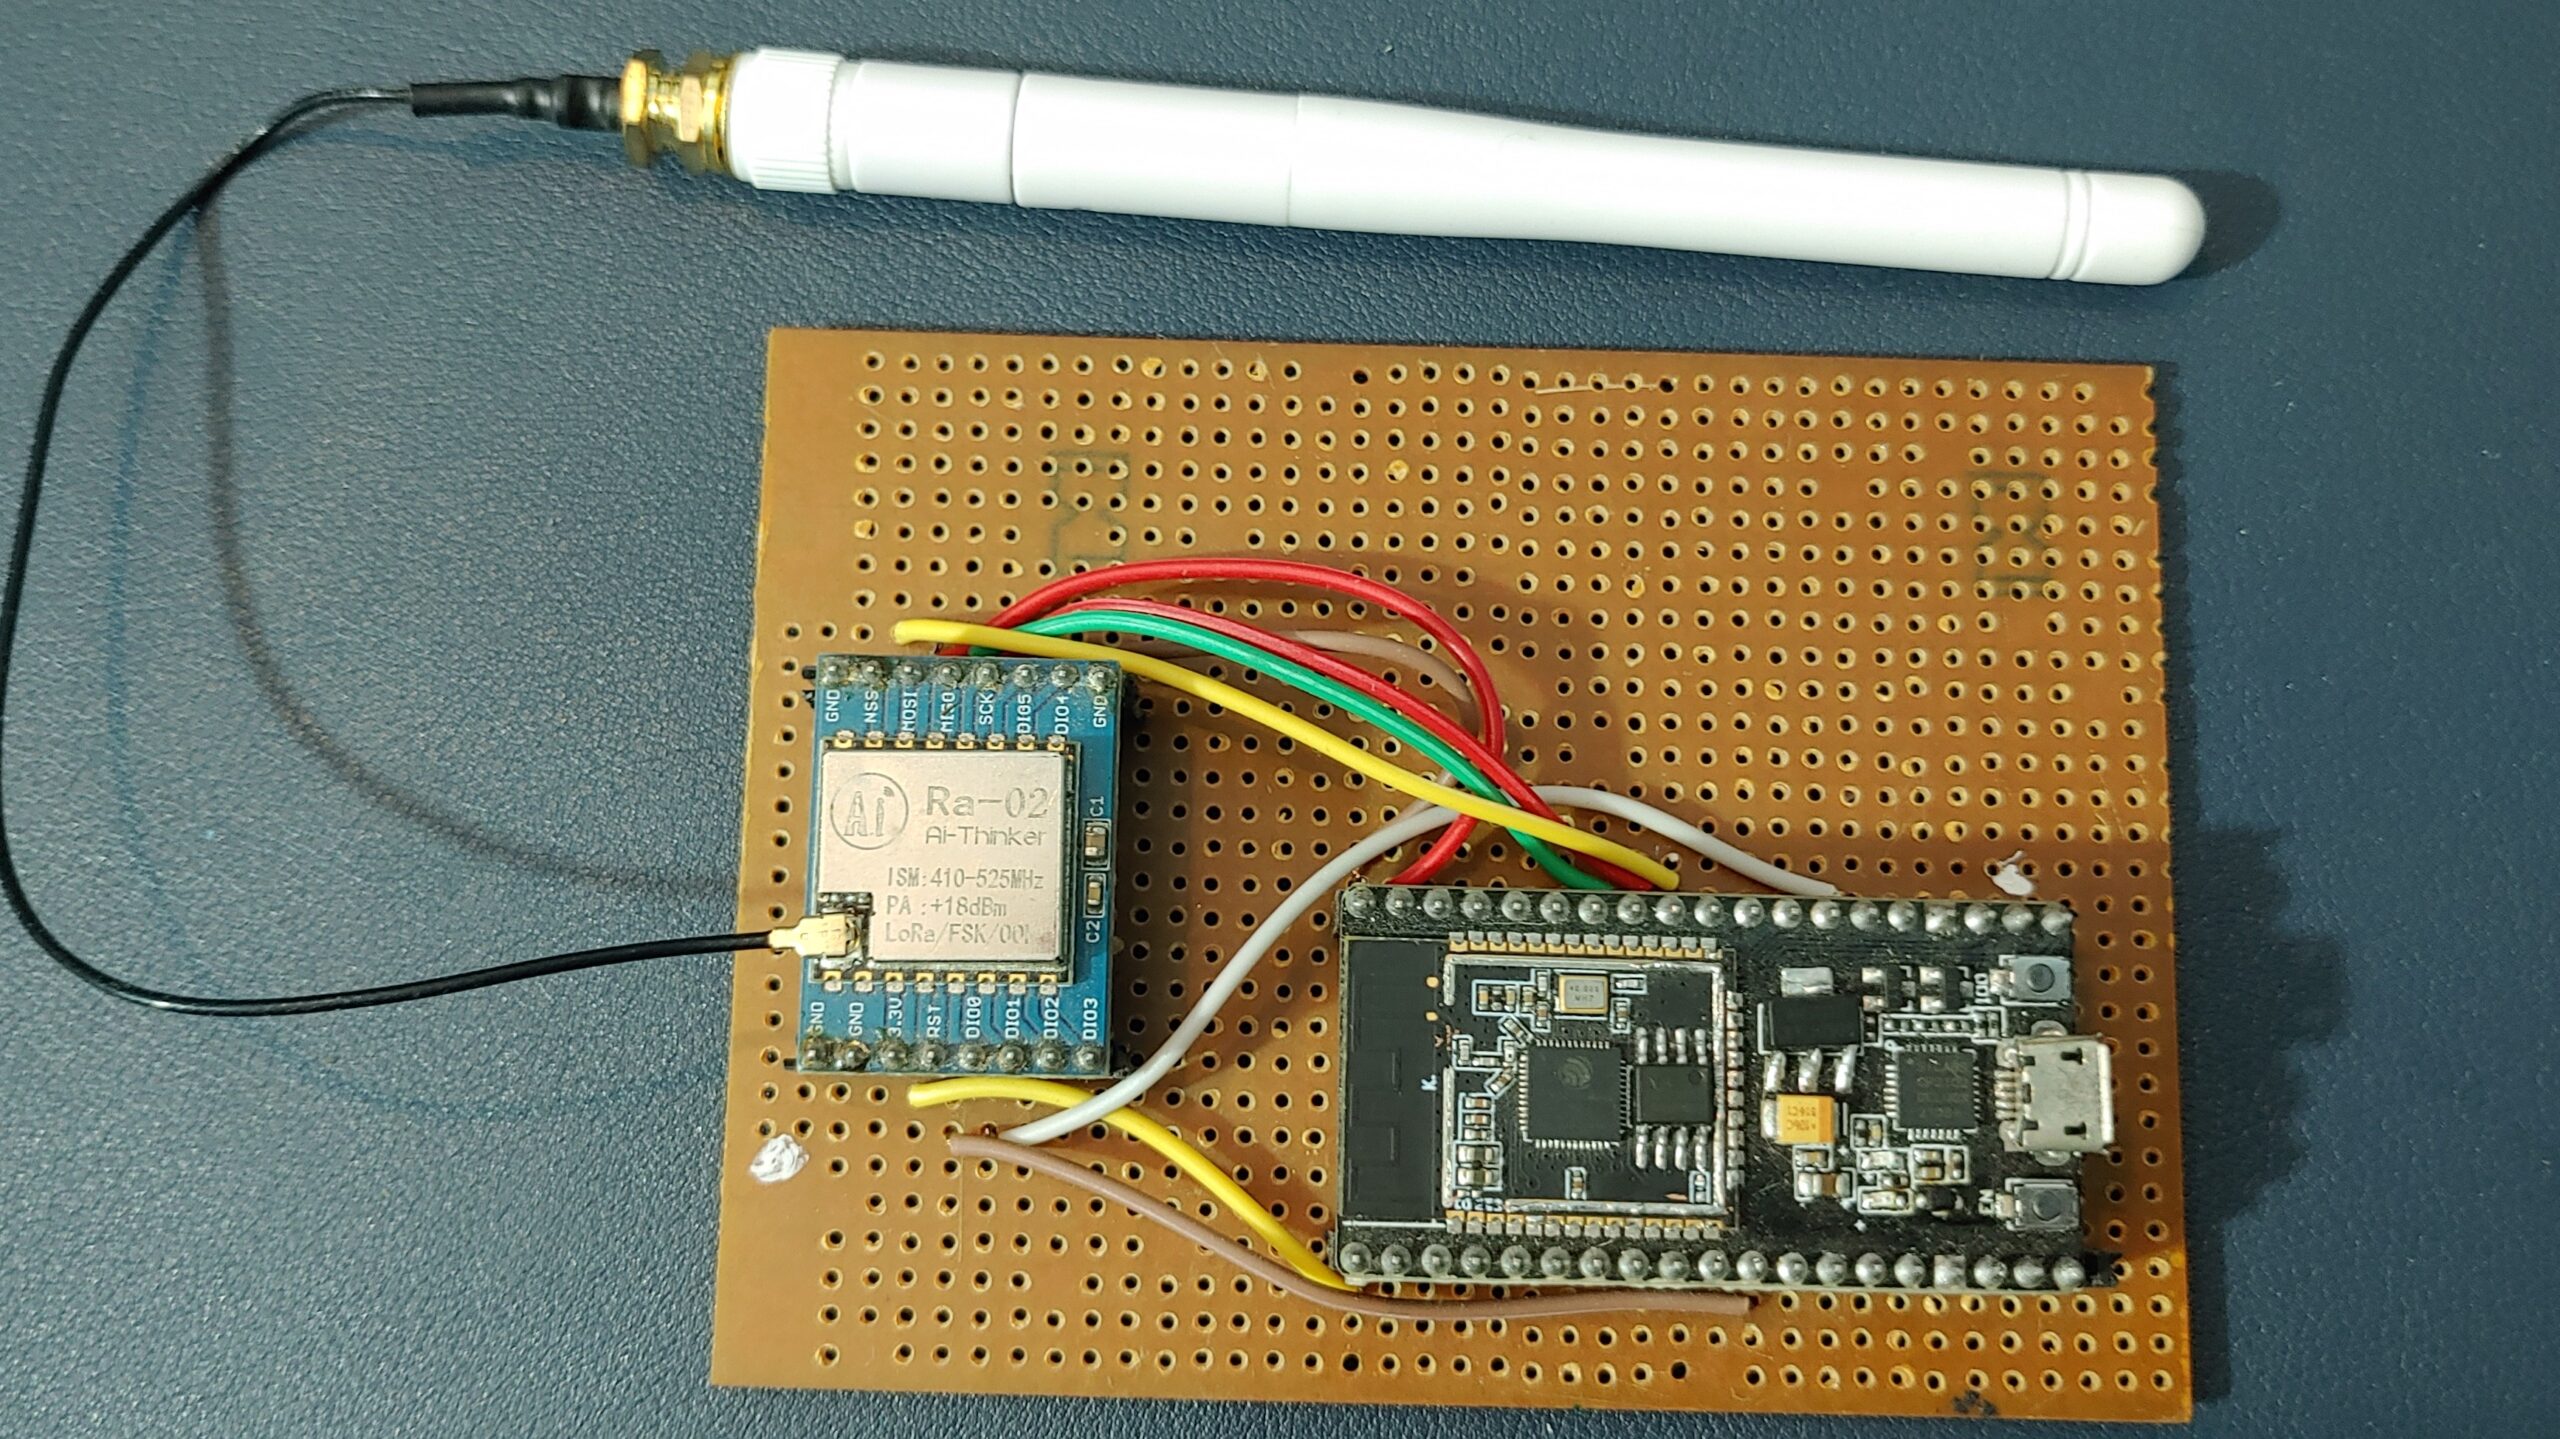
The receiver part uses ESP32 and LoRa Module SX1278. It receives messages from the transmitter and uploads GPS coordinates to the web server. Here’s the schematic for the LoRa-based Geo Fencing Receiver.
| LoRa SX1278 Module | ESP32 |
| 3.3V | 3.3V |
| GND | GND |
| NSS | D5 |
| DIO0 | D2 |
| SCK | D18 |
| MISO | D19 |
| MOSI | D23 |
| RST | D14 |
Programming Guide for ESP32 LoRa GPS-Based IoT Geo-Fencing Arduino
Let’s explore programming for the LoRa-based IoT Geo Fencing project, covering Arduino and ESP32. Since we have both transmitter and receiver circuits, we’ll need code for each.
The following libraries can be installed through the Arduino Library Manager. Go to Sketch > Include Library> Manage Libraries and search for the name.
Before diving into programming, make sure to add these libraries to your Arduino IDE:
Source Code – ESP32 LoRa GPS-Based IoT Geo-Fencing Arduino
First input boundary coordinates into the code:
- Use Google Maps to mark your boundary.
- Get the latitude and longitude for each point, by right-clicking on the map.
- Just copy and paste your Google Maps coordinates into the code
|
1 2 3 4 5 6 7 8 9 10 |
//Set the closed circular or any shape boundary coordinates by clicking on multiple points (10) on google maps & copying GPS points data. const double fences[1][15][2] = { { { 25.62070134304224, 85.10232674707807 }, {25.620626097983013, 85.1025183042639 }, { 25.62053717163948, 85.10276296604327}, {25.62054914224363, 85.1029696957017 }, { 25.620747516451463, 85.10304366372671}, { 25.621033106804642, 85.10314039166406 }, { 25.621216089836725, 85.10320677385776}, } }; |
Copy the following code to your Arduino IDE.
The following code reads GPS Coordinate, long and lat from the GPS Satelite, and sends the readings via LoRa radio to ESP32 Webserver.
|
1 2 3 4 5 6 7 8 9 10 11 12 13 14 15 16 17 18 19 20 21 22 23 24 25 26 27 28 29 30 31 32 33 34 35 36 37 38 39 40 41 42 43 44 45 46 47 48 49 50 51 52 53 54 55 56 57 58 59 60 61 62 63 64 65 66 67 68 69 70 71 72 73 74 75 76 77 78 79 80 81 82 83 84 85 86 87 88 89 90 91 92 93 94 95 |
#include <TinyGPS++.h> #include <SoftwareSerial.h> #include <LoRa.h> #define rxGPS 4 #define txGPS 5 #define ss 10 #define rst 9 #define dio0 2 bool test_mode = 0; TinyGPSPlus gps; SoftwareSerial gpsSerial(rxGPS, txGPS); //Set the closed circular or any shape boundary coordinates by clicking on multiple points (10) on google maps & copying GPS points data. const double fences[1][15][2] = { { { 25.62070134304224, 85.10232674707807 }, {25.620626097983013, 85.1025183042639 }, { 25.62053717163948, 85.10276296604327}, {25.62054914224363, 85.1029696957017 }, { 25.620747516451463, 85.10304366372671}, { 25.621033106804642, 85.10314039166406 }, { 25.621216089836725, 85.10320677385776}, { 25.621311856672182, 85.1032447066172}, {25.62135289998, 85.10313659969805 }, { 25.621417885129528, 85.10292417889723}, { 25.62148287001634, 85.10273451730299}, { 25.621387103034085, 85.10264727295727 }, { 25.62126055382688, 85.10259227123187}, {25.62103652755366, 85.10248795791179}, { 25.620774878472908, 85.10237226541062}, } }; void setup() { Serial.begin(9600); gpsSerial.begin(9600); Serial.println("GPS and LoRa Transmitter Initialized..."); LoRa.setPins(ss, rst, dio0); if (!LoRa.begin(868E6)) { Serial.println("Starting LoRa failed!"); while (1) ; } LoRa.setSyncWord(0xF3); LoRa.setTxPower(20); Serial.println("LoRa Initialized..."); } void loop() { while (gpsSerial.available() | test_mode) { if (gps.encode(gpsSerial.read()) | test_mode) { if (gps.location.isValid() | test_mode) { String lat = String(gps.location.lat(), 6); String lon = String(gps.location.lng(), 6); if (test_mode == 1) { lat = String(12.345); lon = String(67.89); } String dataToSend = "LAT:" + lat + ",LONG:" + lon; // Check if the current location is inside the geo-fence if (isInsideGeoFence(gps.location.lat(), gps.location.lng())) { dataToSend += ",STATUS:Inside"; } else { dataToSend += ",STATUS:Outside"; } LoRa.beginPacket(); LoRa.print(dataToSend); LoRa.endPacket(); Serial.println("Sent data: " + dataToSend); delay(2000); } } } } bool isInsideGeoFence(double latitude, double longitude) { int fenceSize = sizeof(fences[0]) / sizeof(fences[0][0]); double vectors[fenceSize][2]; for (int i = 0; i < fenceSize; i++) { vectors[i][0] = fences[0][i][0] - latitude; vectors[i][1] = fences[0][i][1] - longitude; } double angle = 0; double num, den; for (int i = 0; i < fenceSize; i++) { num = (vectors[i % fenceSize][0]) * (vectors[(i + 1) % fenceSize][0]) + (vectors[i % fenceSize][1]) * (vectors[(i + 1) % fenceSize][1]); den = (sqrt(pow(vectors[i % fenceSize][0], 2) + pow(vectors[i % fenceSize][1], 2))) * (sqrt(pow(vectors[(i + 1) % fenceSize][0], 2) + pow(vectors[(i + 1) % fenceSize][1], 2))); angle += (180 * acos(num / den) / M_PI); } return (angle > 355 && angle < 365); } |
Receiver Code – LoRa-Based IoT Geo-Fencing
Copy the following code to your Arduino IDE.
|
1 2 3 4 5 6 7 8 9 10 11 12 13 14 15 16 17 18 19 20 21 22 23 24 25 26 27 28 29 30 31 32 33 34 35 36 37 38 39 40 41 42 43 44 45 46 47 48 49 50 51 52 53 54 55 56 57 58 59 60 61 62 63 64 65 66 67 68 69 70 71 72 73 74 75 76 77 78 79 80 81 82 83 84 85 86 87 88 89 90 91 92 93 94 95 96 97 98 99 100 101 102 103 104 105 106 107 108 109 110 111 112 113 114 115 116 117 118 119 120 121 122 123 124 125 126 127 128 129 130 131 132 133 134 135 136 137 138 139 140 141 142 143 144 145 146 147 148 149 150 151 152 153 154 155 156 157 |
#include <WiFi.h> #include <WebServer.h> #include <LoRa.h> #define ss 5 #define rst 14 #define dio0 2 String receivedLat, receivedLon, receivedStatus; WebServer server(80); void setup() { Serial.begin(115200); WiFi.softAP("ESP32_Receiver","12345678"); Serial.println("WiFi AP Started"); Serial.println(WiFi.softAPIP()); LoRa.setPins(ss, rst, dio0); if (!LoRa.begin(868E6)) { Serial.println("Starting LoRa failed!"); while (1); } LoRa.setSyncWord(0xF3); Serial.println("LoRa Initialized..."); server.on("/", HTTP_GET, handleRoot); server.on("/data", HTTP_GET, sendData); server.begin(); } void loop() { int packetSize = LoRa.parsePacket(); if (packetSize) { String receivedData = ""; while (LoRa.available()) { receivedData += (char)LoRa.read(); } Serial.println("Received: " + receivedData); parseReceivedData(receivedData); } server.handleClient(); } void parseReceivedData(String data) { int latIndex = data.indexOf("LAT:"); int lonIndex = data.indexOf(",LONG:"); int statusIndex = data.indexOf(",STATUS:"); if (latIndex != -1 && lonIndex != -1 && statusIndex != -1) { receivedLat = data.substring(latIndex + 4, lonIndex); receivedLon = data.substring(lonIndex + 6, statusIndex); receivedStatus = data.substring(statusIndex + 8); } } void handleRoot() { String html = R"html( <!DOCTYPE html> <html lang="en"> <head> <meta charset="UTF-8"> <meta name="viewport" content="width=device-width, initial-scale=1.0"> <title>LoRa Geo Fencing</title> <style> @import url('https://fonts.googleapis.com/css2?family=Montserrat:wght@300;400;500&display=swap'); body { font-family: 'Montserrat', sans-serif; /* Changed font to Montserrat */ text-align: center; background: linear-gradient(120deg, #ffdd99 0%, #99ccff 100%); /* Changed background colors */ height: 100vh; margin: 0; display: flex; flex-direction: column; align-items: center; justify-content: center; /* Center content vertically and horizontally */ padding: 20px; /* Added padding for better spacing */ } h1 { color: #663399; /* Changed heading color */ font-size: 36px; /* Reduced font size */ letter-spacing: 1px; margin-bottom: 20px; } .data-box { background-color: #ffcccc; /* Changed box color */ border-radius: 20px; /* Reduced border radius */ padding: 20px 40px; /* Reduced padding */ margin: 10px 0; box-shadow: 0px 10px 20px rgba(0, 0, 0, 0.1); transition: all 0.3s ease; font-size: 18px; /* Reduced font size */ color: #333; /* Changed text color */ } .data-box:hover { transform: scale(1.05); box-shadow: 0px 15px 25px rgba(0, 0, 0, 0.2); } .green { background-color: #66cc99; /* Changed color to green */ } .blue { background-color: #99ccff; /* Changed color to blue */ } .orange { background-color: #ff9966; /* Changed color to orange */ } .purple { background-color: #cc99ff; /* Changed color to purple */ } </style> <script> function fetchData() { fetch('/data').then(response => response.json()).then(data => { document.getElementById('latitude').innerHTML = 'Latitude: ' + data.lat; document.getElementById('longitude').innerHTML = 'Longitude: ' + data.lon; document.getElementById('status').innerHTML = 'Status: ' + data.status; }); } function updateTime() { const now = new Date(); const timeString = now.toLocaleTimeString(); document.getElementById('time').textContent = 'Current Time: ' + timeString; } setInterval(fetchData, 5000); setInterval(updateTime, 1000); // Update time every second window.onload = updateTime; // Update time when page loads </script> </head> <body onload="fetchData()"> <h1>IoT LoRa Geo Fencing</h1> <div class="data-box green" id="latitude">Latitude: </div> <div class="data-box blue" id="longitude">Longitude: </div> <div class="data-box orange" id="status">Status: </div> <div class="data-box purple" id="time">Current Time: </div> <!-- Container for current time --> </body> </html> )html"; server.send(200, "text/html", html); } void sendData() { String payload = "{"lat":"" + receivedLat + "","lon":"" + receivedLon + "","status":"" + receivedStatus + ""}"; server.send(200, "application/json", payload); } |
Testing the LoRa Sender
Upload the code to your Arduino LoRa Sender Board.
Select the correct COM port under Tools > Port and choose your board under Tools > Board.
Testing LoRa Receiver
The LoRa Receiver gets incoming LoRa packets and shows the received readings on the Serial Monitor.
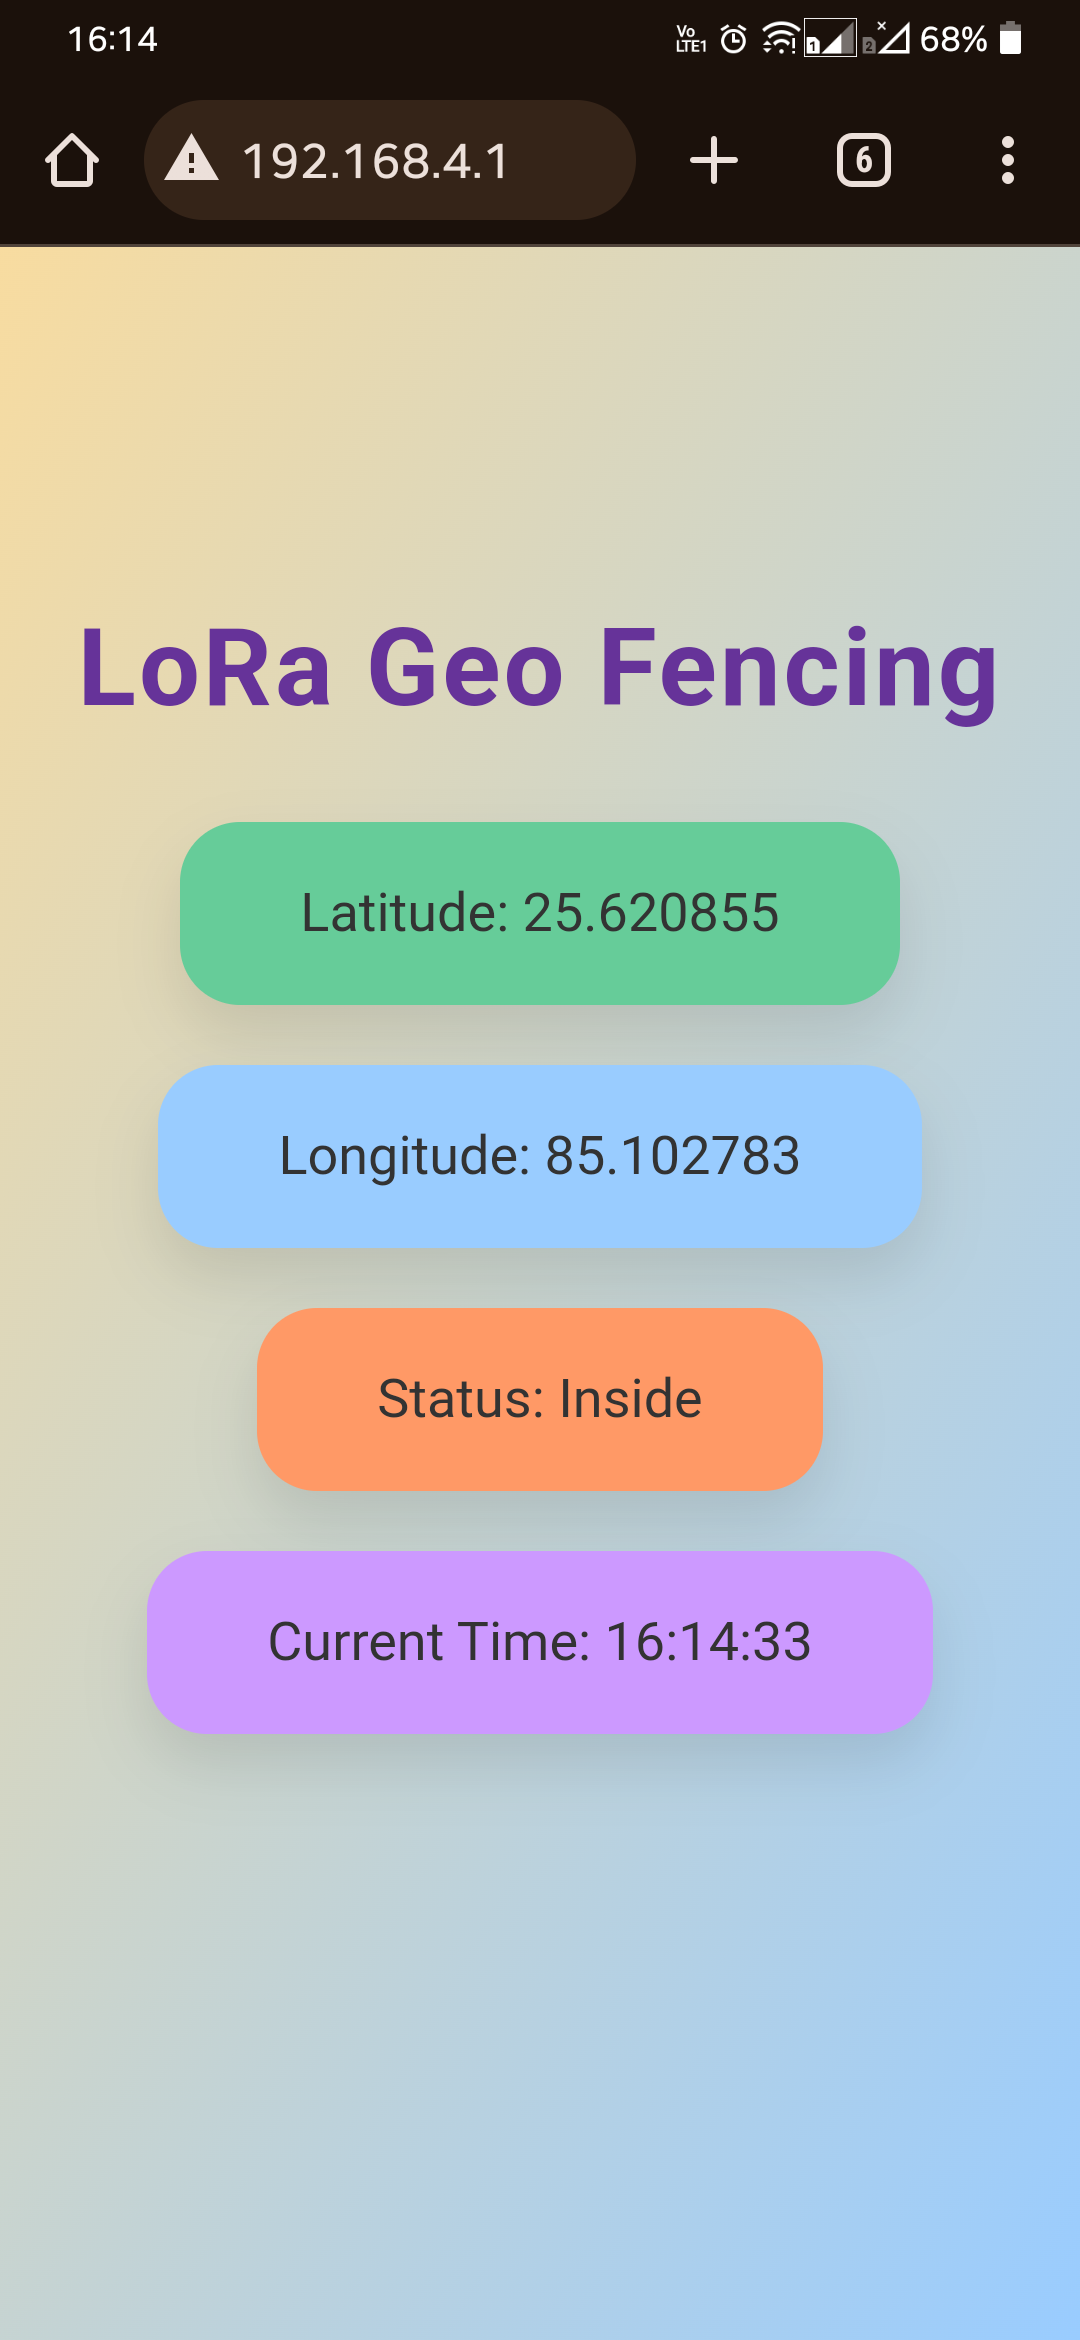
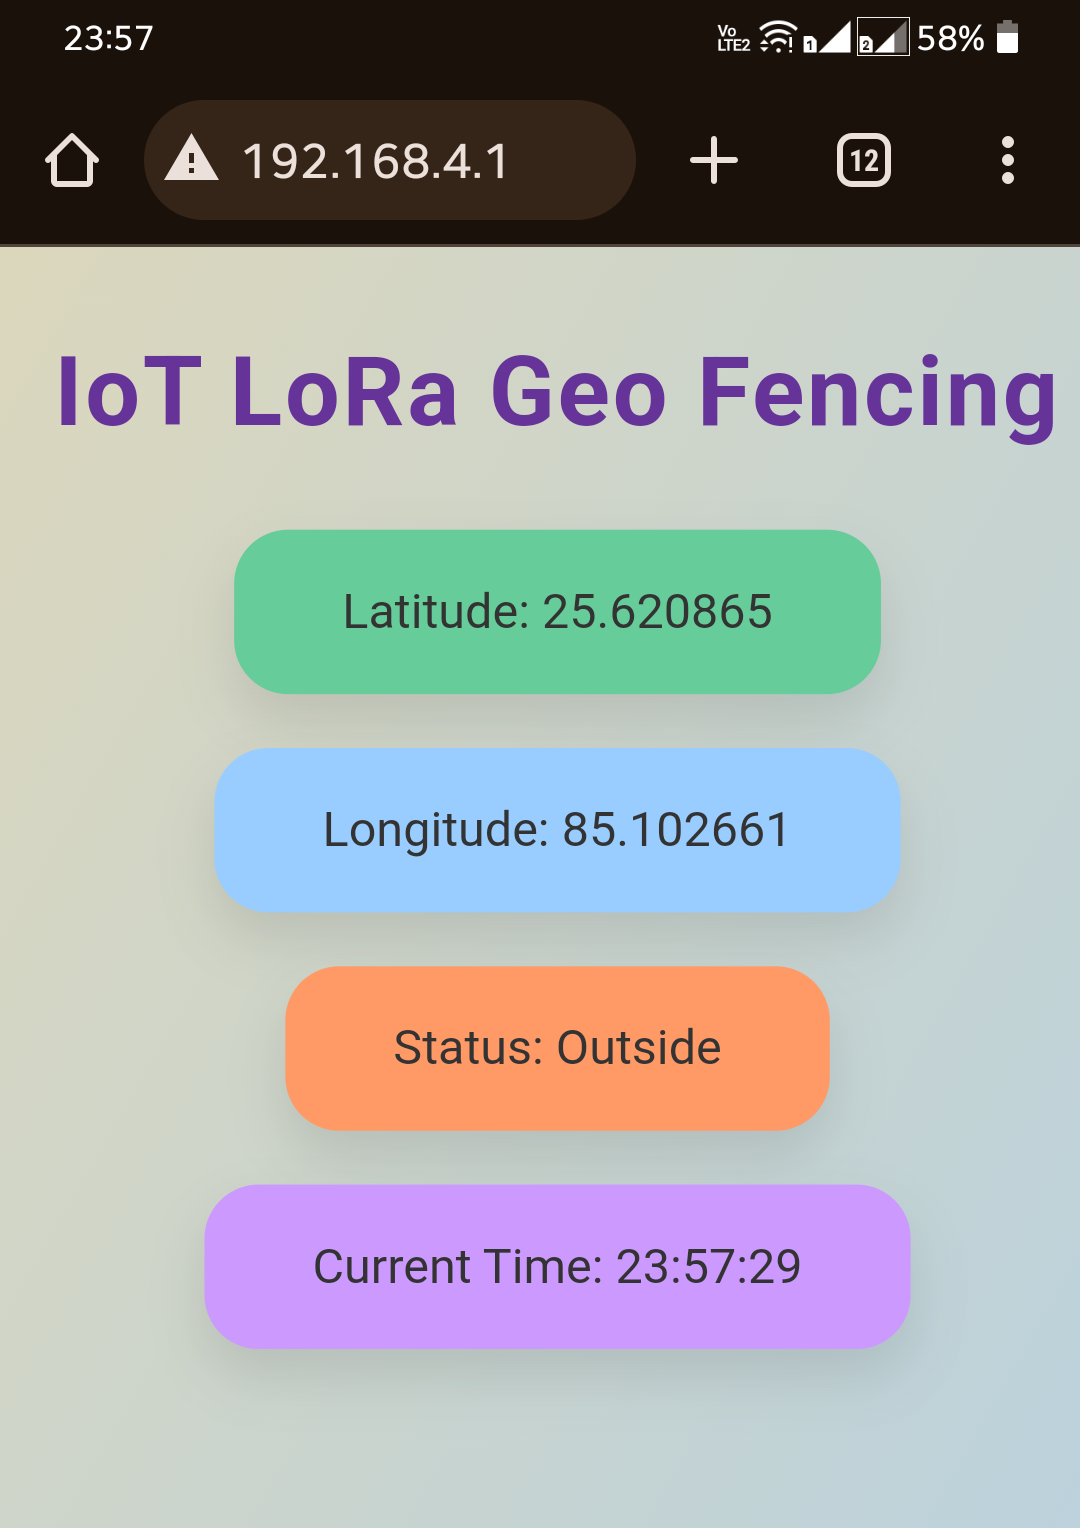
On the receiver side, data is received and shown on the Serial Monitor, alongside the IP Address (192.168.4.1) for the Web Server. To visualize data:
- Power on the receiver, which sets the Access Point as “ESP32_Receiver“.
- Connect your phone or laptop to this Access Point using the password “12345678“
Open your phone’s web browser and enter the IP Address 192.168.4.1, then press Enter.
The webpage will show latitude, longitude, and GPS tracker position(inside/outside), updating every 5 seconds, confirming the functionality of both transmitter and receiver.
When inside the boundary, it shows the inside status.
The Web Server Dashboard shows the outside status when the transmitter is outside the defined boundary.









2 Comments
Hey bro everything is good but 433 mhz is licenced frequency in India we cannot use without licence
Just use it for fun not for commercial use.