Introduction
In this article, we’ll show you how to make a Raspberry Pi Pico W web server using the MicroPython WebREPL client. This is a great way to get started with the coding on the Raspberry Pi Pico, and you can use this webserver to control things like GPIO output and read sensor data.
This guide will show you how to set up the Pico W and get it up and running. We’ll use Pionboardboard WiFi and web server abilities to control an LED. The Pico W is a great board for any Raspberry Pi project that requires wifi.
What is a Raspberry Pi Pico W?
Raspberry Pi Pico W adds on-board single-band 2.4GHz wireless interfaces (802.11n) using the Infineon CYW4343 while retaining the Pico form factor. The on-board 2.4GHz wireless interface has the following features:
The Pico is the first Raspberry Pi board to be built around the company’s new RP2040 microcontroller chip. The RP2040 chip features two CPU cores, each of which can run at up to 133 MHz, and comes with 264KB of on-chip RAM. The Pico also has a variety of I/O peripherals, including GPIO, I2C, SPI, UART, and PWM, as well as an on-chip USB controller. Introduction to Raspberry Pi Pico W – Getting Started: Tutorials, Pinout
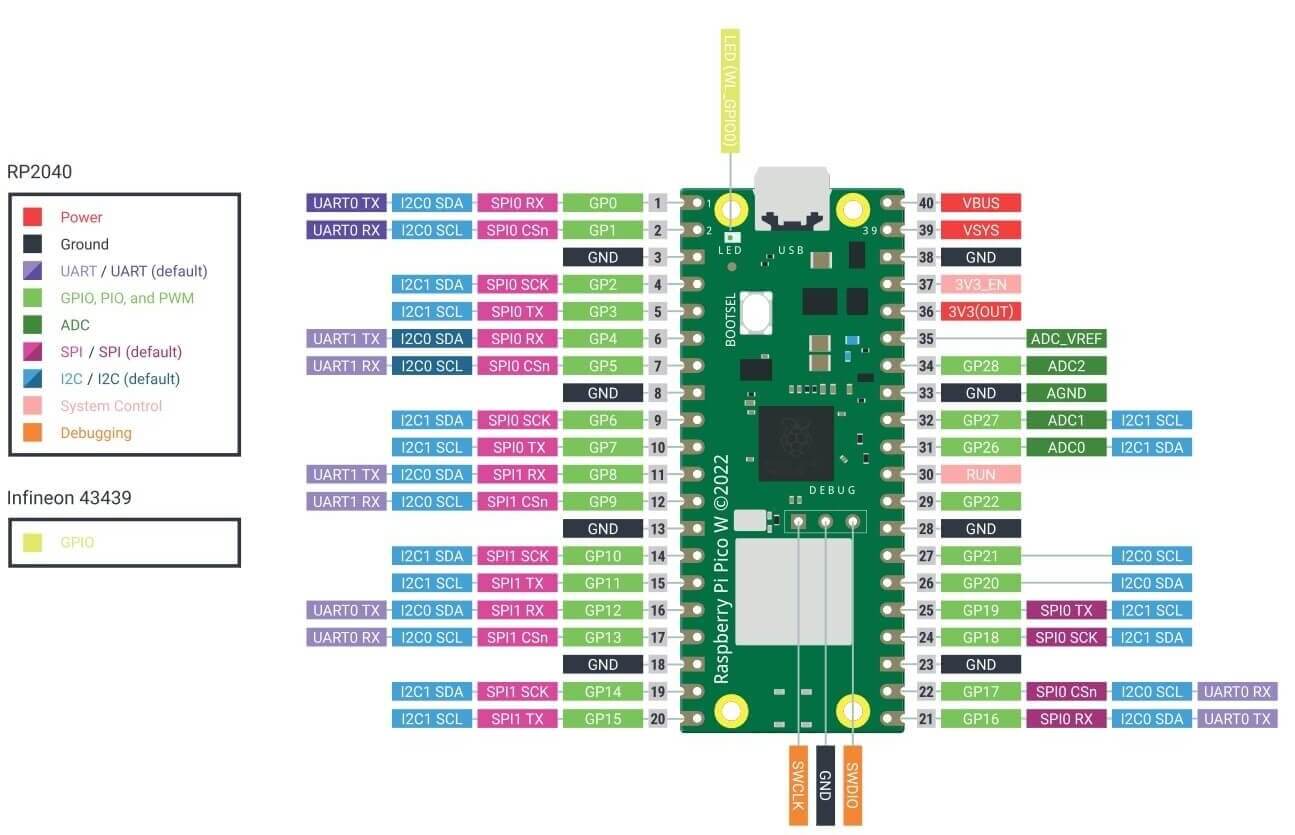
Raspberry Pi Pico W Pinout?
Raspberry Pi Pico W Resources
- An RP2040-based microcontroller board with wireless
- Connecting to the Internet with Raspberry Pi Pico W
Web Server – Client Process

Web server – The client process involves communication between a web server and a web browser. The web server is responsible for handling the requests from the web browser and sending the appropriate response. The web browser is responsible for rendering the web page and displaying it to the user.
The communication between the web server and the web browser is done using the HTTP protocol. The web browser sends an HTTP request to the web server when it wants to retrieve a web page. The web server then processes the request and sends an HTTP response back to the web browser.
The web server and the web browser can be located on different computers in different parts of the world. The only requirement is that they are connected to the Internet.
HTML for Raspberry Pi Pico W Web Server
The HTML for Raspberry Pi Pico W Web Server is a great way to easily create a web server on your Raspberry Pi Pico W device. This is a great way to create a simple web page to display data from your Raspberry Pi Pico W device, or to control your device remotely. The HTML for Raspberry Pi Pico W Web Server is very easy to use, and it is a great way to get started with web development on the Raspberry Pi Pico W.
The Raspberry Pi Pico W is a web server that has WiFi capabilities. It is a low-power device that is also very portable, making it ideal for use in a variety of different settings.
The Raspberry Pi Pico Wseveraler of GPIO pins that can be used to control various devices and peripherals, and it also has a built-in ADC that can be used to take measurements from sensors.
Setup to blink LED via WiFi on Raspberry Pi Pico W
we will take a look at how to set up the Pico Wifi and how to use it to blink an LED.
Set up MicroPython on Raspberry Pi Pico W
- First, you require to set up MicroPython. Download the UF2 file here that’s especially meant for the Pico W.
- Hold down the BOOTSEL button and connect your Pico W via USB to your laptop.
- Once it’s mounted, copy the UF2 file that you just downloaded onto the Pico.
You can check here How to Set up MicroPython on Raspberry Pi Pico Use Thonny IDE to program Raspberry Pi Pico W Thonny makes it easy to program the Raspberry Pi Pico W and it comes pre-installed on the Raspberry Pi OS. You can also download it for Windows here. Make sure your interpreter is set to MicroPython (Raspberry Pi Pico).
Raspberry Pi Pico W Test Script
|
1 2 3 4 5 6 7 8 |
import time from machine import Pin led=Pin(2,Pin.OUT) #create LED object from pin2,Set Pin2 to output while True: led.value(1) #Set led turn on time.sleep(0.5) led.value(0) #Set led turn off time.sleep(0.5) |
Run a network scan to confirm Pico W wireless is working
Use this code to print out all available wireless networks in your location.
|
1 2 3 4 |
import network wlan = network.WLAN(network.STA_IF) wlan.active(True) print(wlan.scan()) |
When run on a Raspberry Pi Pico W it will allow the network interface, scan for wireless networks & print them on the shell.
Program the Raspberry Pi Pico W Web Server
Create a code called secrets.py and use the following content, replacing the value for SSID and Password with your network.
secrets.py
|
1 2 3 4 |
secrets = { 'ssid': 'Add your wifi SSID Here', 'Password': 'Add your wifi Password Here' } |
Create the HTML Page
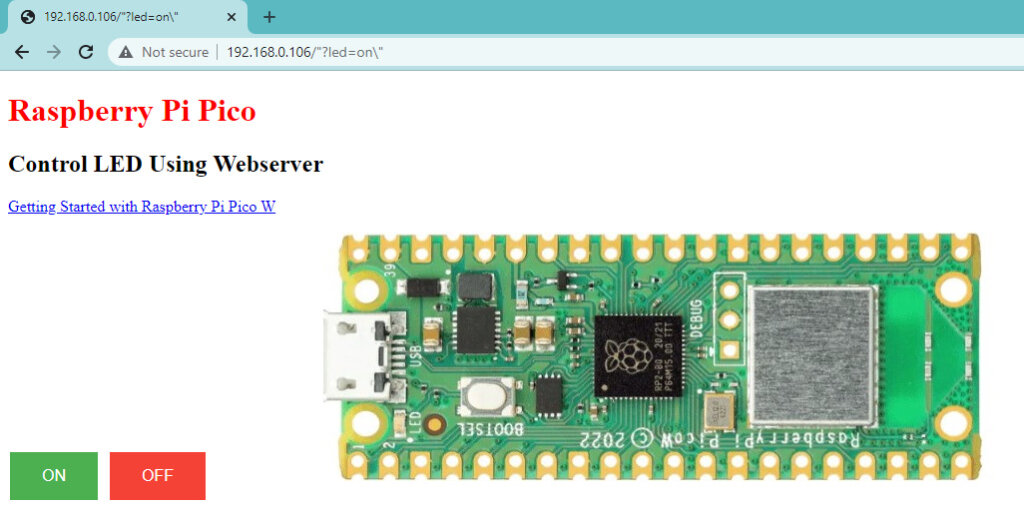
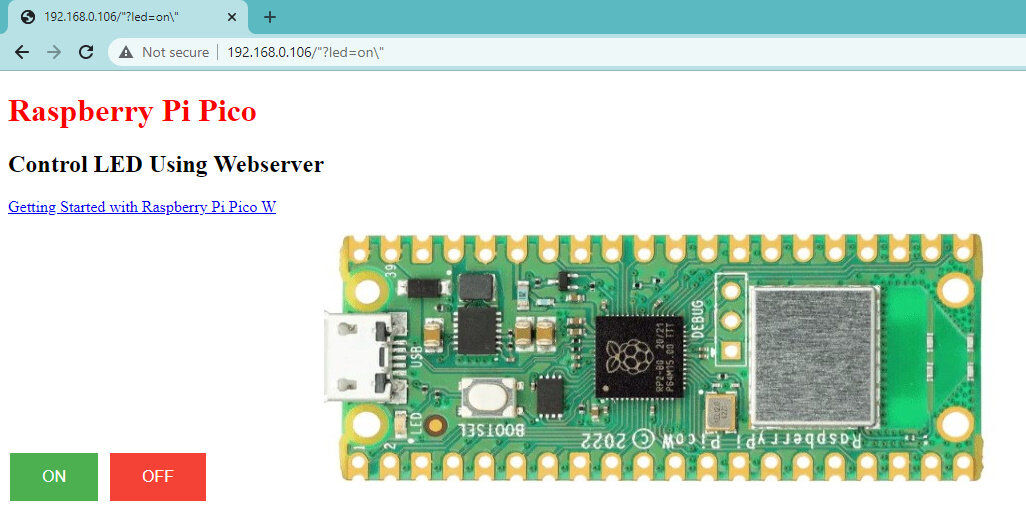
The following line will be the HTML file that’s done when you load Pico W’s IP address. Save it asindex.html It’s an easy page with two buttons that allow you to turn the Pico W’s LED on and off.
index.html
|
1 2 3 4 5 6 7 8 9 10 11 12 13 14 15 16 17 18 19 20 21 22 23 24 25 26 27 28 29 30 31 32 |
<!DOCTYPE html> <html> <head> <style> .button { background-color: #4CAF50; /* Green */ border: none; color: white; padding: 15px 32px; text-align: center; text-decoration: none; display: inline-block; font-size: 16px; margin: 4px 2px; cursor: pointer; } .button3 {background-color: #f44336;} /* Red */ </style> </head> <body> <html> <head> <h1 style="color: red;"><strong>Raspberry Pi Pico W Webserver</strong></h1> </head> <body> <h2>Control LED Using Webserver </h2> <p><a href="https://www.diyprojectslab.com/introduction-to-raspberry-pi-pico-w/">Getting Started with Raspberry Pi Pico W</a></p> <a href=\"?led=on\"><button class="button">ON</button></a> <a href=\"?led=off\"><button class="button button3">OFF</button></a> </body> <a href="https://www.diyprojectslab.com/introduction-to-raspberry-pi-pico-w"><img class="aligncenter wp-image-4863 size-full" src="https://www.diyprojectslab.com/wp-content/uploads/2022/11/pico-w.jpg" alt="" width="677" height="250" /></a> |
Then, make main.py which will host your primary code.
main.py
|
1 2 3 4 5 6 7 8 9 10 11 12 13 14 15 16 17 18 19 20 21 22 23 24 25 26 27 28 29 30 31 32 33 34 35 36 37 38 39 40 41 42 43 44 45 46 47 48 49 50 51 52 53 54 55 56 57 58 59 60 61 62 63 64 65 66 67 68 69 70 71 72 73 74 75 76 77 78 79 80 81 82 83 84 85 86 87 88 89 90 91 92 93 94 95 96 97 98 99 100 101 102 103 104 105 106 107 108 109 110 111 112 113 114 115 116 117 118 119 120 121 |
import rp2 import network import ubinascii import machine import urequests as requests import time from secrets import secrets import socket # Set country to avoid possible errors rp2.country('DE') wlan = network.WLAN(network.STA_IF) wlan.active(True) # If you need to disable powersaving mode # wlan.config(pm = 0xa11140) # See the MAC address in the wireless chip OTP mac = ubinascii.hexlify(network.WLAN().config('mac'),':').decode() print('mac = ' + mac) # Other things to query # print(wlan.config('channel')) # print(wlan.config('essid')) # print(wlan.config('txpower')) # Load login data from different file for safety reasons ssid = secrets['ssid'] pw = secrets['pw'] wlan.connect(ssid, pw) # Wait for connection with 10 second timeout timeout = 10 while timeout > 0: if wlan.status() < 0 or wlan.status() >= 3: break timeout -= 1 print('Waiting for connection...') time.sleep(1) # Define blinking function for onboard LED to indicate error codes def blink_onboard_led(num_blinks): led = machine.Pin('LED', machine.Pin.OUT) for i in range(num_blinks): led.on() time.sleep(.2) led.off() time.sleep(.2) # Handle connection error # Error meanings # 0 Link Down # 1 Link Join # 2 Link NoIp # 3 Link Up # -1 Link Fail # -2 Link NoNet # -3 Link BadAuth wlan_status = wlan.status() blink_onboard_led(wlan_status) if wlan_status != 3: raise RuntimeError('Wi-Fi connection failed') else: print('Connected') status = wlan.ifconfig() print('ip = ' + status[0]) # Function to load in html page def get_html(html_name): with open(html_name, 'r') as file: html = file.read() return html # HTTP server with socket addr = socket.getaddrinfo('0.0.0.0', 80)[0][-1] s = socket.socket() s.bind(addr) s.listen(1) print('Listening on', addr) led = machine.Pin('LED', machine.Pin.OUT) # Listen for connections while True: try: cl, addr = s.accept() print('Client connected from', addr) r = cl.recv(1024) # print(r) r = str(r) led_on = r.find('?led=on') led_off = r.find('?led=off') print('led_on = ', led_on) print('led_off = ', led_off) if led_on > -1: print('LED ON') led.value(1) if led_off > -1: print('LED OFF') led.value(0) response = get_html('index.html') cl.send('HTTP/1.0 200 OK\r\nContent-type: text/html\r\n\r\n') cl.send(response) cl.close() except OSError as e: cl.close() print('Connection closed') # Make GET request #request = requests.get('http://www.google.com') #print(request.content) #request.close() |
Time to Run Program
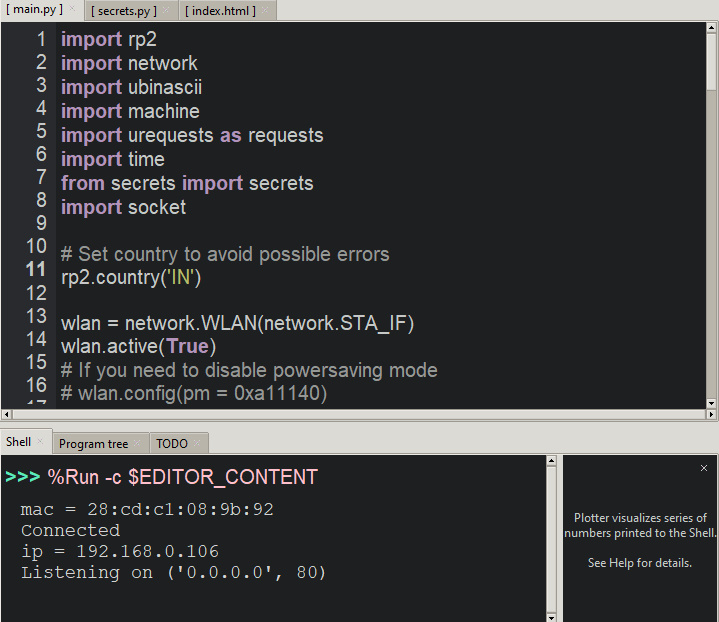
You will see the IP address of the Pico W. Copy that into your web browser that’s connected to the same wireless network. Click on the buttons and you should see the change.
Open Sell
|
1 2 3 4 5 6 7 8 9 10 11 12 13 14 |
mac = 28:cd:c1:08:9b:92 Connected ip = 192.168.0.106 Listening on ('0.0.0.0', 80) Client connected from ('192.168.0.107', 62974) led_on = -1 led_off = -1 Client connected from ('192.168.0.107', 62975) led_on = -1 led_off = -1 Client connected from ('192.168.0.107', 62978) led_on = 10 led_off = -1 LED ON |


4 Comments
Pingback: Controlling RGB LED From Raspberry Pi Pico W Web Server
Pingback: How To Set Up Raspberry Pi Pico W With A Static IP Address
Pingback: Raspberry Pi Pico W Web Server With BME280 – Weather Station
Pingback: BME280 Sensor With Raspberry Pi Pico W Using MicroPython Code