In this post, we will revive dead DJI drone batteries using the CP2112 adapter and DJI Battery Killer software. some users have said success with this method for different DJI drone models, including Mavic 2, Mavic Air 1, Mavic Air 2, Mini 2, Mini, and Spark. We will show you how to revive the battery using the CP2112 adapter and DJI Battery Killer software.
we’ll explore a software solution for overcoming BMS (Battery Management System) issues related to power failure flags or “pflag.” When a power failure happens, the BMS senses a drop below a particular limit, leading to a shutdown, and effecting the battery useless. This can also happen when changing cells, requiring the disconnection of the BMS.
A special thanks to Erick Santos for providing me with all these photos and guidance on battery recovery. Thank you, my friend!
Required Material
- CP2012 circuit board (Amazon.com)
- Jumper wire (Amazon.com)
- Laptop
- Adjustable power supply (up to 12 volts)
- Dead batteries
- Micro USB Cable
My friend successfully revived all three DJI Spark batteries that had been stored for a whopping one year and were completely dead. 🚀 How did he do it? he used a $10 CP2112 from Amazon and some simple soldering skills. No required to disassemble the batteries, except for Mavic Pro ones.
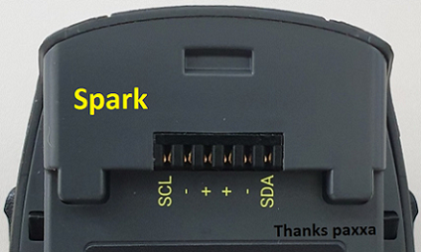
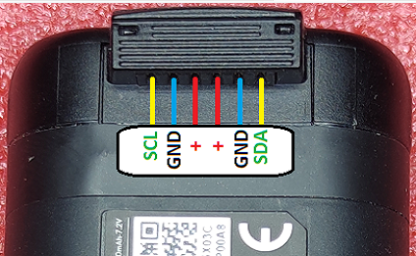
DJI Spark Battery Pinout
Specifications and Pinout for DJI Mavic Mini Battery:
- Model: MB1
- Nominal Voltage: 11.4V
- Design Capacity: 1480mAh
- Design Energy: 16.87Wh
- Max. Charge Voltage: 13.05V
Cells in Use:
- Type: LiPoHV
- Voltage: 3.80V (4.35V)
- Capacity: 5.62Wh
- Size: 6.3 x 33 x 60mm
- Manufacturer: ATL
- Configuration: 3S1P
DJI Mavic Mini Battery Pinout
Specifications and Pinout for DJI Mavic Mini Battery
- Model: MB2
- Nominal Voltage: 7.2V
- Design Capacity: 2400mAh
- Design Energy: 17.28Wh
- Max. Charge Voltage: 8.4V
Cells in Use:
- Type: Li-Ion
- Voltage: 3.70V (4.20V)
- Capacity: 2500mAh
- Model: Samsung INR18650-25R
- Configuration: 2S1P
Chip in Use:
- bq9003 (Texas Instruments)
- Firmware: bq40z307 (DJI)
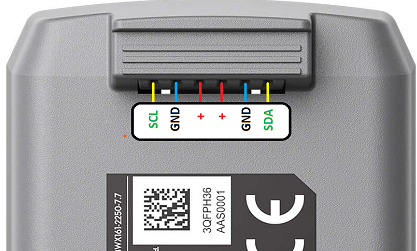
DJI Mini 2 Battery Pinout
Specifications and Pinout for DJI Mini 2 Battery:+]
- Model: BWX161
- Nominal Voltage: 7.7V
- Design Capacity: 2250mAh
- Design Energy: 17.32Wh
- Max. Charge Voltage: 8.8V
Cells in Use:
- Type: LiPoHV
- Voltage: 3.85V (4.40V)
- Capacity: 2250mAh
- Size: 8 x 34 x 62mm
- Configuration: 2S1P
Chip in Use:
- bq9003 (Texas Instruments)
- Firmware: bq40z307 (DJI)
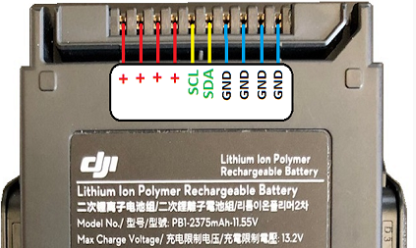
DJI Mavic Air Battery Pinout
Specifications and Pinout for DJI Mavic Air Battery:
- Model: PB1
- Nominal Voltage: 11.55V
- Design Capacity: 2375mAh
- Design Energy: 27.43Wh
- Max. Charge Voltage: 13.20V
Cells in Use:
- Type: LiPoHV
- Voltage: 3.85V (4.40V)
- Capacity: 2375mAh
- Size: 6.9 x 37 x 72mm
- Configuration: 3S1P
Chip in Use:
- bq9003 (Texas Instruments)
- Firmware: bq40z307 (DJI)
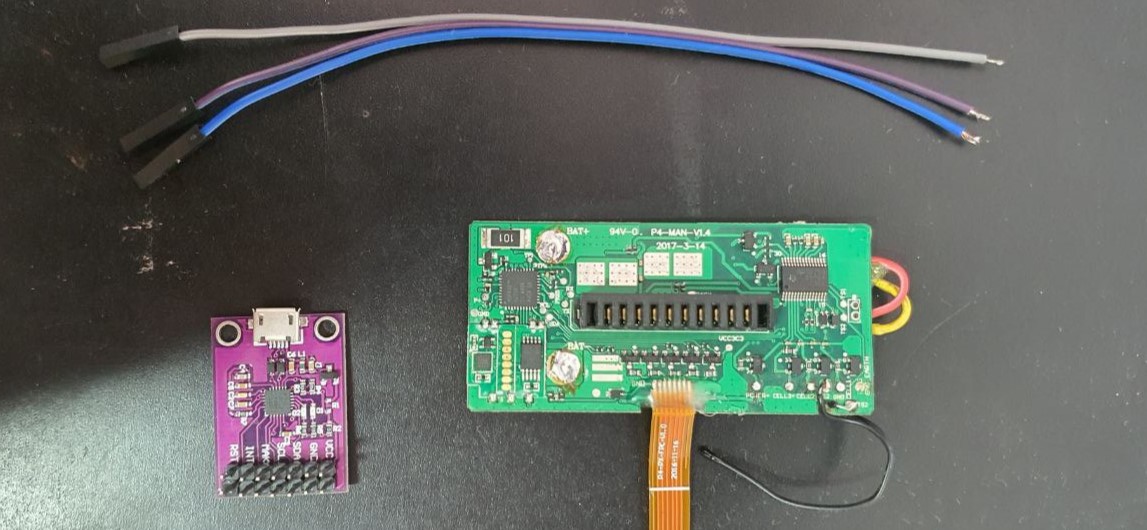
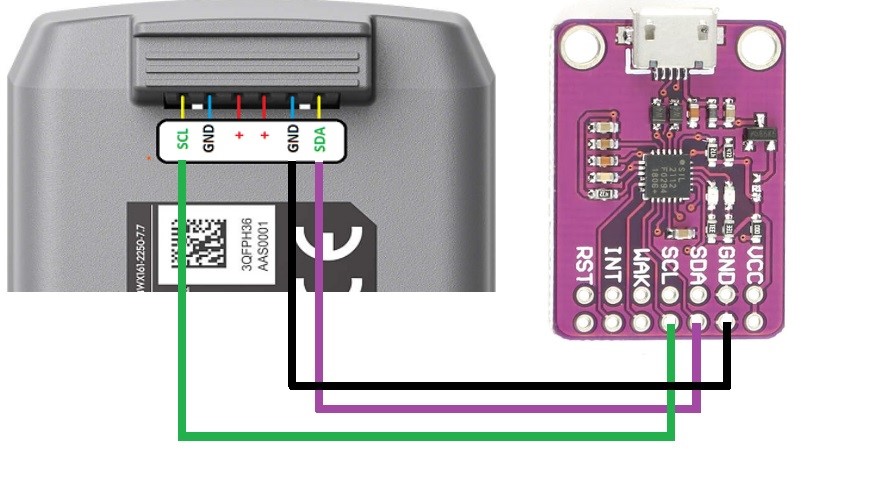
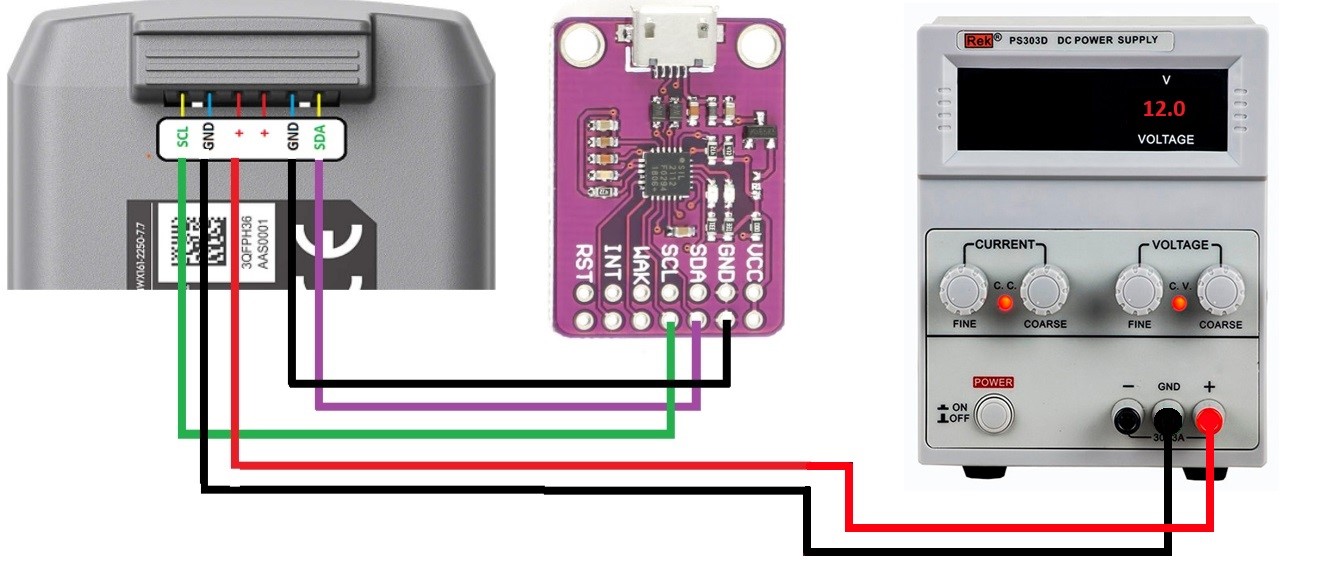
Connect the CP2112 Adapter to the battery
The CP112 chip Communicates to the BMS through SDA and SCL, helping us address power failure, disconnection, or short circuit issues. But be careful! If your cells are swollen, replace them before trying to revive the battery.
Connect DJI Battery to CP2112 as follows:
- Connect SCL to SDA and SCL to SDA pins
- Connect GND to GND
- Connect VCC to the positive terminal of the battery
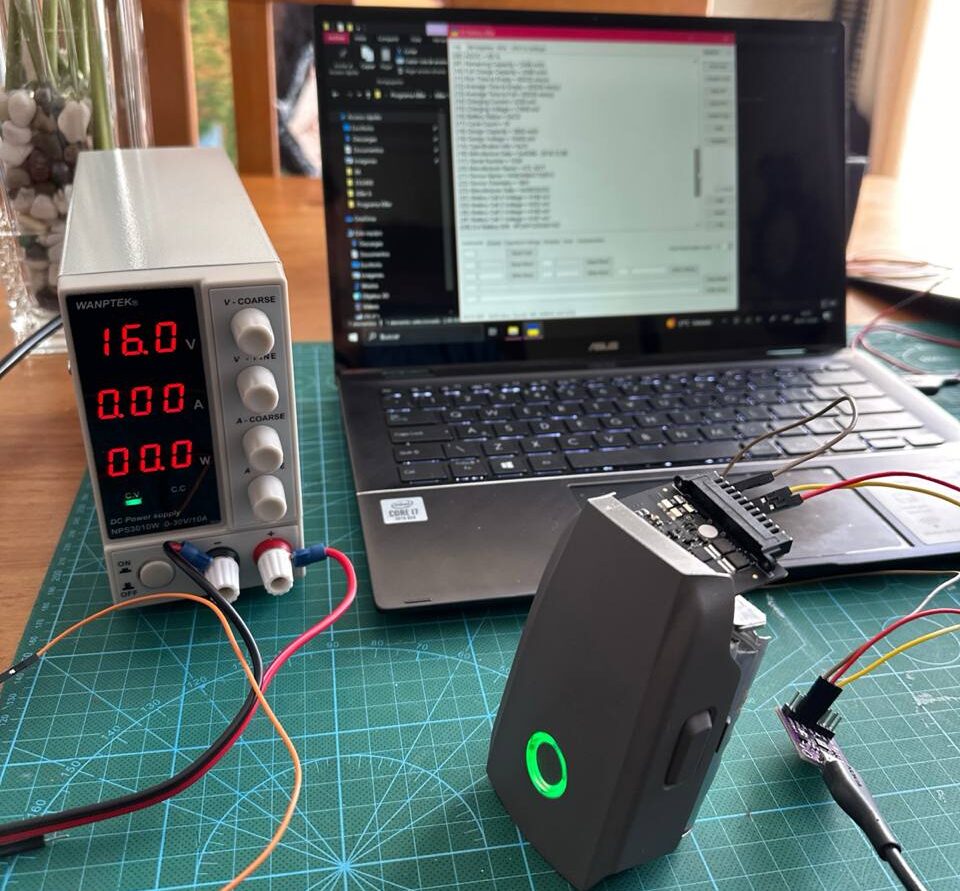
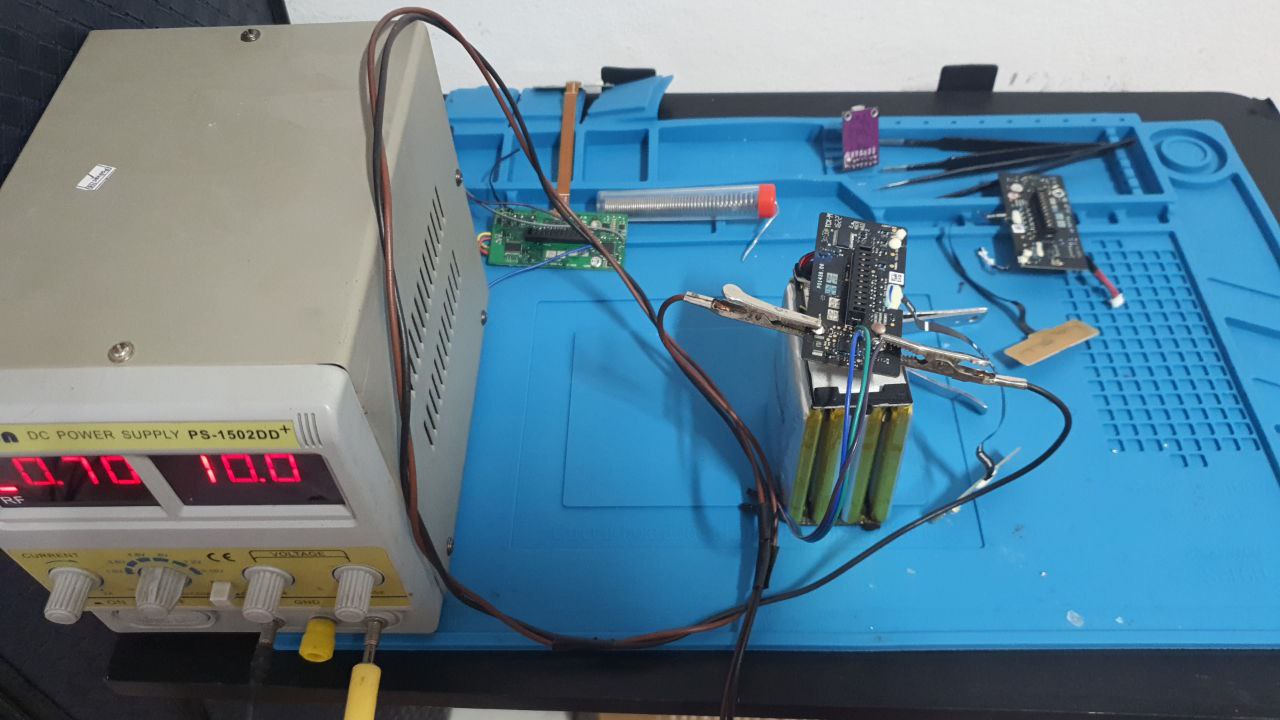
Now Connect the Power Supply to the battery
For batteries that were completely dead, an important step was applied using +12v to the battery’s + and GND To GND. Interestingly, a simple 9V alkaline battery sufficed for three batteries, but one Spark battery required a 12V supply.
The 9V was too weak, causing the PF Flag Clear to repeatedly fail. Using 12V resolved this issue, allowing me to charge all four batteries fully in the Spark. During flight tests, all four batteries performed comparably, lasting between 12-14 minutes, similar to my personal, new batteries.
Here’s a tip for those fully dead batteries: apply +12v to both + and GND- of the battery simultaneously with the CP2112. I even used a 9V alkaline battery for three of them, but one needed a 12V supply.
Lesson learned: 9V was too weak, causing the PF Flag Clear to keep failing. Switching to 12V did the trick, and I was able to fully charge all four batteries in the Spark.
Note: Please adjust the voltage according to your drone model:
- For Mavic 2/Mavic 3, use 16V.
- For Air 1/Air 2, use 12V.
- For Mini 1/Mini 2, use 8V.
The flight results were awesome – all four batteries lasted a solid 12-14 minutes, just like my good batteries.
DJI battery Killer Software
Install DJI Killer and launch the DJI Battery Killer software on your PC. Download DJI Killer.
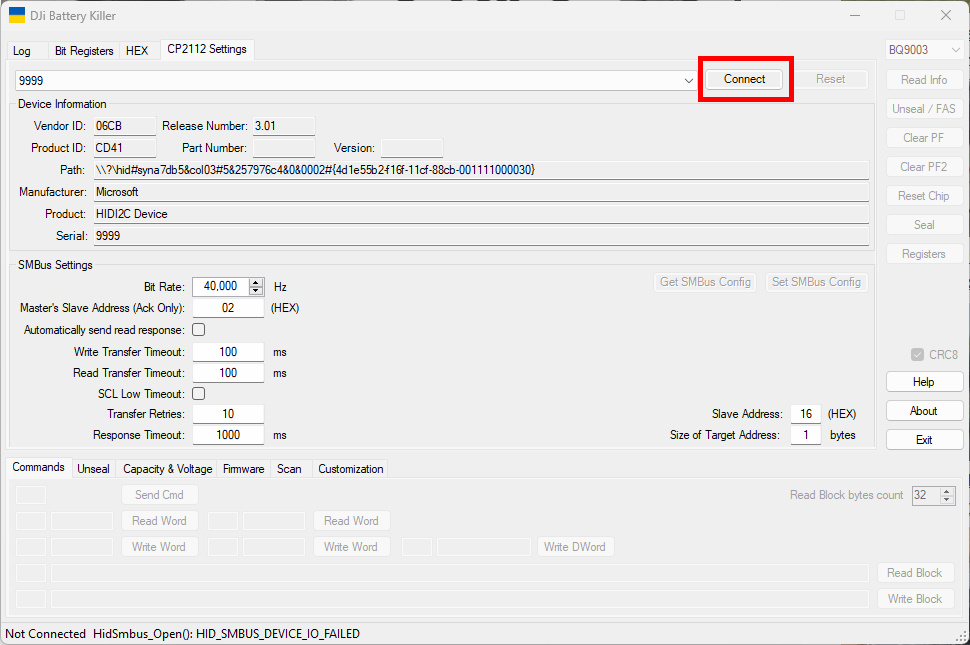
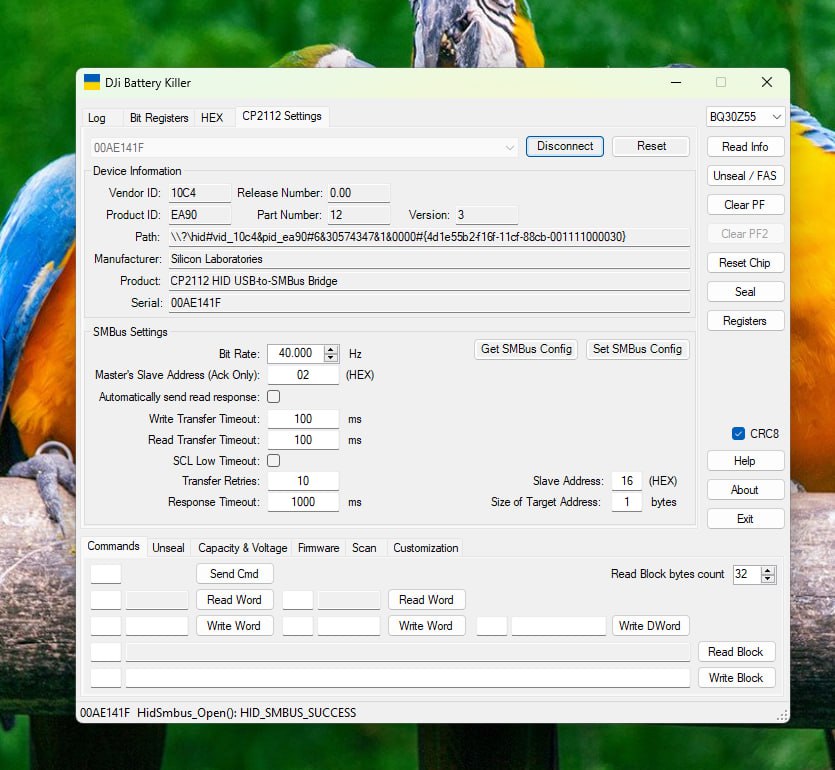
In the CP2112 Settings, ensure that you choose the option for BQ30Z55, and then click on “Connect.” This action confirms the connection between the program and the chip.
After Connect, click on Bit register this green and red colored screen will appear. On this screen, at some point, there will be PF in red.
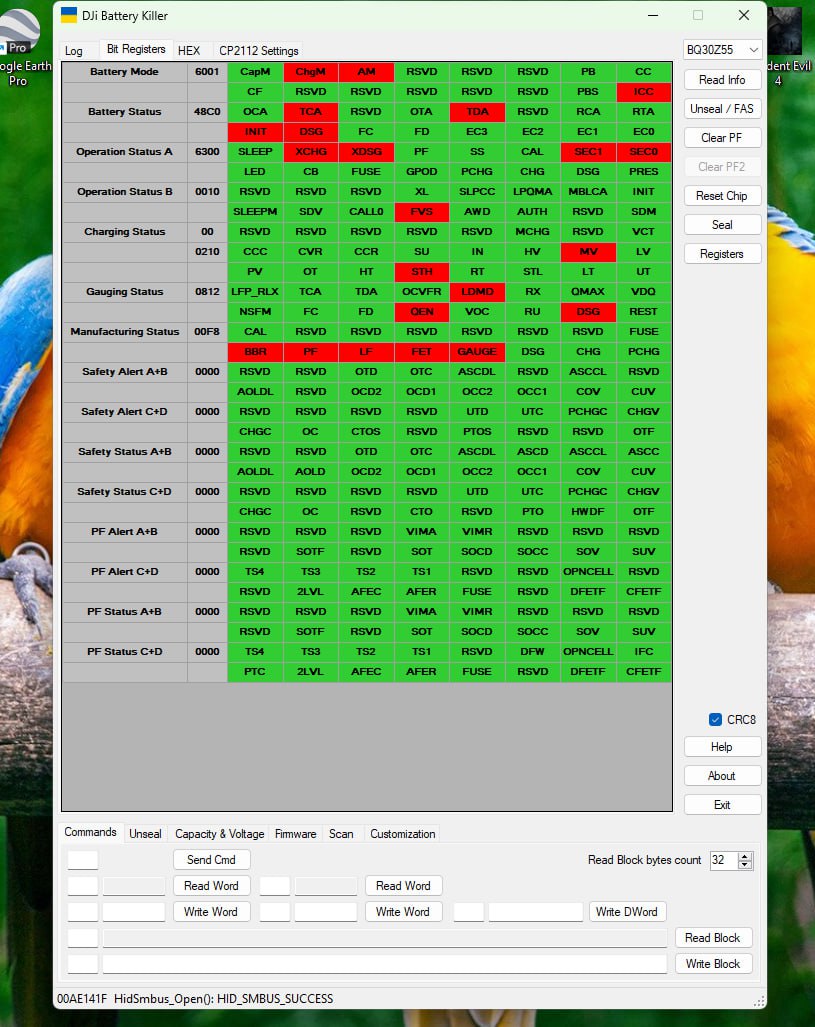
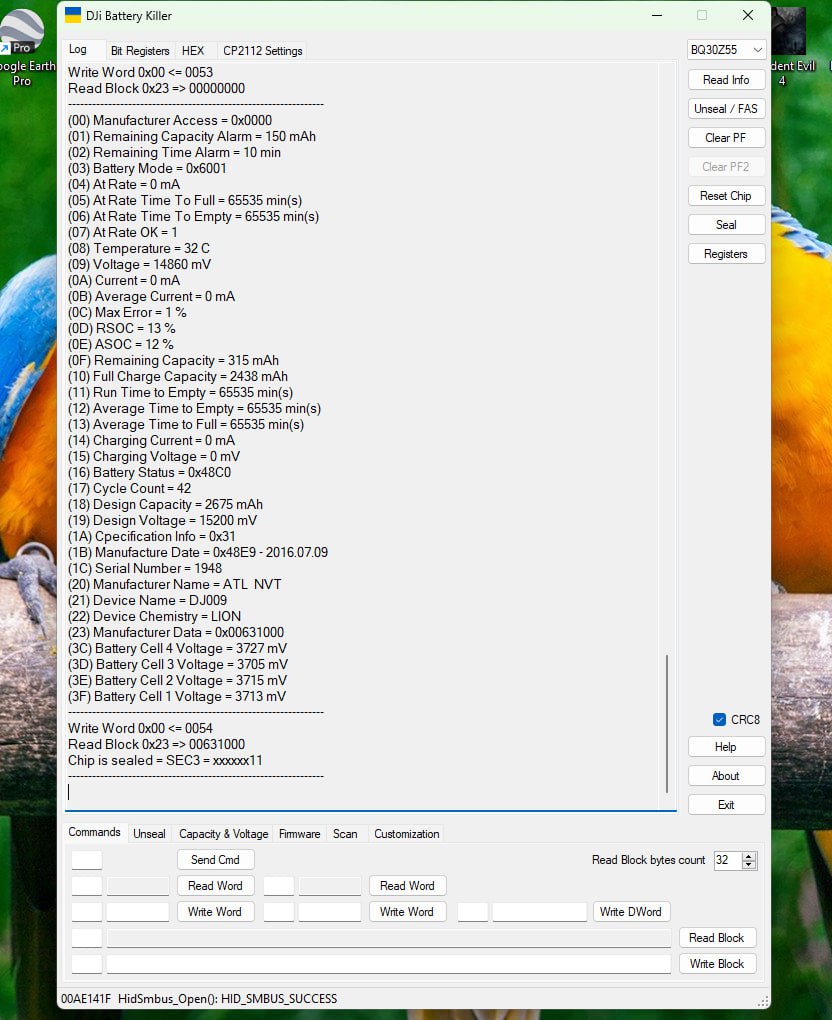
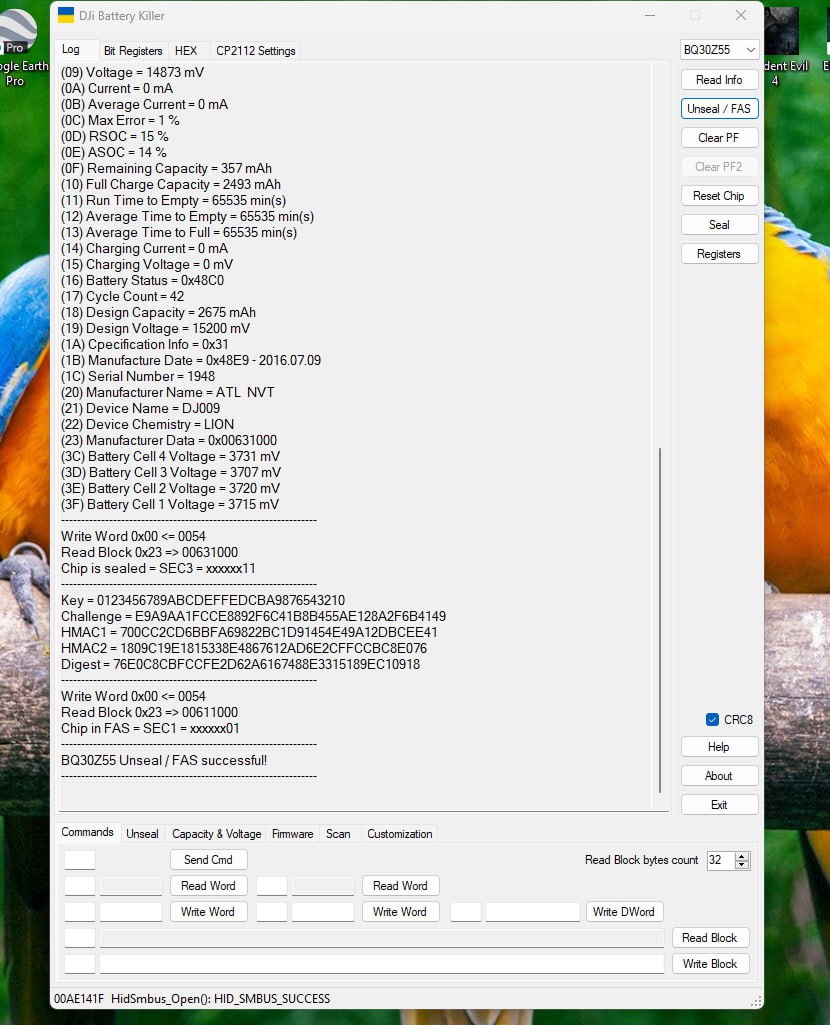
If successful, you’ll receive a detailed report on your battery’s statistics, covering cycle counts, temperature, current voltages, and more. The output should resemble something similar to the below images:
- Click on “Unseal” and later, click on “Clear PF” to clear the PF flags.
Once completed, the battery should start blinking, indicating the issue is resolved, Click “Exit” to close the application.
Working
The battery will charge normally again and you can use it on the drone.
Now the battery charging normally in the charger.

4 Comments
I tried but when I run Battery Killer,
I get
FAILED TO CONNECT TO 9999
HID_SMBUS DEVICE NOT SUPPORTED
I got my chip and jumpers following your links to Amazon
Running win 11 fully updated
Please help! THX
In bit regestration pf is in green mode. Please help
What version of DJI Battery Killer are you using? My version was compiled 6/26/21 and it looks completely different – and doesn’t have the “Seal” option.
hello brother you tuto is great, but mi question is, how reset the cycle count? to zero