Introduction
In this tutorial, we will be interfacing Capacitive Soil Moisture Sensor v1.2 with Arduino Uno. The Capacitive Soil Moisture Sensor v1.2 is a sensor that can measure the soil’s moisture content. The sensor is based on the principle of capacitive sensing.
The sensor will be made up of two copper plates that will be inserted into the soil. The Arduino will be used to measure the capacitance of the soil, which will be used to determine the moisture content. The sensor also has a LED that is used to indicate the moisture content of the soil. Raspberry PI Soil Moisture Sensor Tutorial
The Capacitive Soil Moisture Sensor measures the volume of water inside the soil and outputs the moisture level as an analog voltage.
Required Materials
- Arduino UNO Board
- Capacitive Soil Moisture Sensor
- Breadboard
- jumper wires
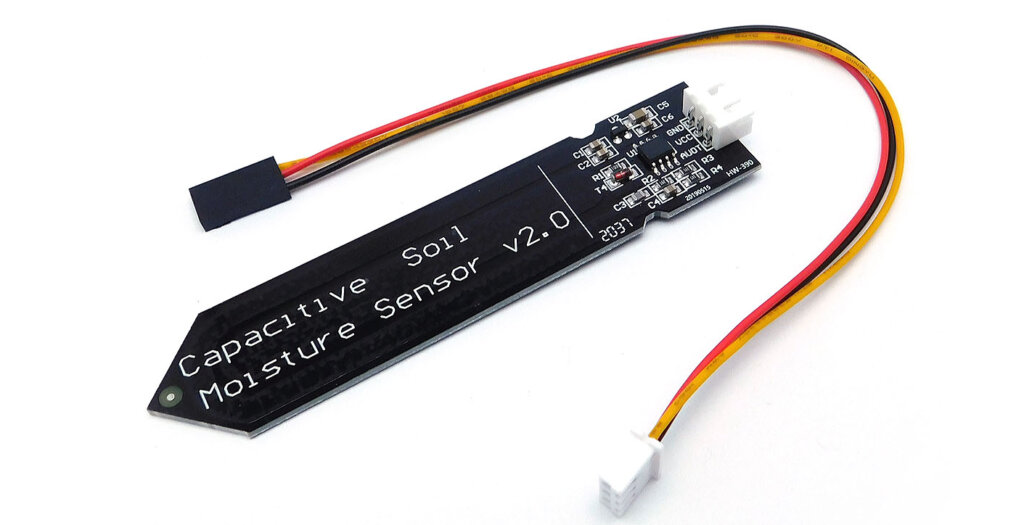
Capacitive Soil Moisture Sensor v1.2
The Capacitive Soil Moisture Sensor v1.2 from DFRobot is a high-precision sensor that can measure the soil’s moisture content. Moisture Sensors are made of a corrosion-resistant material offering them a long service life.
This module has an onboard voltage regulator which provides it with an operating voltage capacity of 3.3 ~ 5.5V. It is perfect for low-voltage MCUs, both 3.3V and 5V. For compatibility with a Raspberry Pi, it will require an ADC converter.
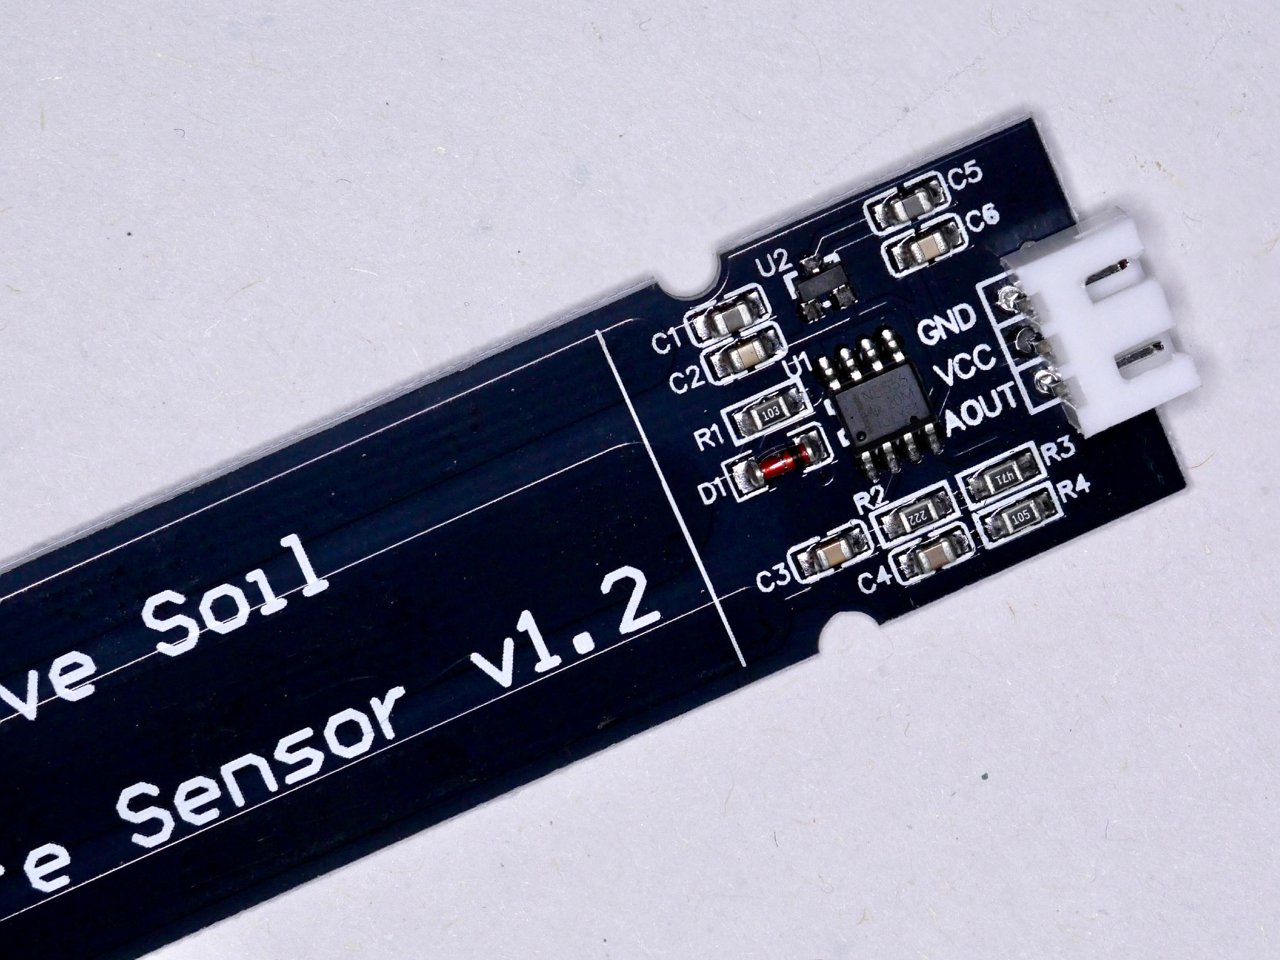
Capacitive Soil Moisture Sensor Pinout
The soil moisture sensor has three pins: GND(ground), VCC, and AOUT(analog output).
- GND: Ground (GND 0V)
- VCC: Supply voltage (3.3V – 5V DC)
- AOUT: Analog output
Soil moisture sensor specifications
Features
- Supports Gravity 3-Pin Interface
- Analog Output
Specifications
- Operating Voltage: 3.3 ~ 5V
- Output Voltage: 1.2 ~ 2.5V
- Interface: PH2.0-3P
- Dimension: 98mm * 23mm (3.86in x 0.905in)
- Weight: 15g
Gravity Capacitive Soil Moisture Sensor Wiki
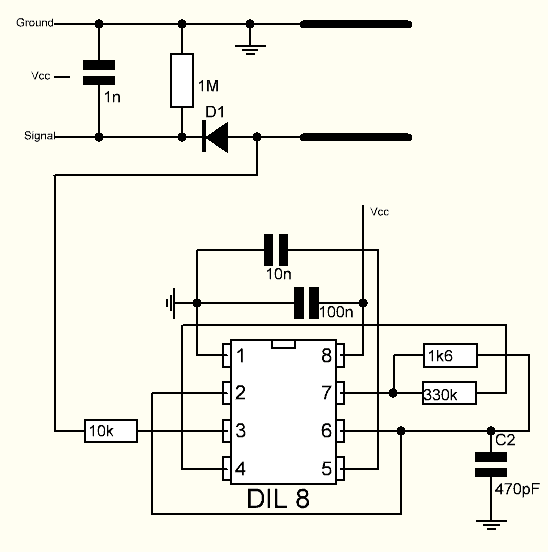
Capacitive Soil Moisture Sensor Schematic
A schematic diagram of the hardware for a capacitive soil moisture sensor is provided below.
Wiring Diagram Soil Moisture Sensor with Arduino
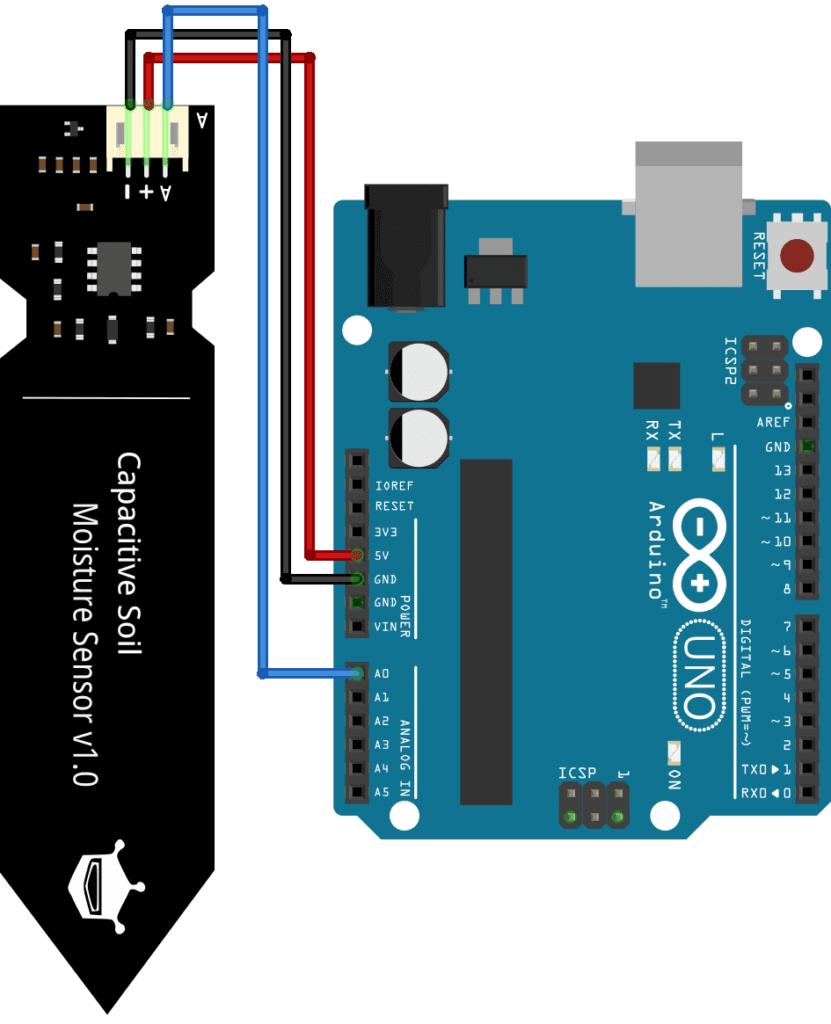
Connect the VCC pin to 3.3V of Arduino and GND to GND. Similarly, connect the Analog output pin to the A0 pin of Arduino.
Simple Source Code/Program
Interface Capacitive Soil Moisture Sensor with Arduino This program reads the capacitive soil moisture sensor and prints the current moisture level. The program would be as follows:
|
1 2 3 4 5 6 7 8 9 |
void setup() { Serial.begin(9600); // open serial port, set the baud rate as 9600 bps } void loop() { int val; val = analogRead(0); //connect sensor to Analog 0 Serial.println(val); //print the value to serial port delay(100); } |
How to Calibrate Capacitive Soil Moisture Sensor V1.2 With Arduino
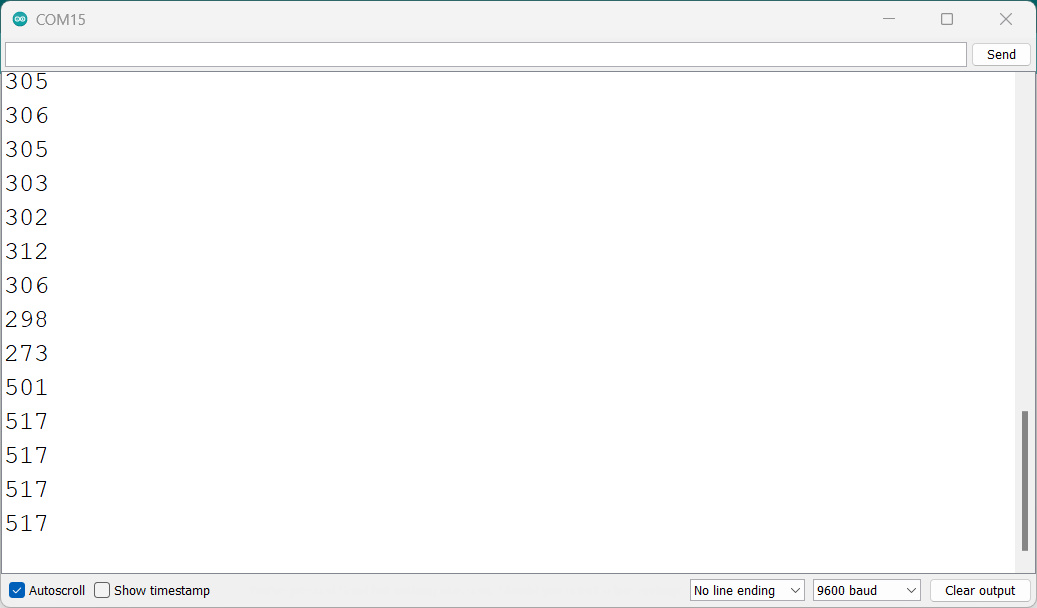
- Go to the serial port monitor, select the “No line ending” option, and set the baud rate to 9600. Then the following content is read.
- Record the sensor value when the probe is exposed to the air as “Value 1”. This is the target value as “Humidity: 0%RH”.
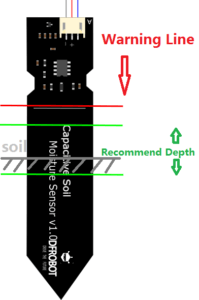
- Take a cup and fill it with water, then insert the PROBE no further than the red line in the diagram, please insert it only in a cup of water
Note:- The components on this board are NOT waterproof, and do not expose them to moisture beyond the red line.
Section Settings
The final output value is affected by probe insertion depth, and distribution of soil, air, and water. We “value_1” as the threshold of soil and “value_2” as the threshold of water. Note that value_1 > value_2 — “Ideal” condition. Otherwise, you might want to reconsider using this sensor.
This is the sensor detection range. For example: Value_1 = 520; Value_2 = 260. The range will diverge into three units: dry, wet, and water. Their related values are:
- Dry: (520 – 430]
- Wet: (430 – 350]
- Water: (350 – 260]
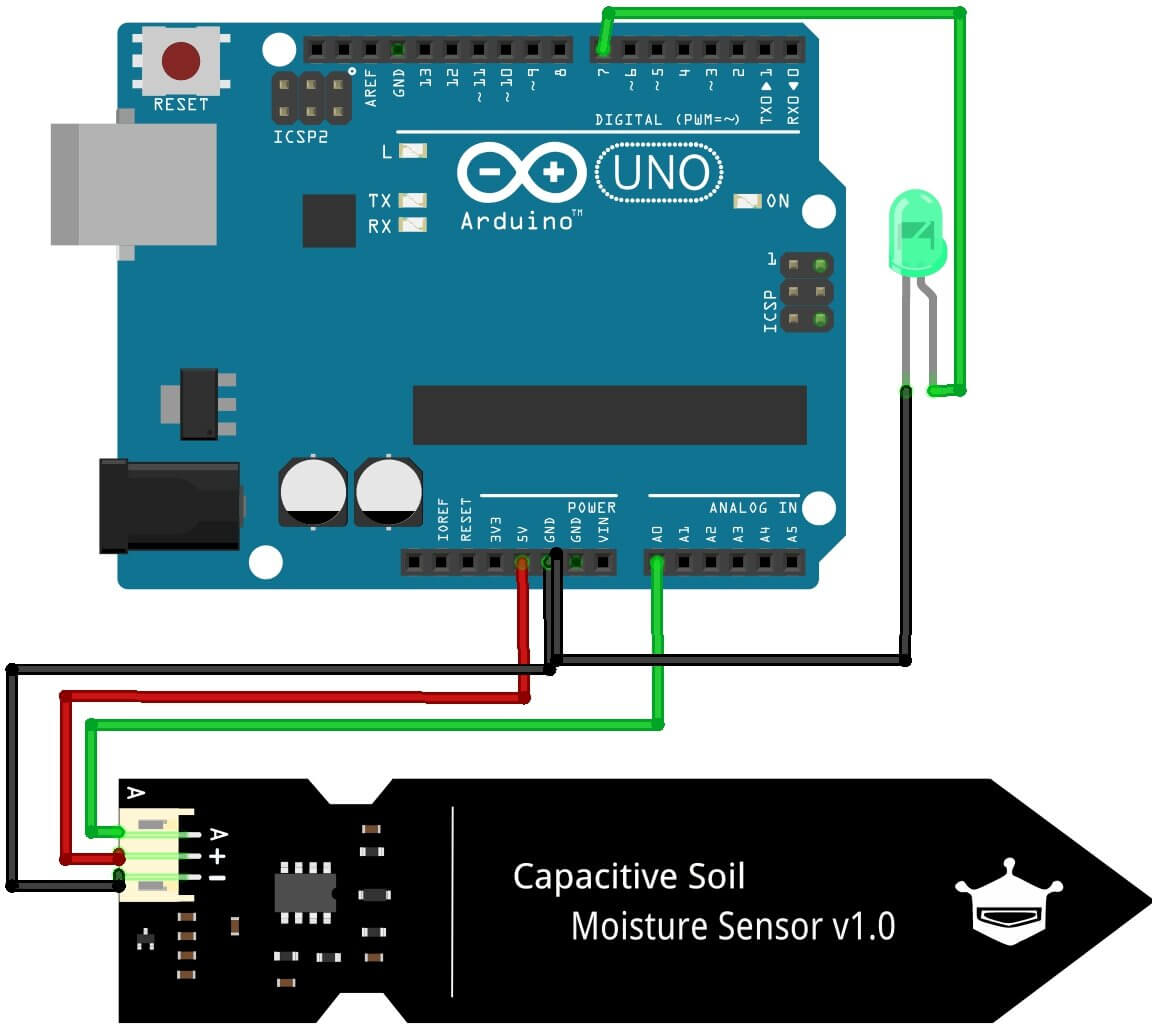
Using the Capacitive Soil Moisture Sensor to turn on an LED
In this example, we will configure a digital output I put it to 5V or 0V depending on the reading obtained in a digital input. This example will simulate devices such as a motor pump for a motor.
The code
|
1 2 3 4 5 6 7 8 9 10 11 12 13 14 15 16 17 18 |
int SensorPin = A0; void setup() { pinMode(7,OUTPUT); Serial.begin(9600); } void loop() { int humedad = analogRead(SensorPin); Serial.println(humedad); if(humedad>=450) { digitalWrite(7,LOW); } else { digitalWrite(7,HIGH); } delay(1000); } |
Interface Capacitive Soil Moisture Sensor with Arduino & I2C 16×2 Display
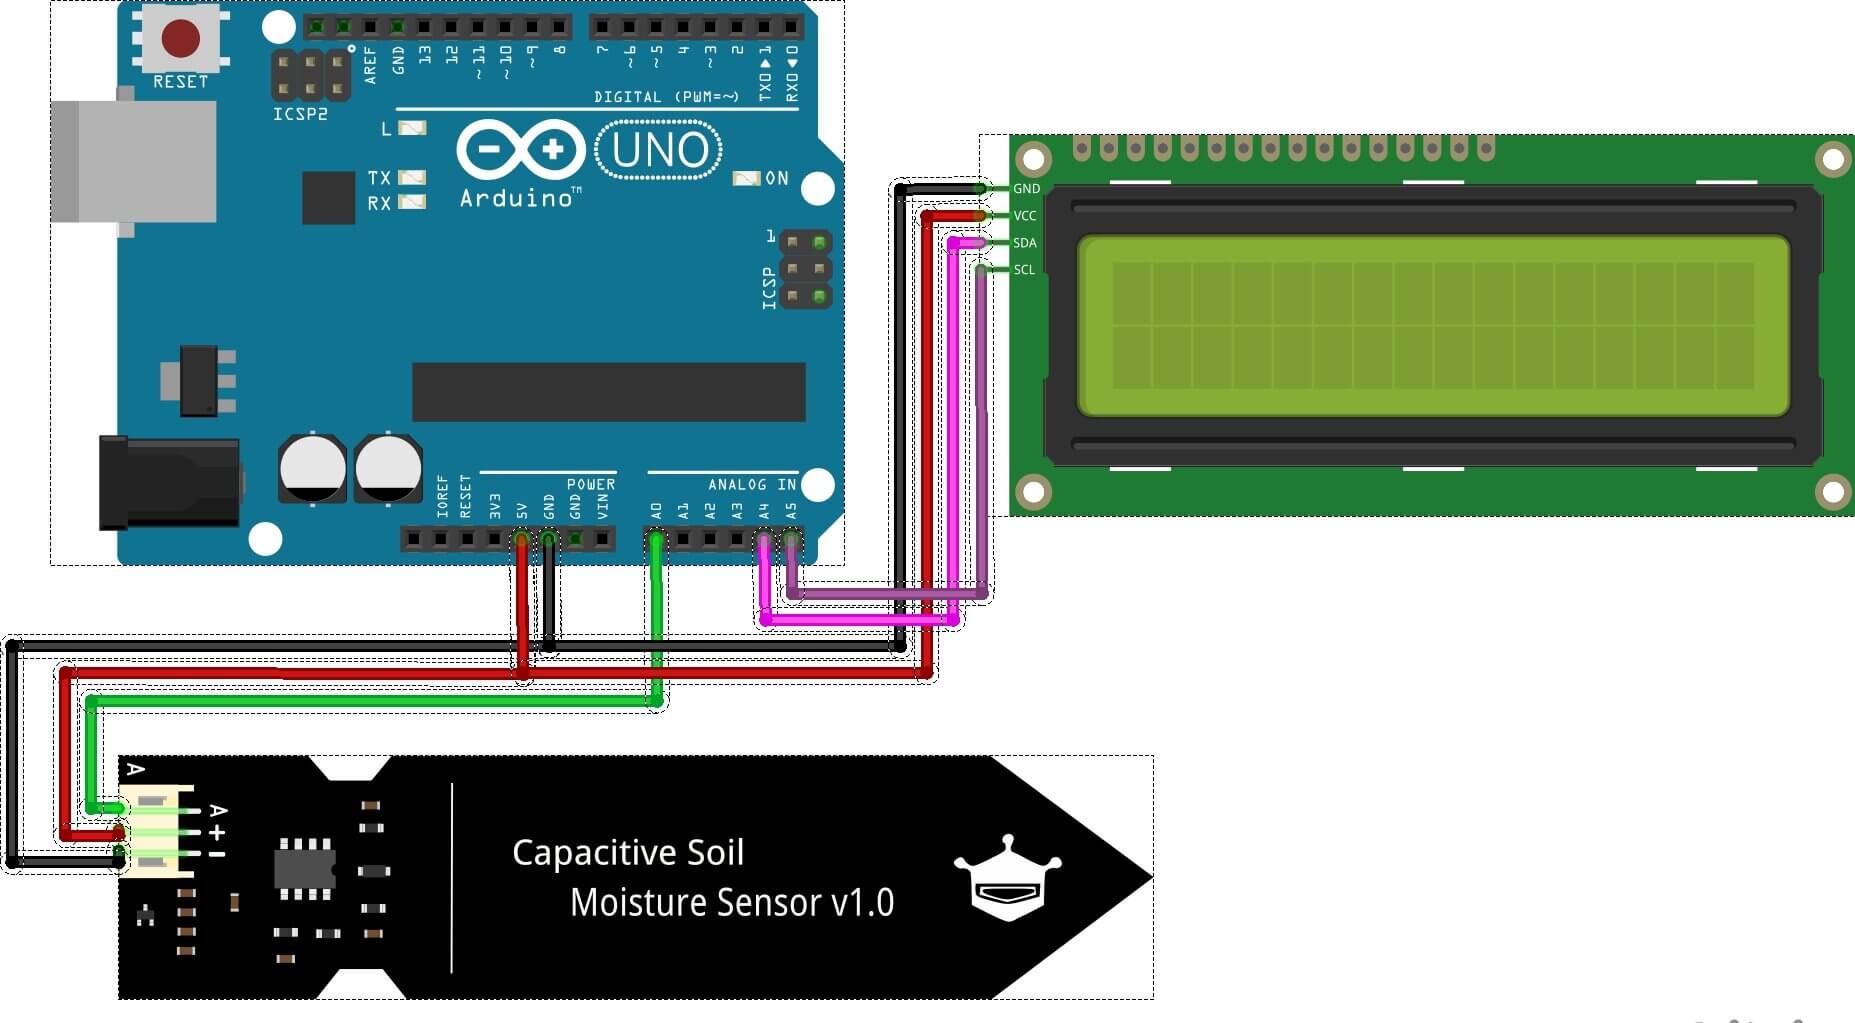
We can interface the Capacitive Soil Moisture Sensor with Arduino & LCD display to get an estimate of soil moisture level.
Source Code
Interfacing Capacitive Soil Moisture Sensor with Arduino & I2C 16×2 LCD Display. Copy the code from below and upload it to your Arduino board.
|
1 2 3 4 5 6 7 8 9 10 11 12 13 14 15 16 17 18 19 20 21 22 23 24 25 26 27 28 29 30 31 32 33 34 35 36 37 38 39 40 41 42 |
#include <Wire.h> #include <LiquidCrystal_I2C.h> LiquidCrystal_I2C lcd(0x27, 16, 2); const int sensorPin = A0; const int wetThreshold = 350; const int dryThreshold = 600; int sensorValue = 0; int percentage = 0; void setup() { Serial.begin(9600); lcd.init(); lcd.backlight(); lcd.setCursor(0, 0); lcd.print("Soil Moisture Meter"); } void loop() { sensorValue = analogRead(sensorPin); Serial.println(sensorValue); percentage = map(sensorValue, wetThreshold, dryThreshold, 100, 0); lcd.setCursor(0, 1); lcd.print("Moisture: "); lcd.print(percentage); lcd.print("% "); if (percentage < 20) { lcd.setCursor(0, 0); lcd.print("Water the plant! "); } else if (percentage < 50) { lcd.setCursor(0, 0); lcd.print("The soil is dry. "); } else { lcd.setCursor(0, 0); lcd.print("Soil is healthy. "); } delay(1000); } |
Working
The sensor is able to measure the moisture in the soil and transfer the data to the Arduino, which is then displayed on the I2C 16×2 Display.
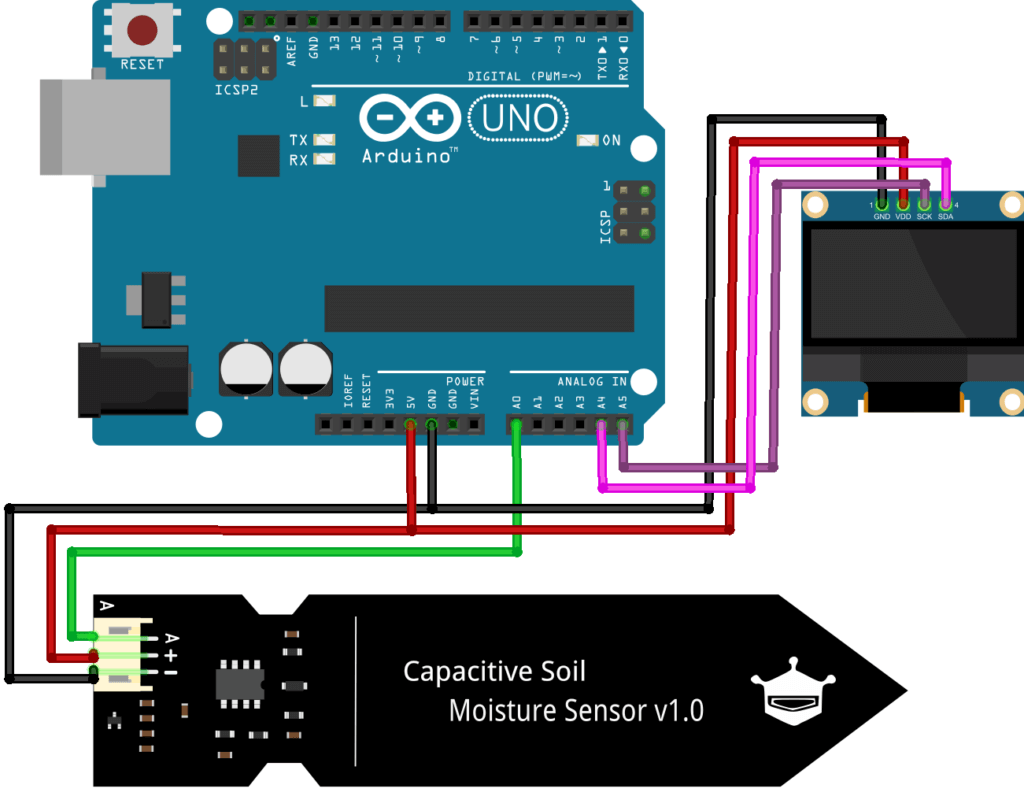
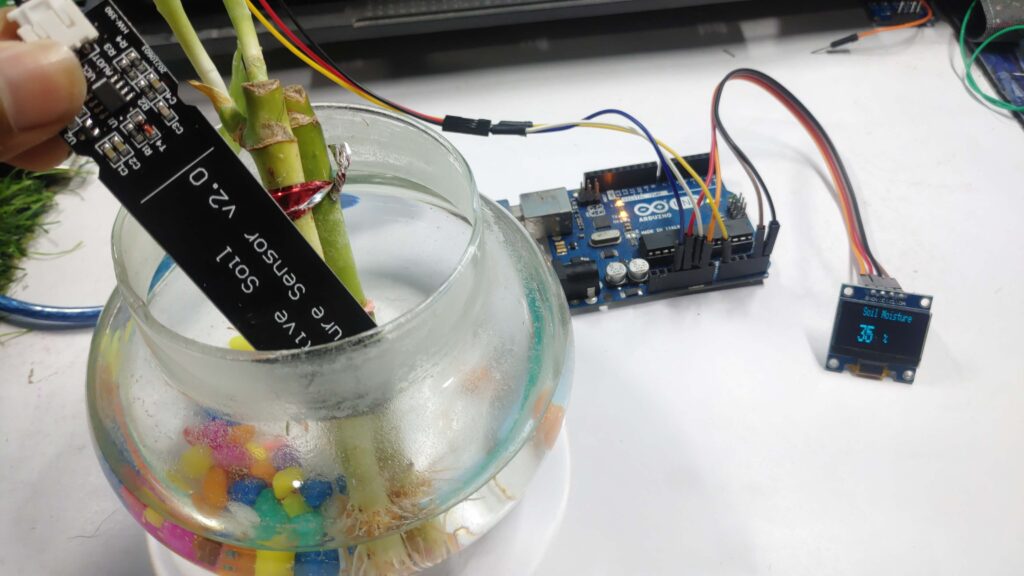
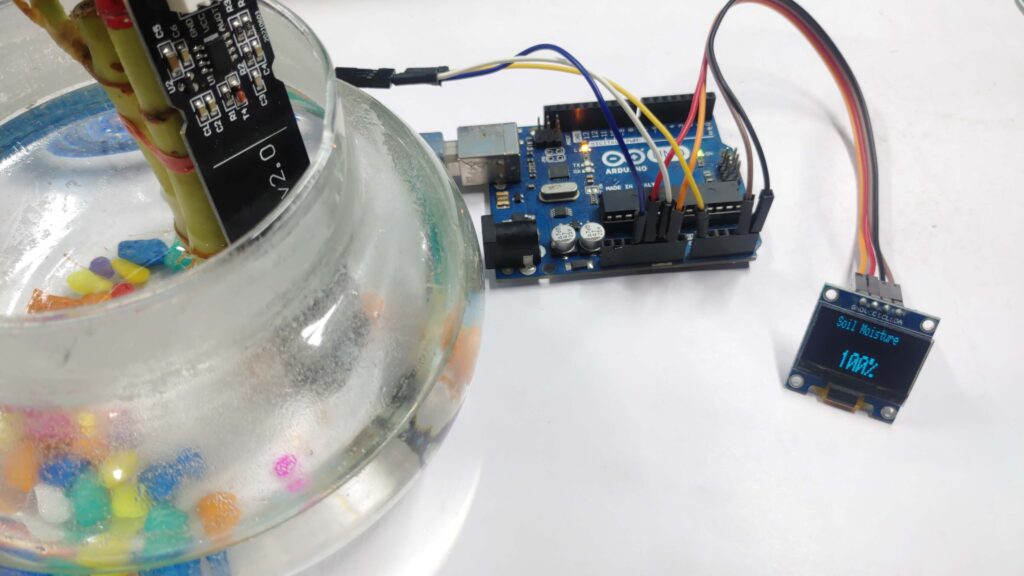
Interface Capacitive Soil Moisture Sensor with Arduino & OLED Display
Source Code
|
1 2 3 4 5 6 7 8 9 10 11 12 13 14 15 16 17 18 19 20 21 22 23 24 25 26 27 28 29 30 31 32 33 34 35 36 37 38 39 40 41 42 43 44 45 46 47 48 49 50 51 52 53 54 55 56 57 58 59 60 61 62 63 64 65 66 67 68 69 70 71 72 73 74 75 76 77 78 79 80 81 82 83 |
#include <Wire.h> #include <Adafruit_GFX.h> #include <Adafruit_SSD1306.h> #define OLED_RESET 4 Adafruit_SSD1306 display(OLED_RESET); const int AirValue = 620; // Air value of the sensor - you need to replace this value with Value_1 const int WaterValue = 310; // Water value of the sensor - you need to replace this value with Value_2 int soilMoistureValue = 0; int soilmoisturepercent = 0; void setup() { Serial.begin(9600); // open serial port, set the baud rate to 9600 bps display.begin(SSD1306_SWITCHCAPVCC, 0x3C); // initialize OLED display with the I2C address 0x3C (128x64) display.clearDisplay(); // clear OLED display } void loop() { soilMoistureValue = analogRead(A0); // read soil moisture sensor value from A0 pin Serial.println(soilMoistureValue); // print sensor value to Serial Monitor soilmoisturepercent = map(soilMoistureValue, AirValue, WaterValue, 0, 100); // map sensor value to percentage if (soilmoisturepercent > 100) { // if sensor value is greater than 100% Serial.println("100 %"); // print "100%" to Serial Monitor // OLED display display.setCursor(20, 0); display.setTextSize(1); display.setTextColor(WHITE); display.println("Soil Moisture"); display.setCursor(40, 20); display.setTextSize(2); display.setTextColor(WHITE); display.println("100%"); display.display(); delay(250); // delay to prevent flickering display.clearDisplay(); // clear OLED display } else if (soilmoisturepercent < 0) { // if sensor value is less than 0% Serial.println("0 %"); // print "0%" to Serial Monitor // OLED display display.setCursor(20, 0); display.setTextSize(1); display.setTextColor(WHITE); display.println("Soil Moisture"); delay(100); display.setCursor(40, 20); display.setTextSize(2); display.setTextColor(WHITE); display.println("0%"); display.display(); delay(250); // delay to prevent flickering display.clearDisplay(); // clear OLED display } else if (soilmoisturepercent > 0 && soilmoisturepercent < 100) { // if sensor value is between 0% and 100% Serial.print(soilmoisturepercent); Serial.println("%"); // print percentage to Serial Monitor // OLED display display.setCursor(30, 0); display.setTextSize(1); display.setTextColor(WHITE); display.println("Soil Moisture"); display.setCursor(30, 15); display.setTextSize(2); display.setTextColor(WHITE); display.println(soilmoisturepercent); display.setCursor(65, 20); display.setTextSize(1); display.println(" %"); display.display(); delay(250); // delay to prevent flickering display.clearDisplay(); // clear OLED display } } |




1 Comment
Reading your article has greatly helped me, and I agree with you. But I still have some questions. Can you help me? I will pay attention to your answer. thank you.